Covcheck Applicaton Server


Introduction

The document describes how to install the Covcheck application server and configure a Galaxy Gate so that COVID certificates and tests presented at the gate can be validated through the server's REST API.

Installation of Covcheck Application Server

Prerequisites

  • Ubuntu 22.04 with Internet access
  • User with sudo permissions and availability of a user with ID 1000 (cat /etc/passwd | grep 1000), which is by default
  • Archive covcheck-installer.tar.gz with the files listed in Installation Files. The name covcheck-installer.tar.gz can include a version, e.g. covcheck-installer-v0.1.tar.gz

Installation Steps

  • Connect with ssh to the Ubuntu server
  • Copy covcheck-installer.tar.gz to the local directory
  • Execute the following command:


tar xvf covcheck-installer.tar.gz && cd ./covcheck-installer


  • Modify file .env and specify the database password (POSTGRES_PASSWORD) and, if necessary, host name (ODOO_HOST_NAME) and timezone (TZ):


POSTGRES_PASSWORD=gR7K6GT8MvQHpvLs
ODOO_HOST_NAME=covcheck.maxcr.de
TZ=Europe/Berlin


  • If SSL certificates are provided for domain name ODOO_HOST_NAME, put them into directory /etc/nginx/certs, e.g:
sudo mkdir -p /etc/nginx/certs
sudo tar xvf certs.tar.gz -C /
  • If SSL certificates are not available, HTTP connection will be used and you need to modify file **docker-compose** accordingly:

          ◦ Add this section to container **odoo**:

       ports:
      - 80:8069

          ◦ Comment out or remove port 80 for container **nginx_proxy**:

       ports:
    #  - 80:80
       - 443:443
  • Run the installer script:


script=install-covcheck.sh && chmod +x $script && ./$script -i


  • The installation is finished successfully if you see this line in the shell:


### Installation finished successfully


You can make sure that the Covcheck is installed and running by executing the following command:


curl https://covcheck.maxcrc.de/covcheck/status


The reply must be a JSON like as follows:

{
   "status":"ok",
   "last_update":"2022-07-04 12:06:34"
}


Installation Files

.env 
environment variables
covcheck.tar.gz 
archived covcheck and request_extension ODOO addons
docker-compose.yml 
docker compose file
git-submodule-status
information about git submodules that comprise the Covcheck application server
install-covcheck.sh 
primary installation script
nginx-vhost 
template vhost file for nginx
odoo.conf 
configuration file for ODOO

Configuration of Covcheck Application Server

Change Default Password

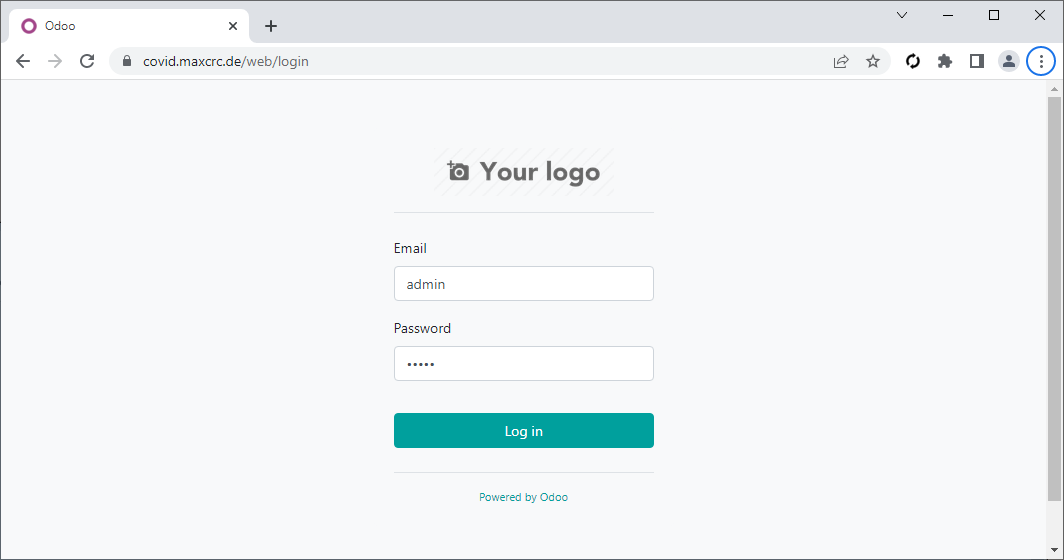
Open the address of the server in a browser and loging using the following default credentials:

Username Password
admin admin


covcheck-login.png


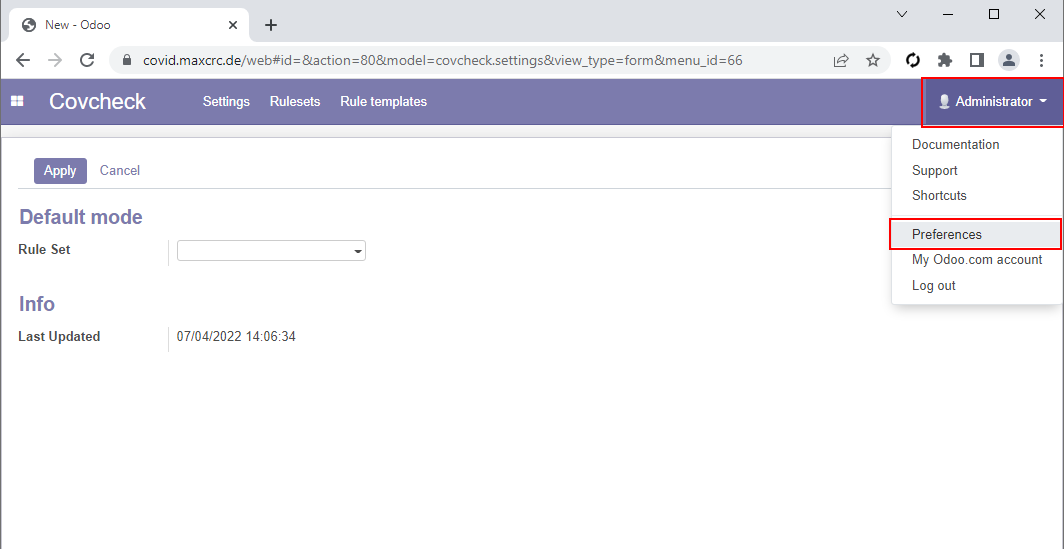
Click the Administrator in the top right corner and then Preferences:


covcheck-admin.png


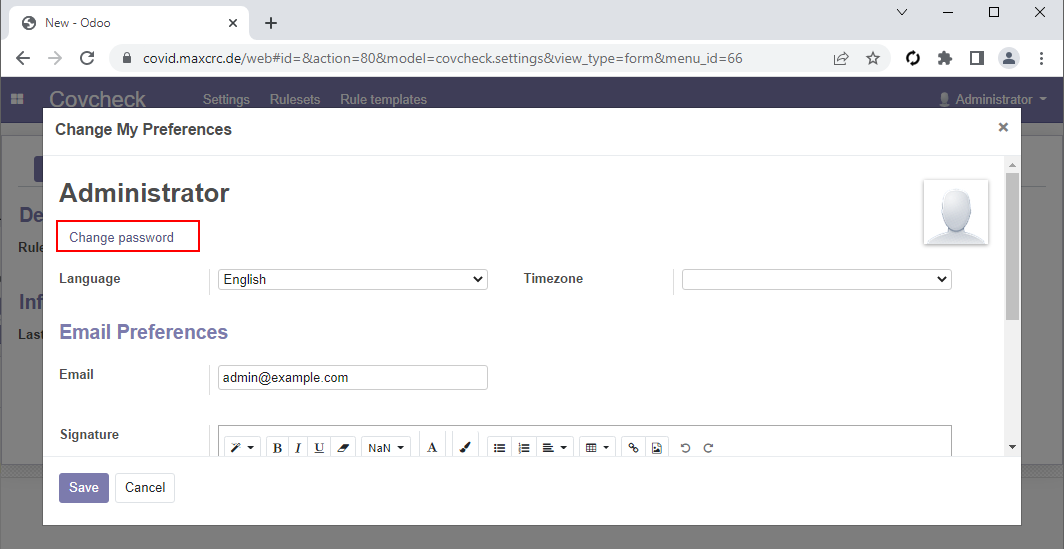
In the opened window click Change password:


covcheck-change-password.png


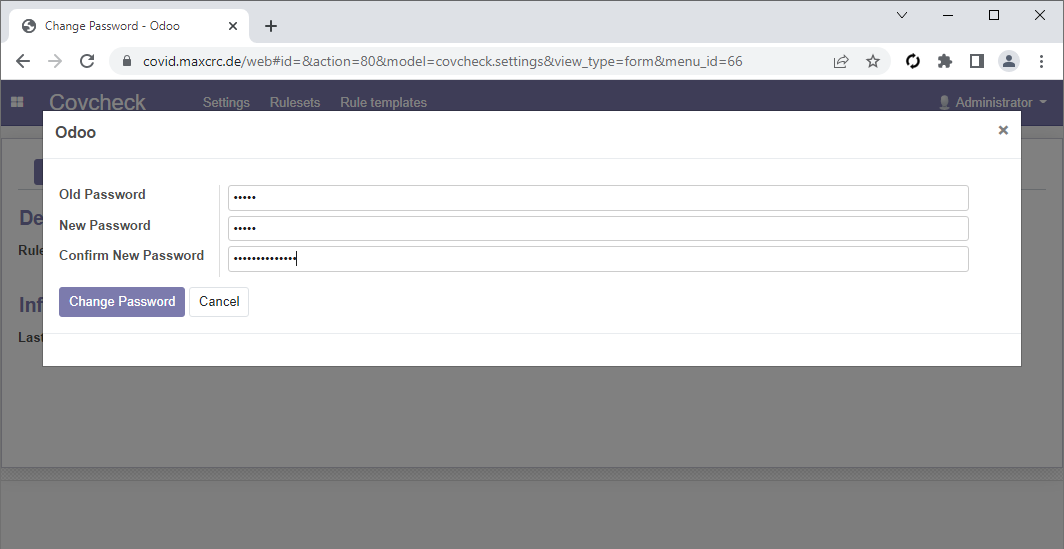
Fill-in the following fields and then click Change Password:

  • Old Password
  • New Password
  • Confirm New Password


covcheck-change-password2.png


Managing Rulesets

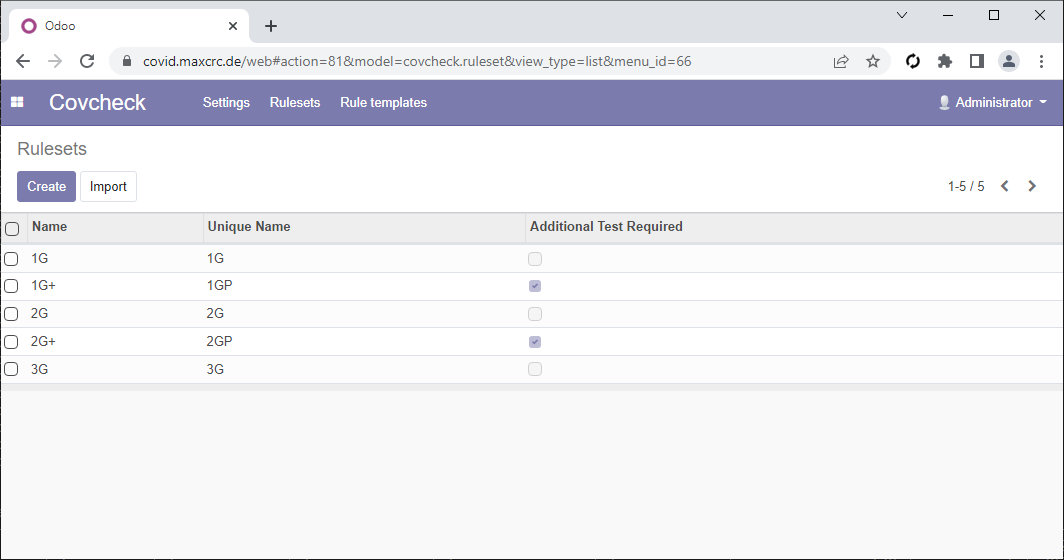
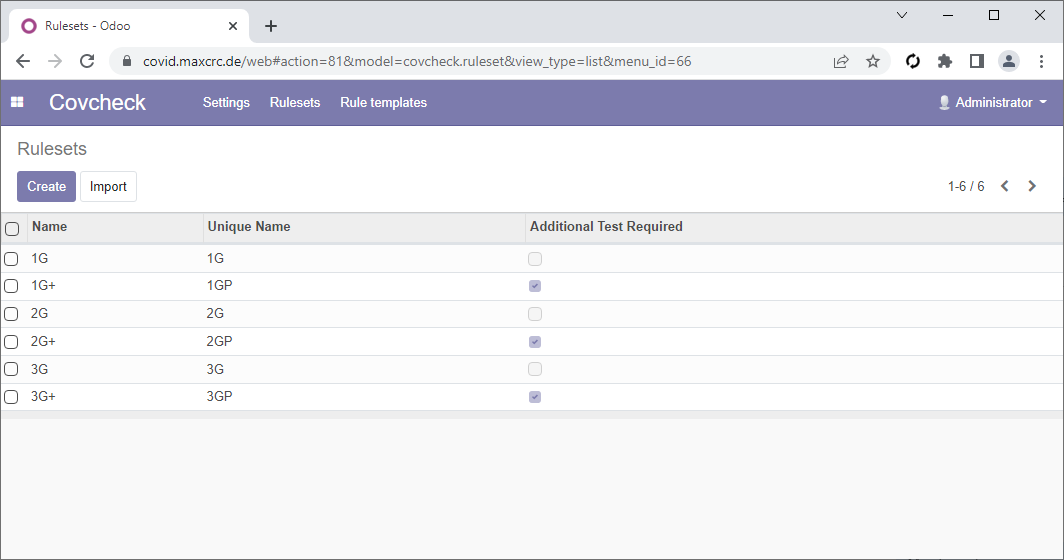
You can add, modify and delete rulesets on the Rulesets page:


covcheck-rulesets.png


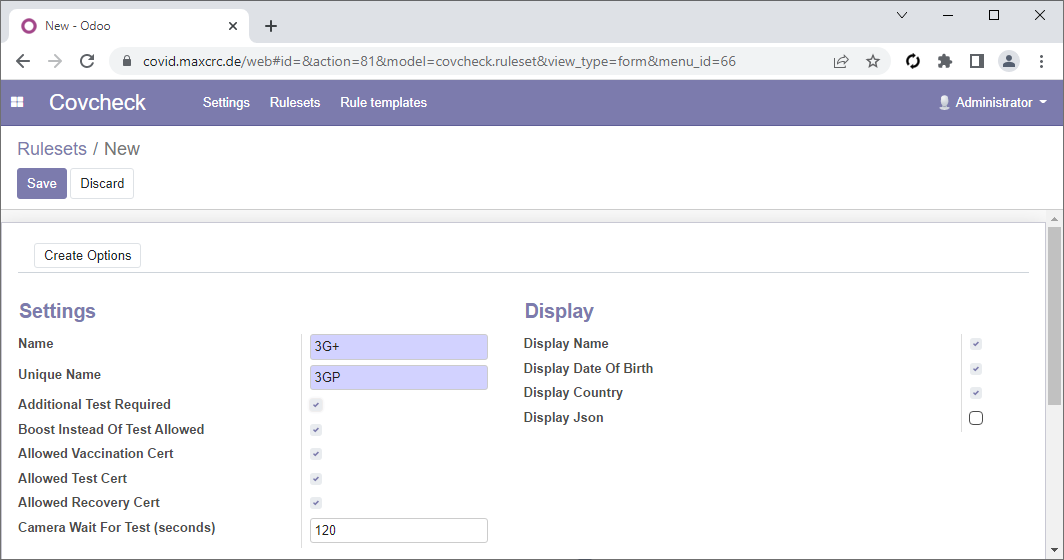
For example, let us create a ruleset 3G+, which requires an additional test. Click Create fill-in the fields Name and Unique Name, check Additional Test Required and click Save:


covcheck-3gp.png


The list now includesthe 3G+ruleset:


covcheck-rulesets-with-3gp.png


Configuration of Galaxy Gate

In order COVID certificates and tests can be validated against the Covcheck server, the proper dispatcher and display must be selected and configured.

Dispatcher

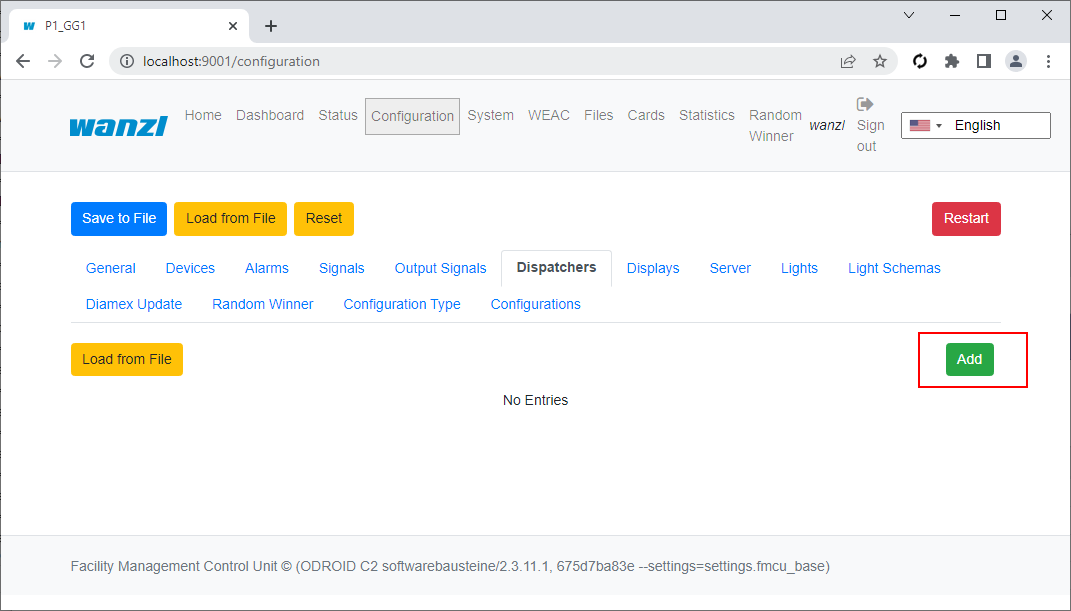
Open the URL of the gate, login with user wanzl and navigate to the Configuration page. Select tab Dispatchers and click Add:


covcheck-dispatcher-add.png


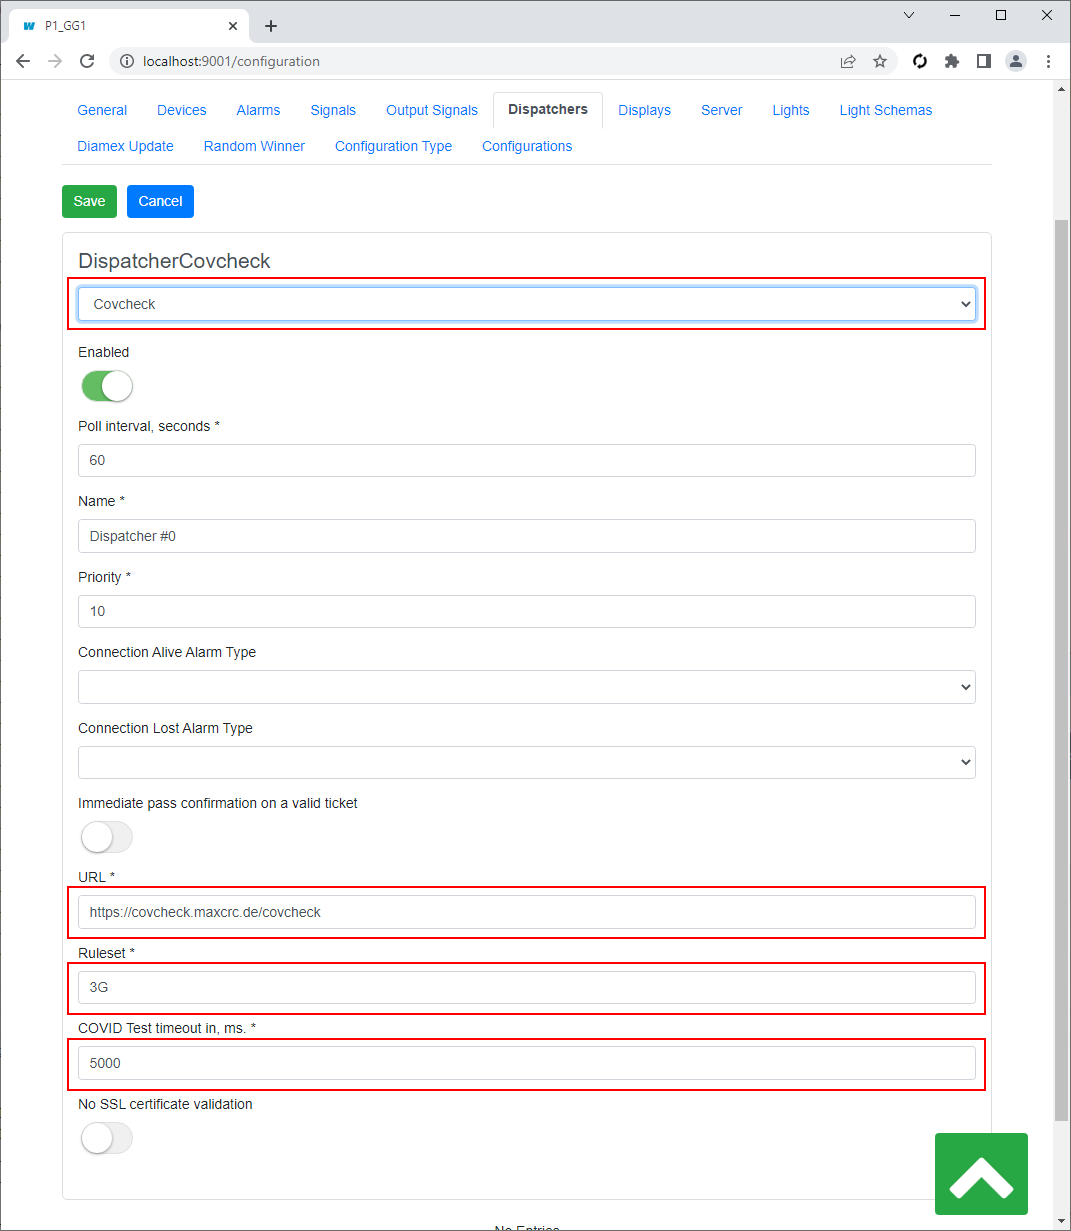
In the combo box under the title Dispatcher select Covcheck, modify the following properties if needed and click Save:

URL 
Base URL of Covcheck's API
Ruleset 
Ruleset for validating COVID certificates and tests
COVID Test timeout, ms 
When a COVID test is required, specifies the timeout of waiting for it


covcheck-dispatcher-covcheck.png


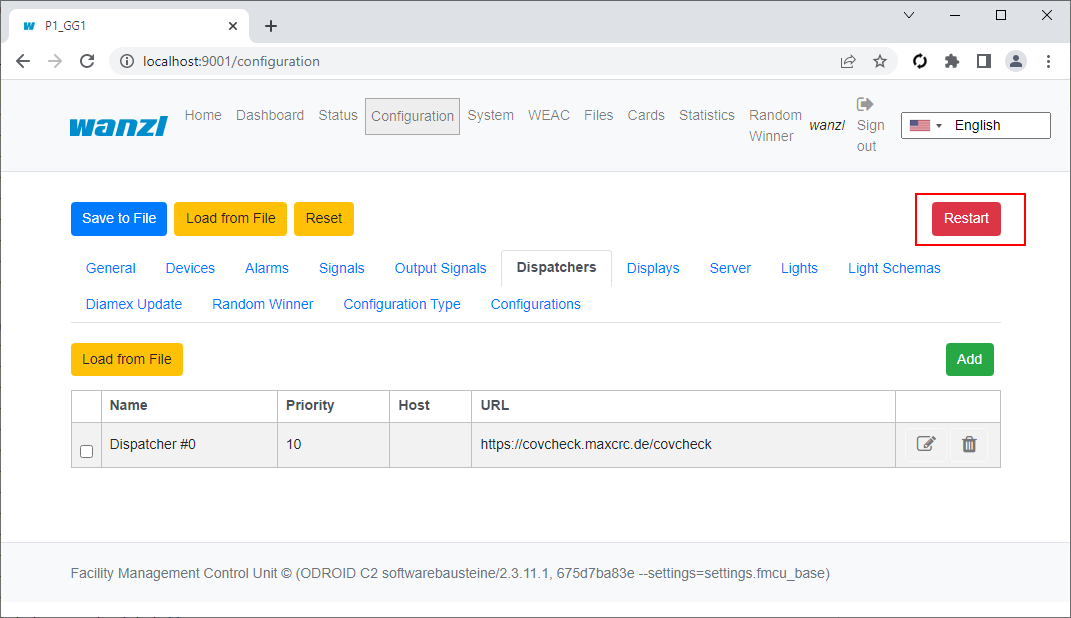
Restart the gate:


covcheck-dispatcher-restart.png


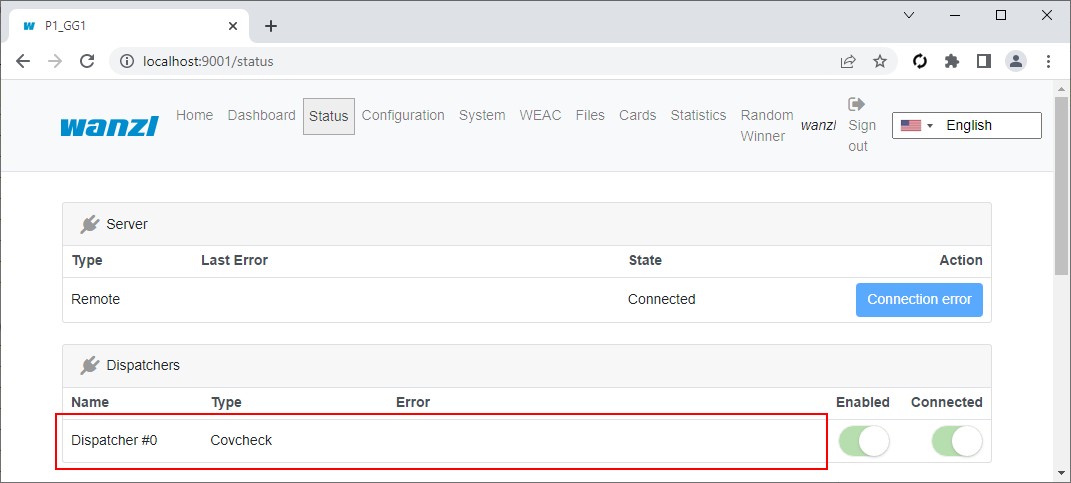
If the Covcheck server is available, the Error field is empty:


covcheck-dispatcher-connected.png


Display

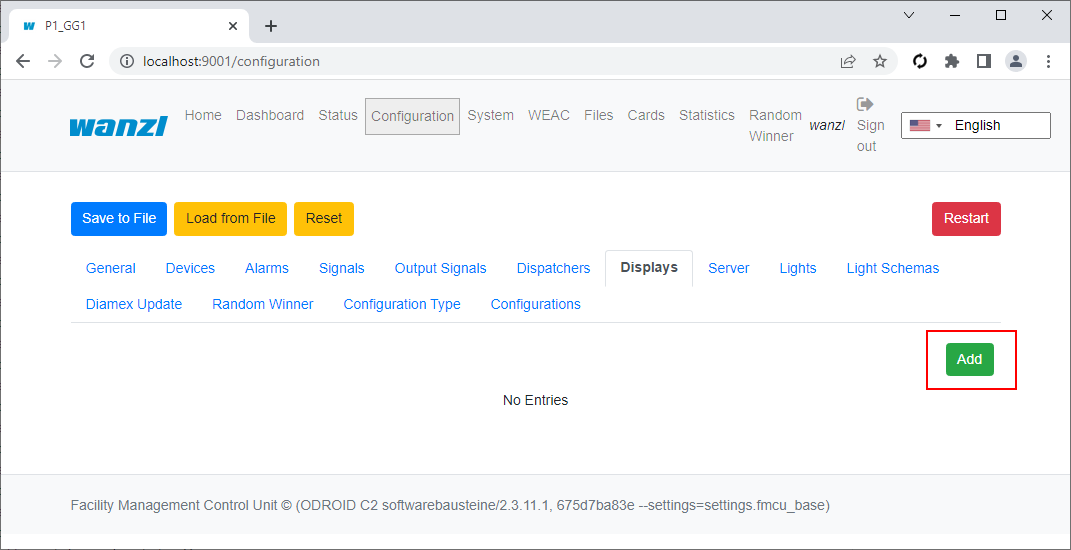
Open the URL of the gate, login with user wanzl and navigate to the Configuration page. Select tab Displays and click Add:


covcheck-display-add.png


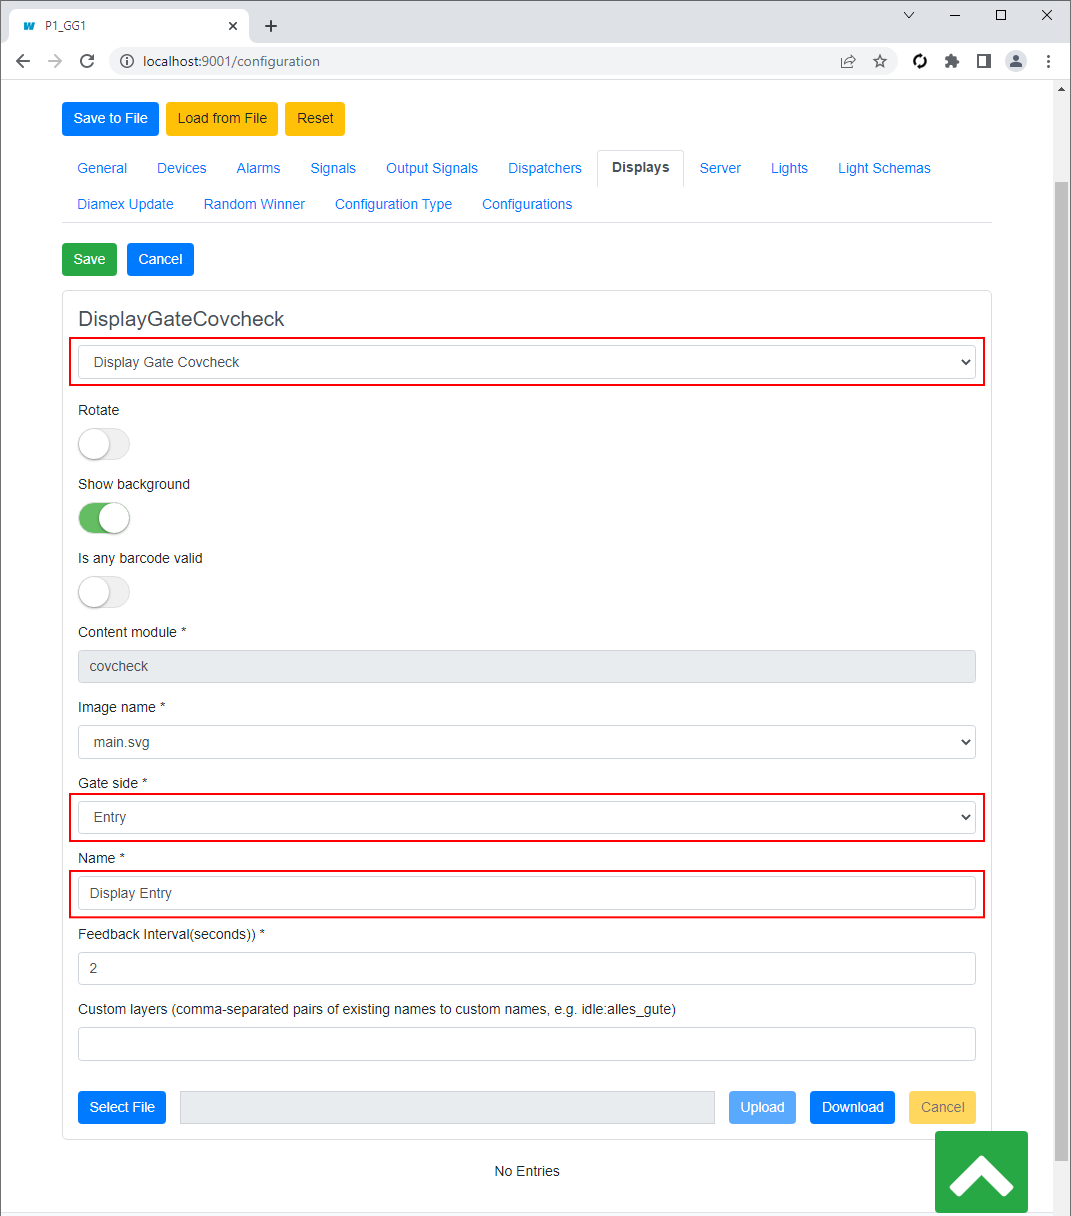
In the combo box under the title Display select Display Gate Covcheck, modify the following properties if needed and click Save:

Gate side 
Side of the display, Entry or Exit
Name 
User-friendly name


covcheck-display-covcheck.png


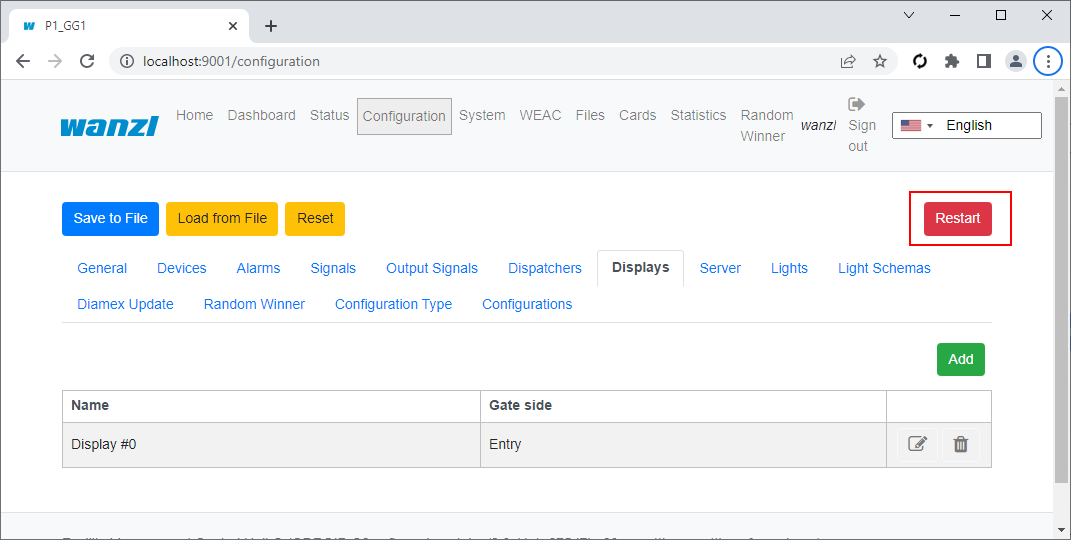
Restart the gate:


covcheck-display-restart.png


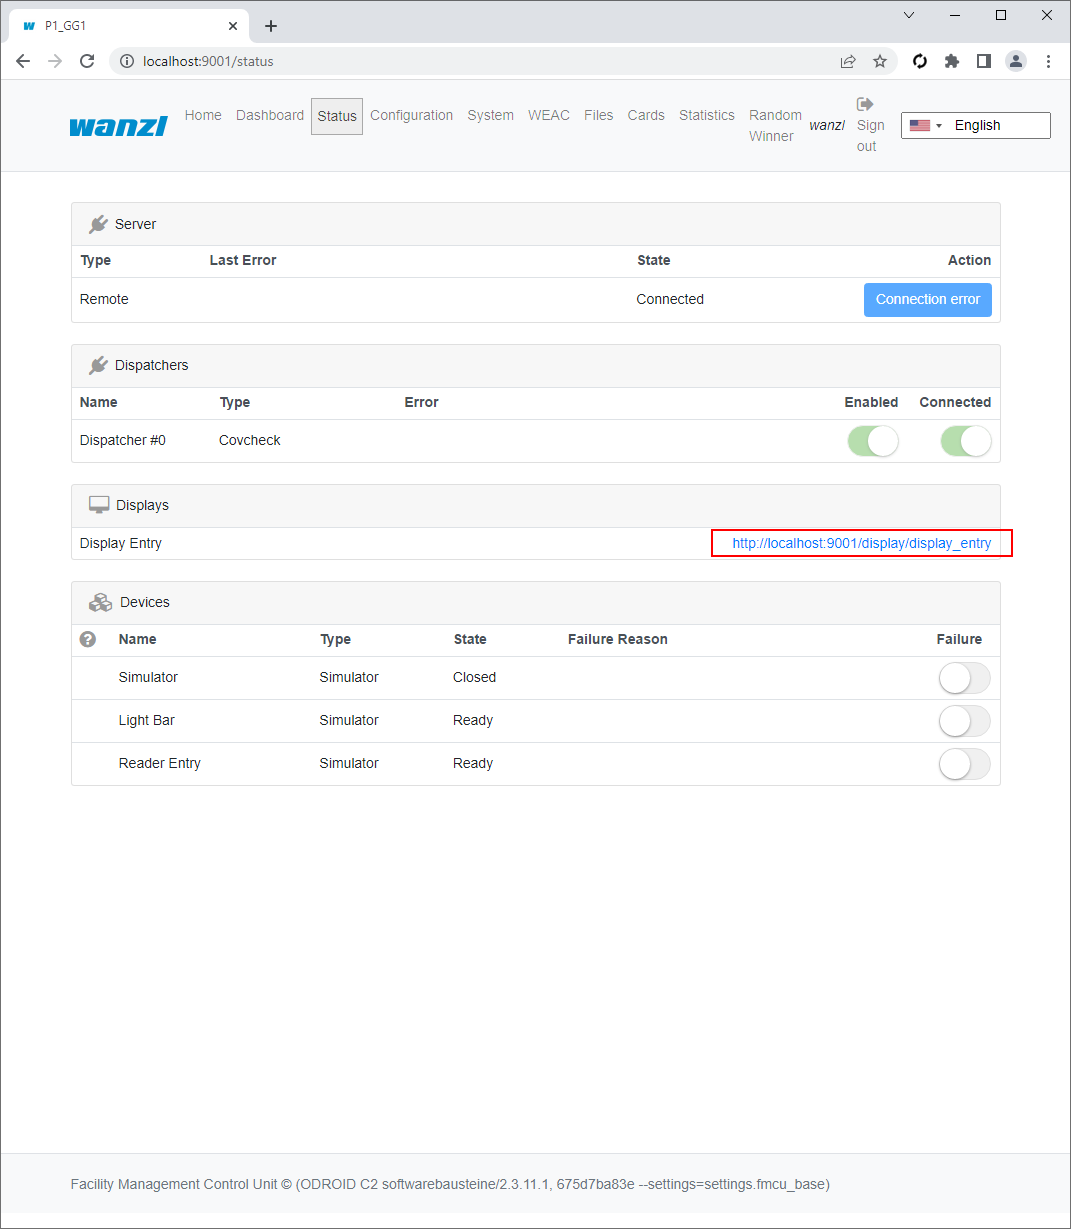
Navigate to the Status page and open the link corresponding to the display:


covcheck-display-link.png


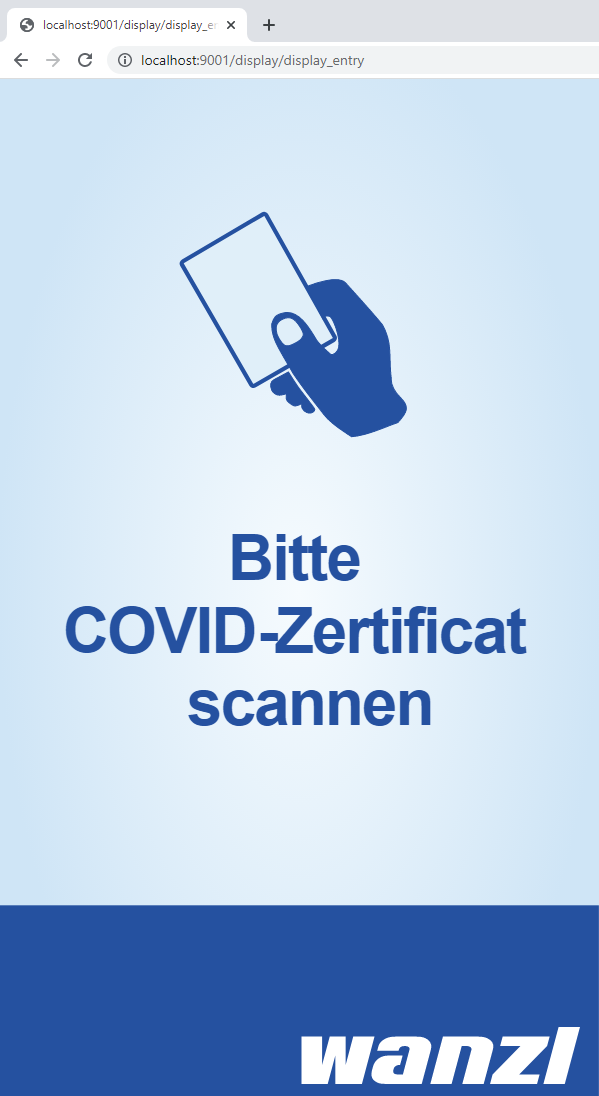
The following screen for the idle state invites to present a COVID certificate:


covcheck-display-scan-certificate.png


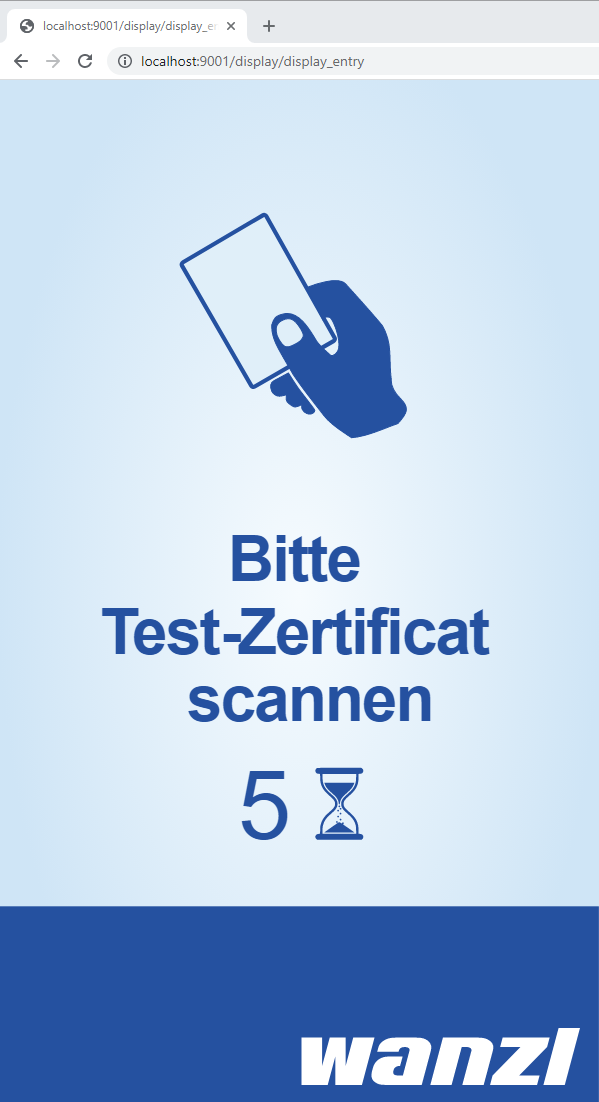
When in addition a test certificate is required, the next screen asks to show it:

covcheck-display-scan-test.png


Anhänge

Diskussionen


Warning: Cannot modify header information - headers already sent by (output started at /var/www/bluespice/w/includes/MediaWiki.php:880) in /var/www/bluespice/w/includes/WebResponse.php on line 46

Warning: Cannot modify header information - headers already sent by (output started at /var/www/bluespice/w/includes/MediaWiki.php:880) in /var/www/bluespice/w/includes/WebResponse.php on line 46

Warning: Cannot modify header information - headers already sent by (output started at /var/www/bluespice/w/includes/MediaWiki.php:880) in /var/www/bluespice/w/includes/WebResponse.php on line 46
Interner Fehler – Maxcrc MediaWiki

Covcheck Applicaton Server


Introduction

The document describes how to install the Covcheck application server and configure a Galaxy Gate so that COVID certificates and tests presented at the gate can be validated through the server's REST API.

Installation of Covcheck Application Server

Prerequisites

  • Ubuntu 22.04 with Internet access
  • User with sudo permissions and availability of a user with ID 1000 (cat /etc/passwd | grep 1000), which is by default
  • Archive covcheck-installer.tar.gz with the files listed in Installation Files. The name covcheck-installer.tar.gz can include a version, e.g. covcheck-installer-v0.1.tar.gz

Installation Steps

  • Connect with ssh to the Ubuntu server
  • Copy covcheck-installer.tar.gz to the local directory
  • Execute the following command:


tar xvf covcheck-installer.tar.gz && cd ./covcheck-installer


  • Modify file .env and specify the database password (POSTGRES_PASSWORD) and, if necessary, host name (ODOO_HOST_NAME) and timezone (TZ):


POSTGRES_PASSWORD=gR7K6GT8MvQHpvLs
ODOO_HOST_NAME=covcheck.maxcr.de
TZ=Europe/Berlin


  • If SSL certificates are provided for domain name ODOO_HOST_NAME, put them into directory /etc/nginx/certs, e.g:
sudo mkdir -p /etc/nginx/certs
sudo tar xvf certs.tar.gz -C /
  • If SSL certificates are not available, HTTP connection will be used and you need to modify file **docker-compose** accordingly:

          ◦ Add this section to container **odoo**:

       ports:
      - 80:8069

          ◦ Comment out or remove port 80 for container **nginx_proxy**:

       ports:
    #  - 80:80
       - 443:443
  • Run the installer script:


script=install-covcheck.sh && chmod +x $script && ./$script -i


  • The installation is finished successfully if you see this line in the shell:


### Installation finished successfully


You can make sure that the Covcheck is installed and running by executing the following command:


curl https://covcheck.maxcrc.de/covcheck/status


The reply must be a JSON like as follows:

{
   "status":"ok",
   "last_update":"2022-07-04 12:06:34"
}


Installation Files

.env 
environment variables
covcheck.tar.gz 
archived covcheck and request_extension ODOO addons
docker-compose.yml 
docker compose file
git-submodule-status
information about git submodules that comprise the Covcheck application server
install-covcheck.sh 
primary installation script
nginx-vhost 
template vhost file for nginx
odoo.conf 
configuration file for ODOO

Configuration of Covcheck Application Server

Change Default Password

Open the address of the server in a browser and loging using the following default credentials:

Username Password
admin admin


covcheck-login.png


Click the Administrator in the top right corner and then Preferences:


covcheck-admin.png


In the opened window click Change password:


covcheck-change-password.png


Fill-in the following fields and then click Change Password:

  • Old Password
  • New Password
  • Confirm New Password


covcheck-change-password2.png


Managing Rulesets

You can add, modify and delete rulesets on the Rulesets page:


covcheck-rulesets.png


For example, let us create a ruleset 3G+, which requires an additional test. Click Create fill-in the fields Name and Unique Name, check Additional Test Required and click Save:


covcheck-3gp.png


The list now includesthe 3G+ruleset:


covcheck-rulesets-with-3gp.png


Configuration of Galaxy Gate

In order COVID certificates and tests can be validated against the Covcheck server, the proper dispatcher and display must be selected and configured.

Dispatcher

Open the URL of the gate, login with user wanzl and navigate to the Configuration page. Select tab Dispatchers and click Add:


covcheck-dispatcher-add.png


In the combo box under the title Dispatcher select Covcheck, modify the following properties if needed and click Save:

URL 
Base URL of Covcheck's API
Ruleset 
Ruleset for validating COVID certificates and tests
COVID Test timeout, ms 
When a COVID test is required, specifies the timeout of waiting for it


covcheck-dispatcher-covcheck.png


Restart the gate:


covcheck-dispatcher-restart.png


If the Covcheck server is available, the Error field is empty:


covcheck-dispatcher-connected.png


Display

Open the URL of the gate, login with user wanzl and navigate to the Configuration page. Select tab Displays and click Add:


covcheck-display-add.png


In the combo box under the title Display select Display Gate Covcheck, modify the following properties if needed and click Save:

Gate side 
Side of the display, Entry or Exit
Name 
User-friendly name


covcheck-display-covcheck.png


Restart the gate:


covcheck-display-restart.png


Navigate to the Status page and open the link corresponding to the display:


covcheck-display-link.png


The following screen for the idle state invites to present a COVID certificate:


covcheck-display-scan-certificate.png


When in addition a test certificate is required, the next screen asks to show it:

covcheck-display-scan-test.png


Anhänge

Diskussionen


Warning: Cannot modify header information - headers already sent by (output started at /var/www/bluespice/w/includes/MediaWiki.php:880) in /var/www/bluespice/w/includes/WebResponse.php on line 46

Warning: Cannot modify header information - headers already sent by (output started at /var/www/bluespice/w/includes/MediaWiki.php:880) in /var/www/bluespice/w/includes/WebResponse.php on line 46

Warning: Cannot modify header information - headers already sent by (output started at /var/www/bluespice/w/includes/MediaWiki.php:880) in /var/www/bluespice/w/includes/WebResponse.php on line 46

Warning: Cannot modify header information - headers already sent by (output started at /var/www/bluespice/w/includes/MediaWiki.php:880) in /var/www/bluespice/w/includes/WebResponse.php on line 46