Benutzerhandbuch/en: Unterschied zwischen den Versionen
Writer (Diskussion | Beiträge) (Markierung: 2017-Quelltext-Bearbeitung) |
Writer (Diskussion | Beiträge) (Markierung: 2017-Quelltext-Bearbeitung) |
Inhaltsverzeichnis
-
2.1
- 1 DASHBOARD 2 REMOTE MONITORING AND CONTROL
- 2
- 2
- 2
- 3
- 2
- 4
- 3
-
2 USER MANAGEMENT
- 3
- 3
- 4
-
3 TICKETS
- 4
- 5
-
4 RFID CARDS
- 5
- 5
- 5
- 5
- 5
- 5
- 5
- 5
- 5
- 5
- 5
- 5
- 5
DASHBOARD[Bearbeiten | Quelltext bearbeiten]
Main elements description[Bearbeiten | Quelltext bearbeiten]
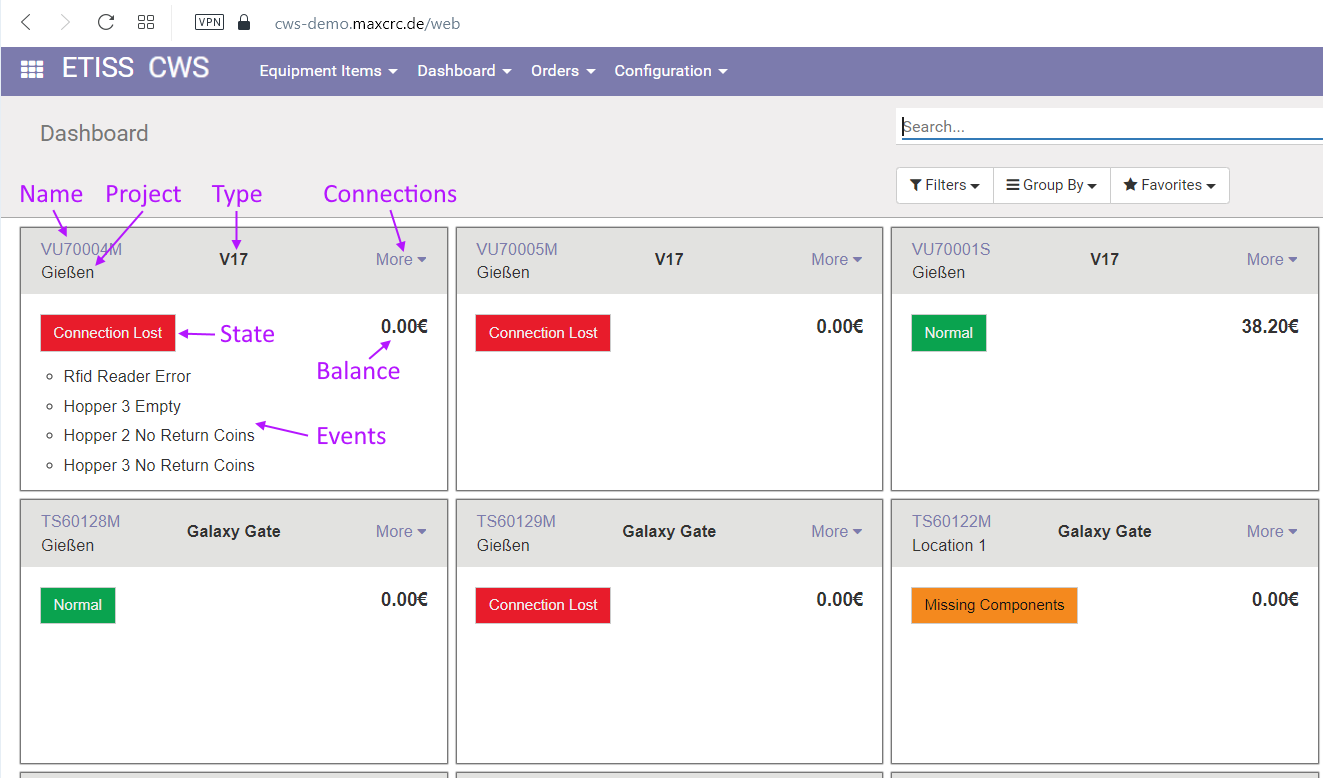
The dashboard is designed to give user a convenient way of managing and controlling equipment items registered in the system. Each dashboard item represents a physical device and consists of the following elements:
- Name: Equipment item name
- Project: A project to which this equipment item belongs
- Type: Equipment item type. In case of Vending Units, this can be either V21 or V7, or other modifications
- Connections: This link allows to quickly connect ot the item either with ssh, or VNC and check the status.
- Balance: In case of VU, shows the current amount of money in the Vending Unit.
- Events: Shows the list of events that have happened recently
- State: Displays current state of the equipment item
VU state and events[Bearbeiten | Quelltext bearbeiten]
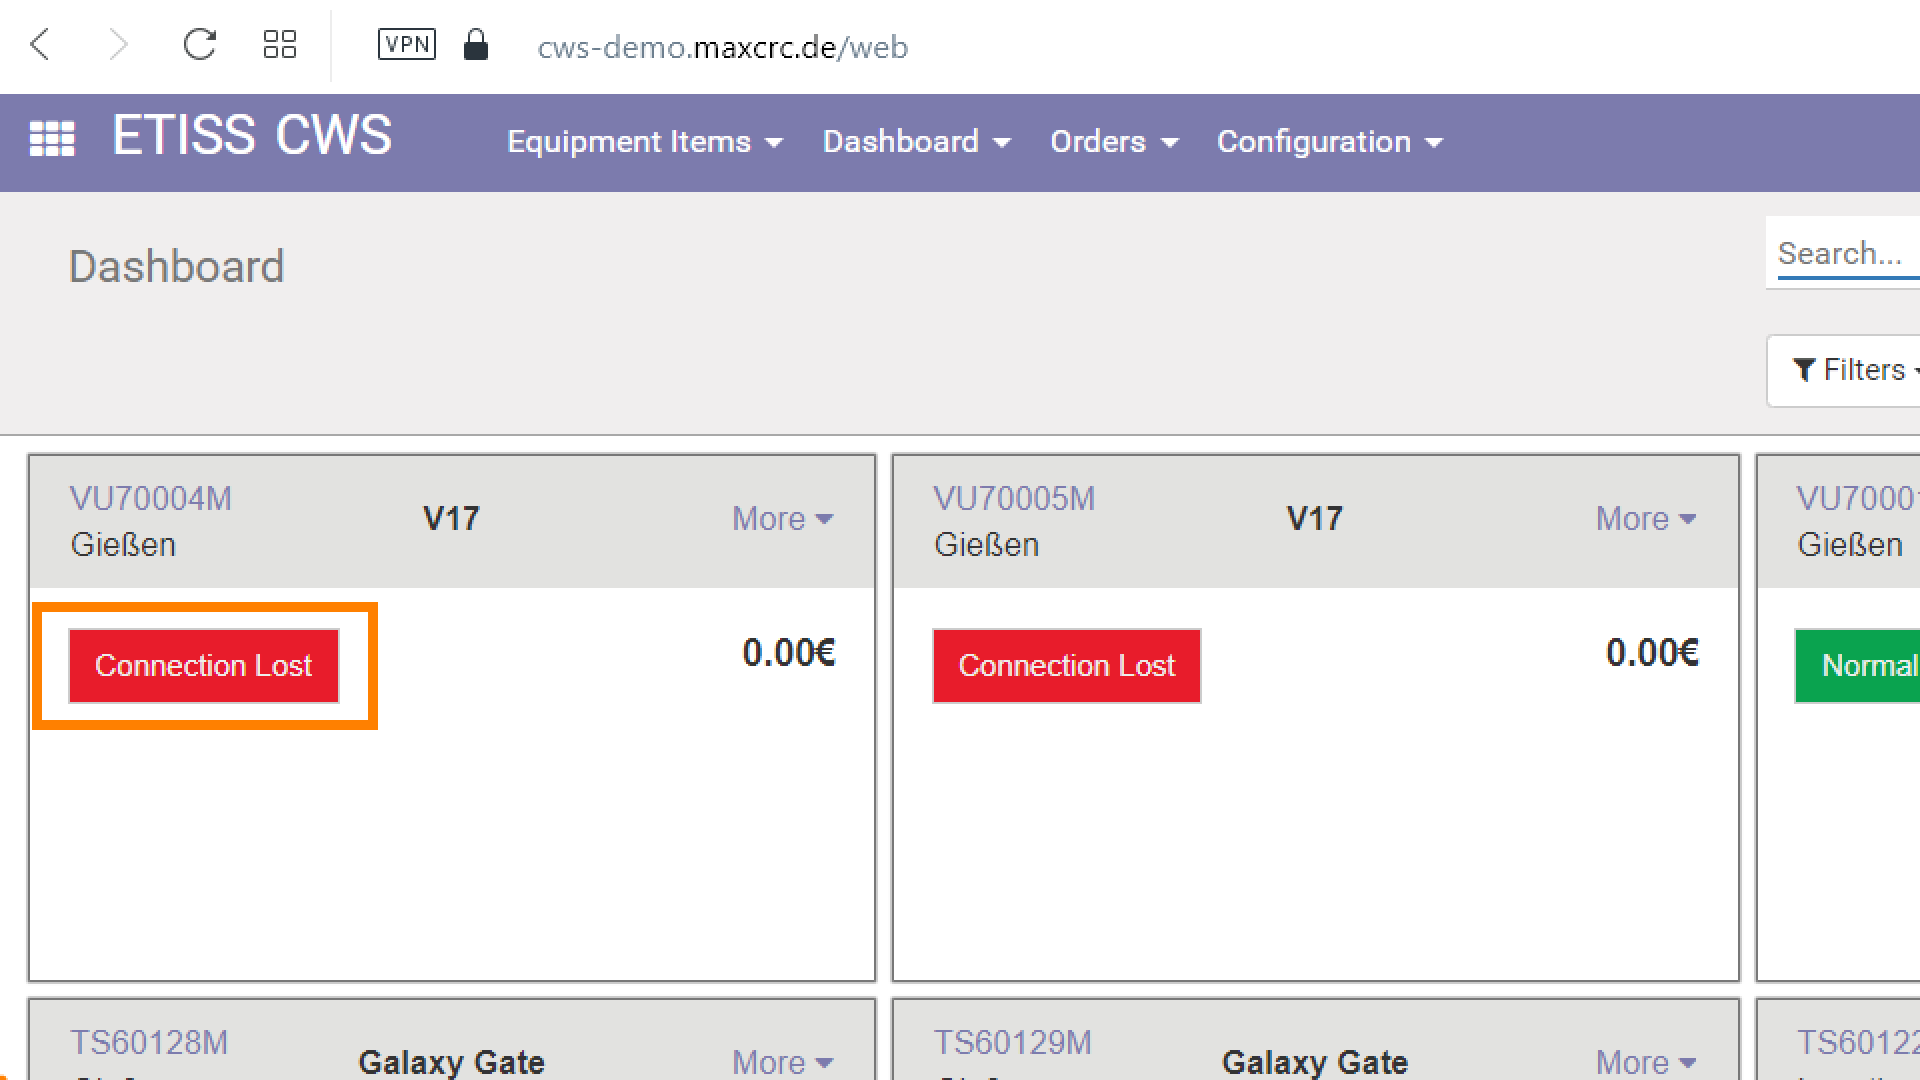
When something happens with Vending Unit or other equipment, it sends an event to the server. You can view current status of the unit and events that happened earlier by pressing a button on the dashboard:
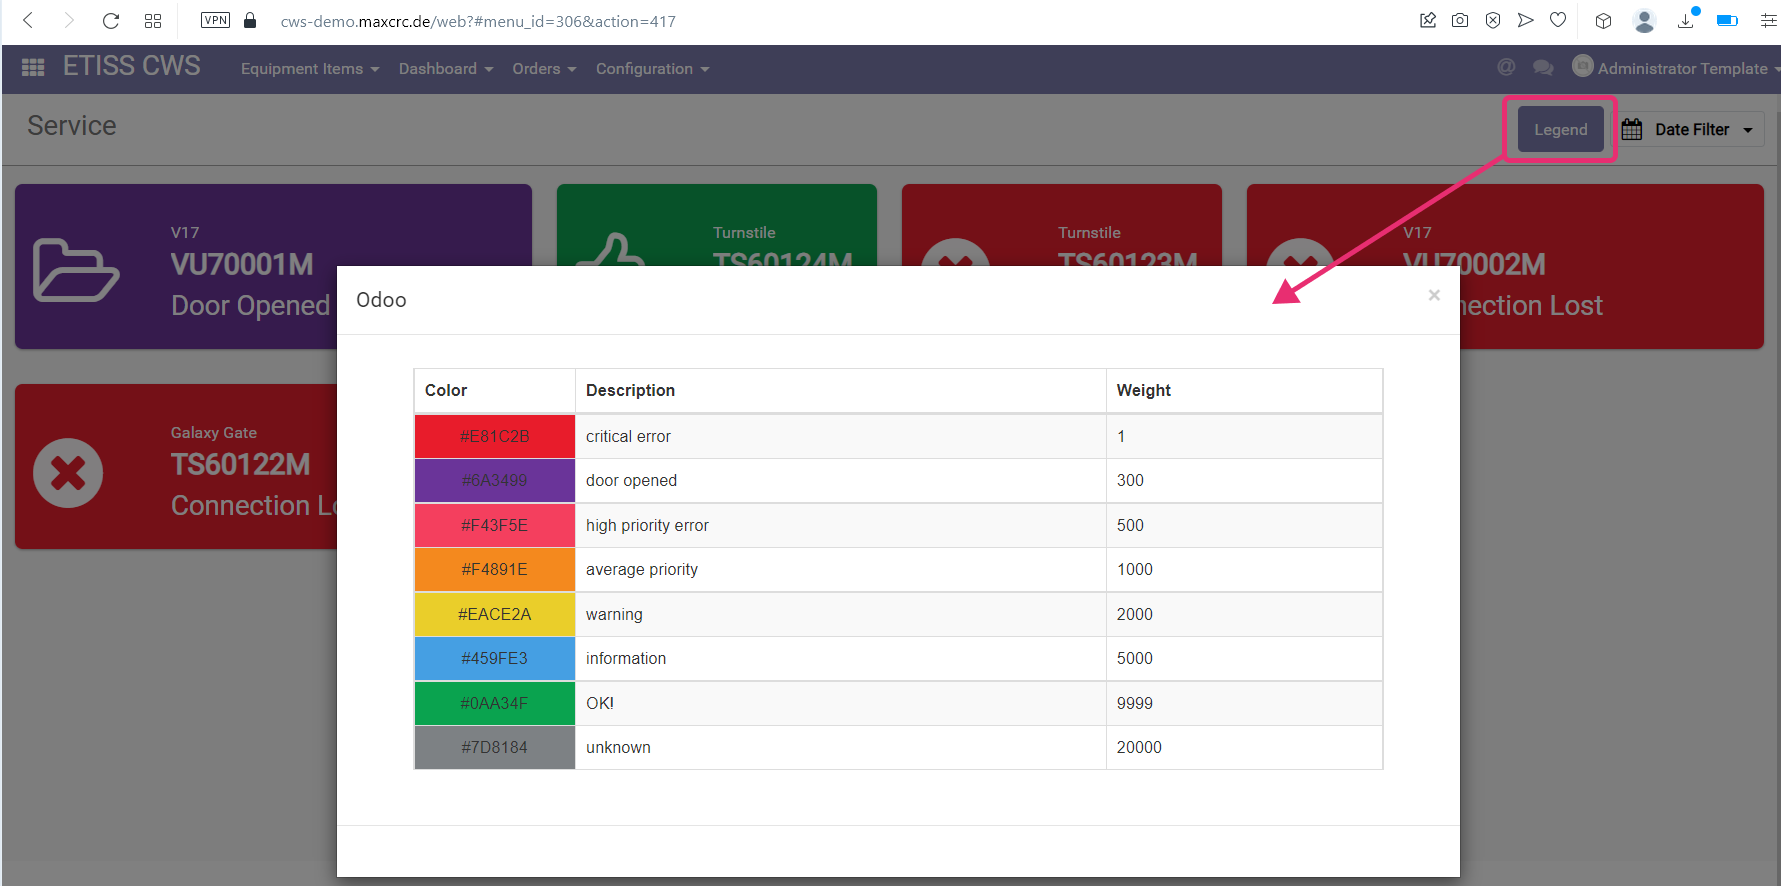
Each event in the list is color-coded and has different weight. More reddish colors have bigger weight and need to be checked immediately. You can see detailed colors description by pressing on the Legend button.
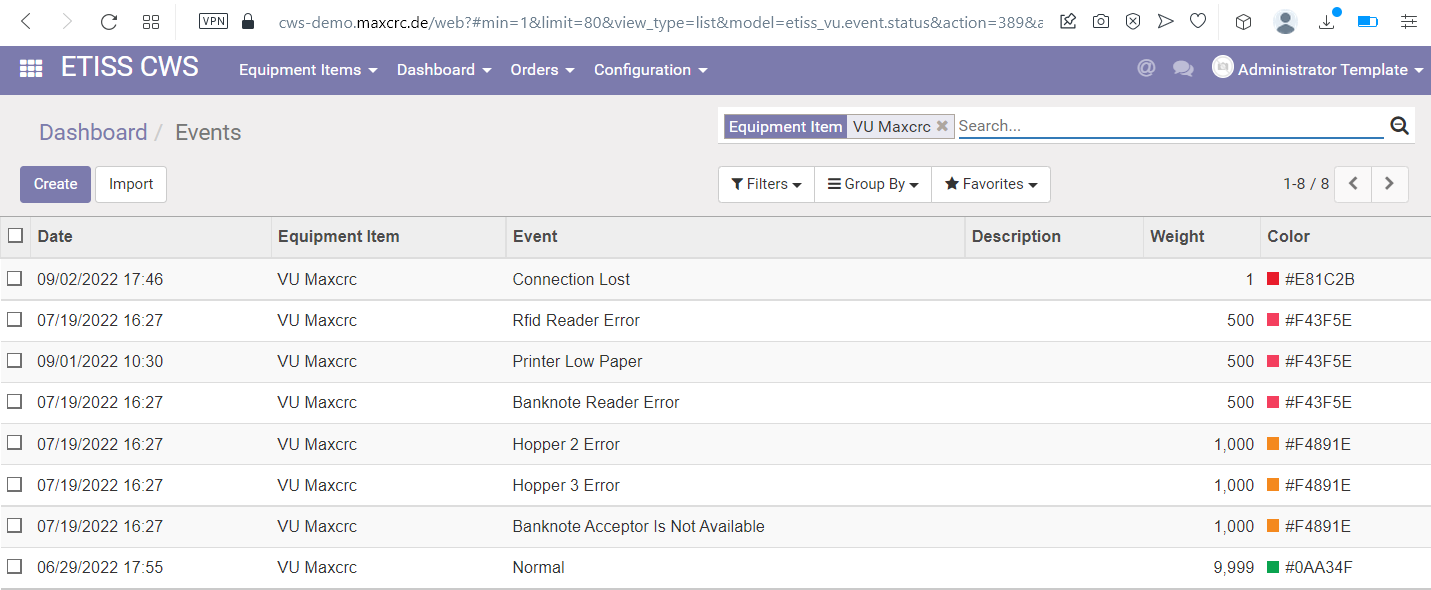
The events list can be sorted by date, weight, color, etc.
Muted events[Bearbeiten | Quelltext bearbeiten]
Sometimes you don't want to see a particular event in the list of current events and you want to simply hide it. The ETISS ERP system allows to do that. Let's say that we know that our coin cashbox is in overflow state and we don't want to see this event in the list.
To do this, first, open the VU - FMCU configuration by going into: Main menu/ETISS CWS/Configuration/Equipment items and select a configuration that your vending unit is currently using. For example, we'll take VU Single FMCU configuration.
In the configuration navigate to the Muted events tab and add an event or a group of events that you don't want to see in the list of current events.
Save the configuration and reload events on the VU instance.
The event will disappear from the dashboard and current events list.
Projects[Bearbeiten | Quelltext bearbeiten]
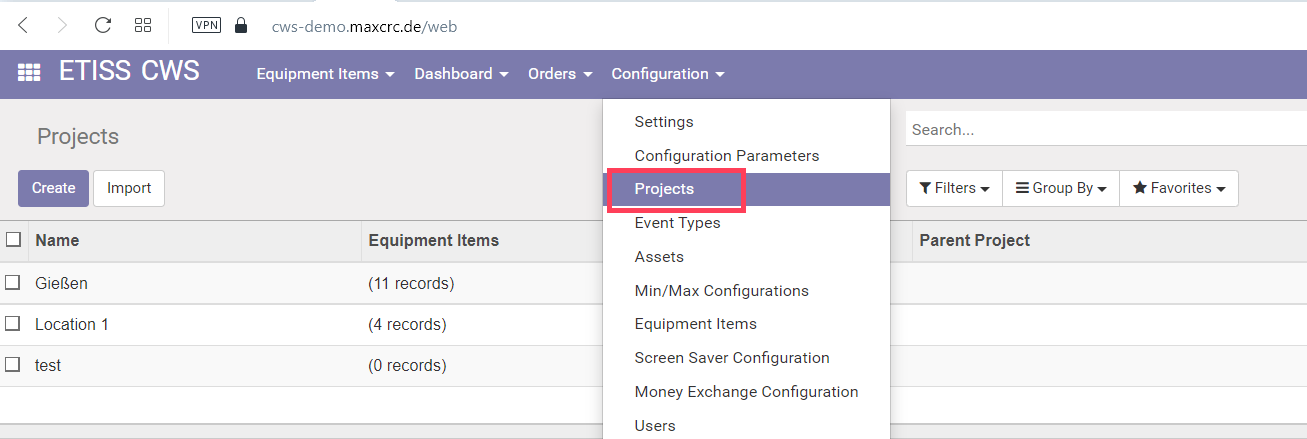
Each equipment item can belong to a certain project. You can configure projects in Etiss CWS -> Configuration -> Projects menu. Once you add an item to a project, you can limit visibility of the project items for certain users by assigning a user to the project. After that, each user will be able to see and work only with equipment items that belong to a certain project.
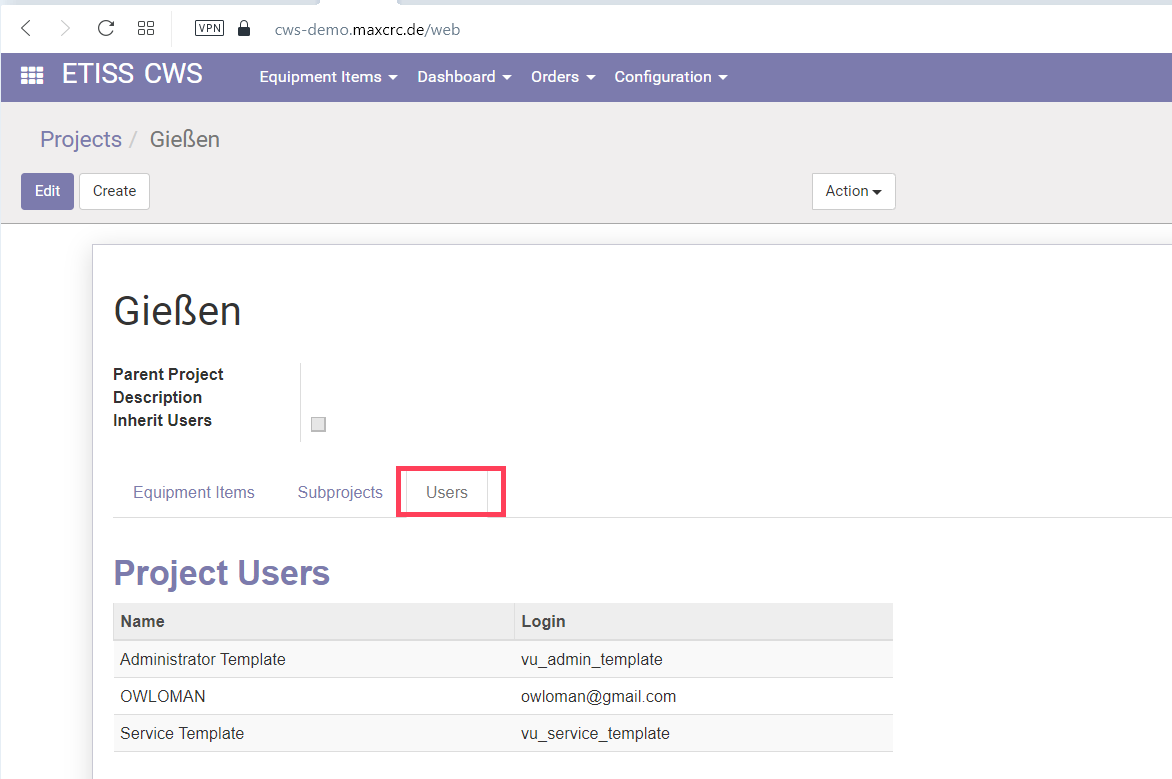 !projects.png! !project_users.png!
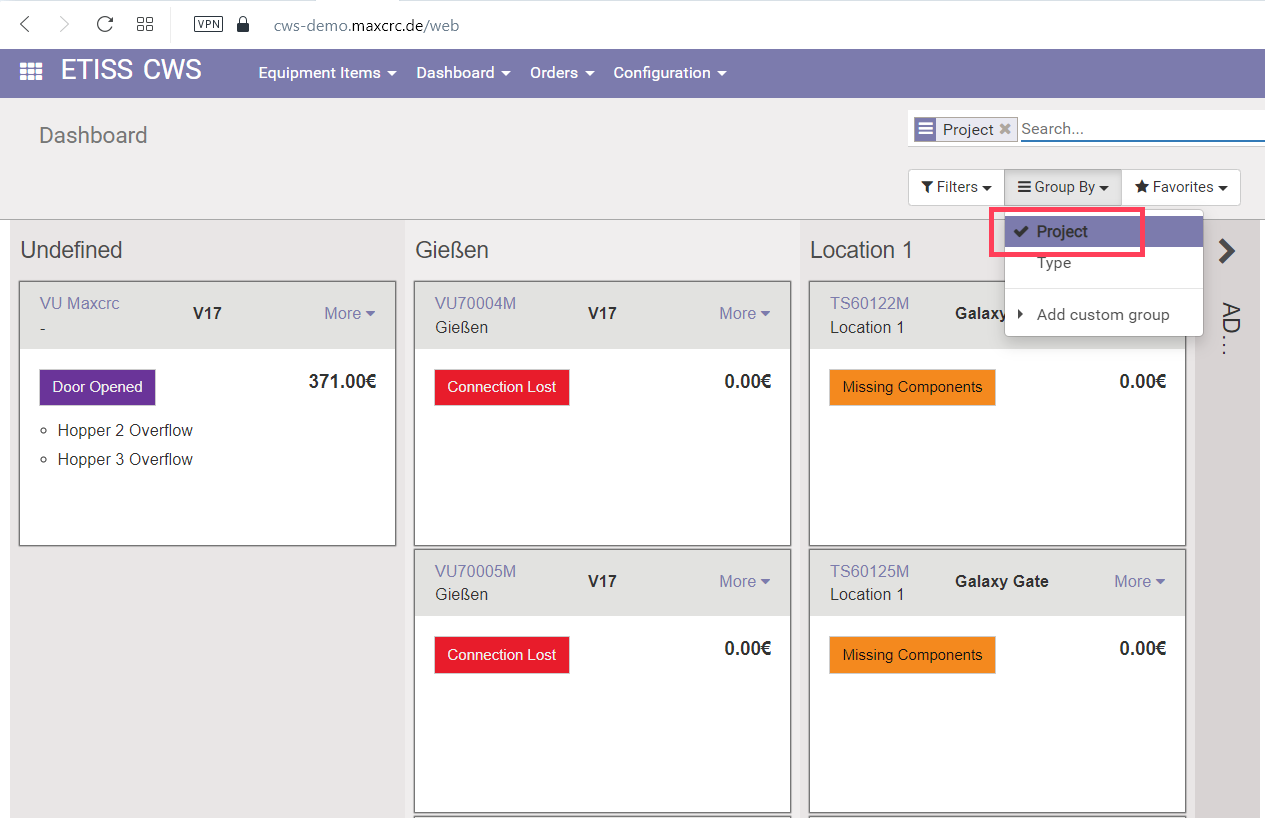
There's also a nice ability to group equipment items by their project or type.
VU TABS AND PROPERTIES[Bearbeiten | Quelltext bearbeiten]
When you click on Vending Unit from the dashboard, you'll see a tabbed page with it's detailed properties. At first you'll see the most common properties of the VU such as:
- Serial: VU serial number
- Type: The VU type. There are number of various VU types such as V17, V21, etc.
- Project: Project to which this VU is assigned
- MAC Address: MAC address of the VU
- Firmware version: This shows the current firmware version of the device
- Actual IP: If the device has a real network IP address, it will be displayed here
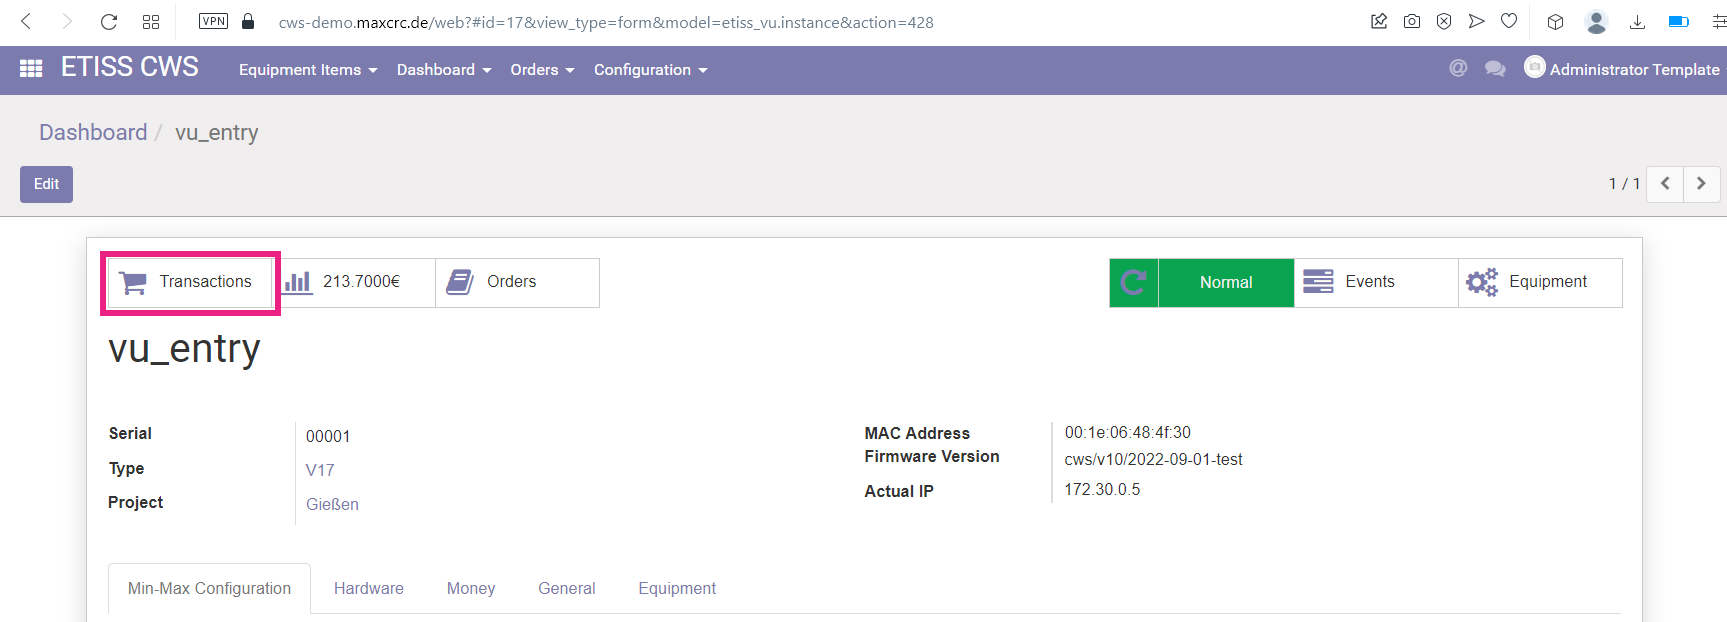
Transactions button[Bearbeiten | Quelltext bearbeiten]
This buttons shows all transactions that happened on the VU.
You can see here the type of transaction, related money status and other information.
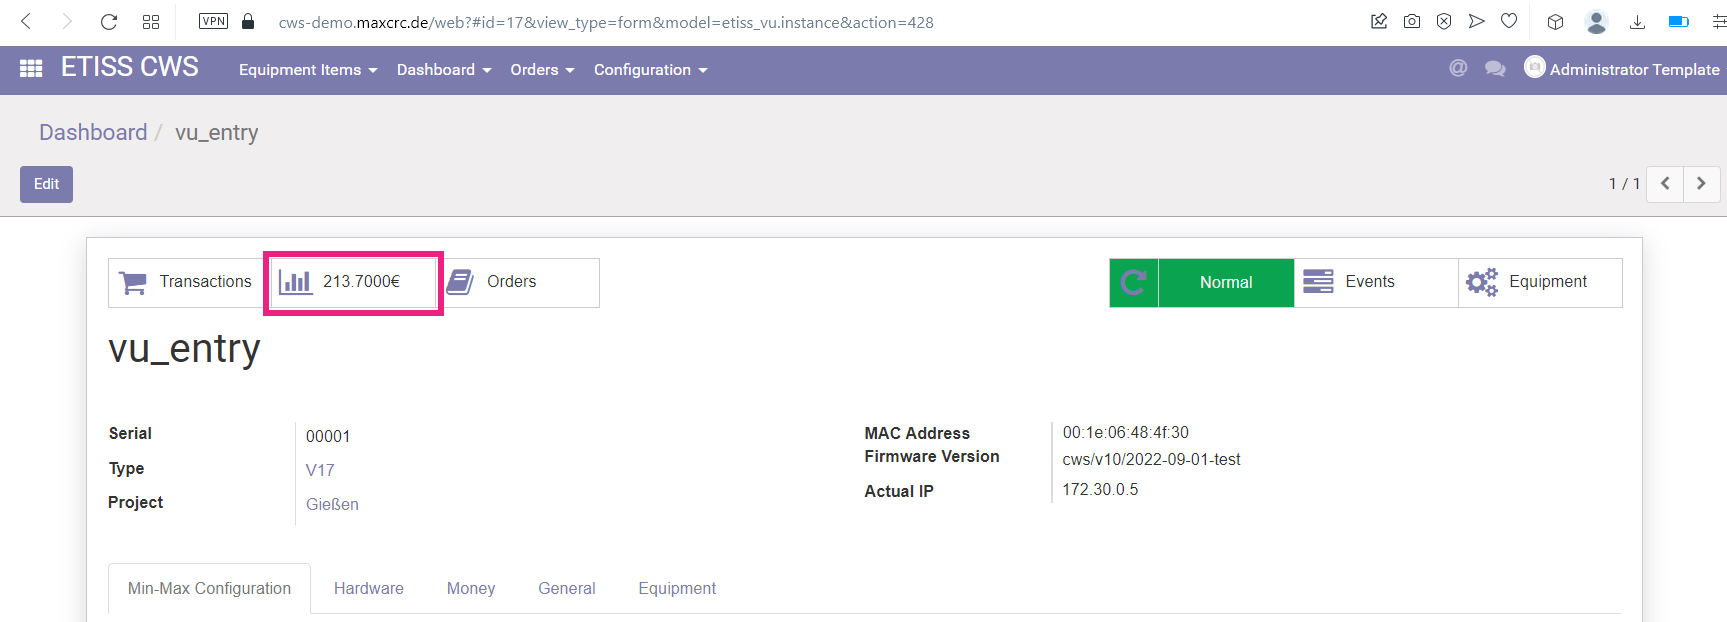
Money statuses button[Bearbeiten | Quelltext bearbeiten]
If you press this button, you'll be presented with the detailed information about money in the VU.
If money amount changes on VU a record is added here, so you won't miss any money-related event on this VU.
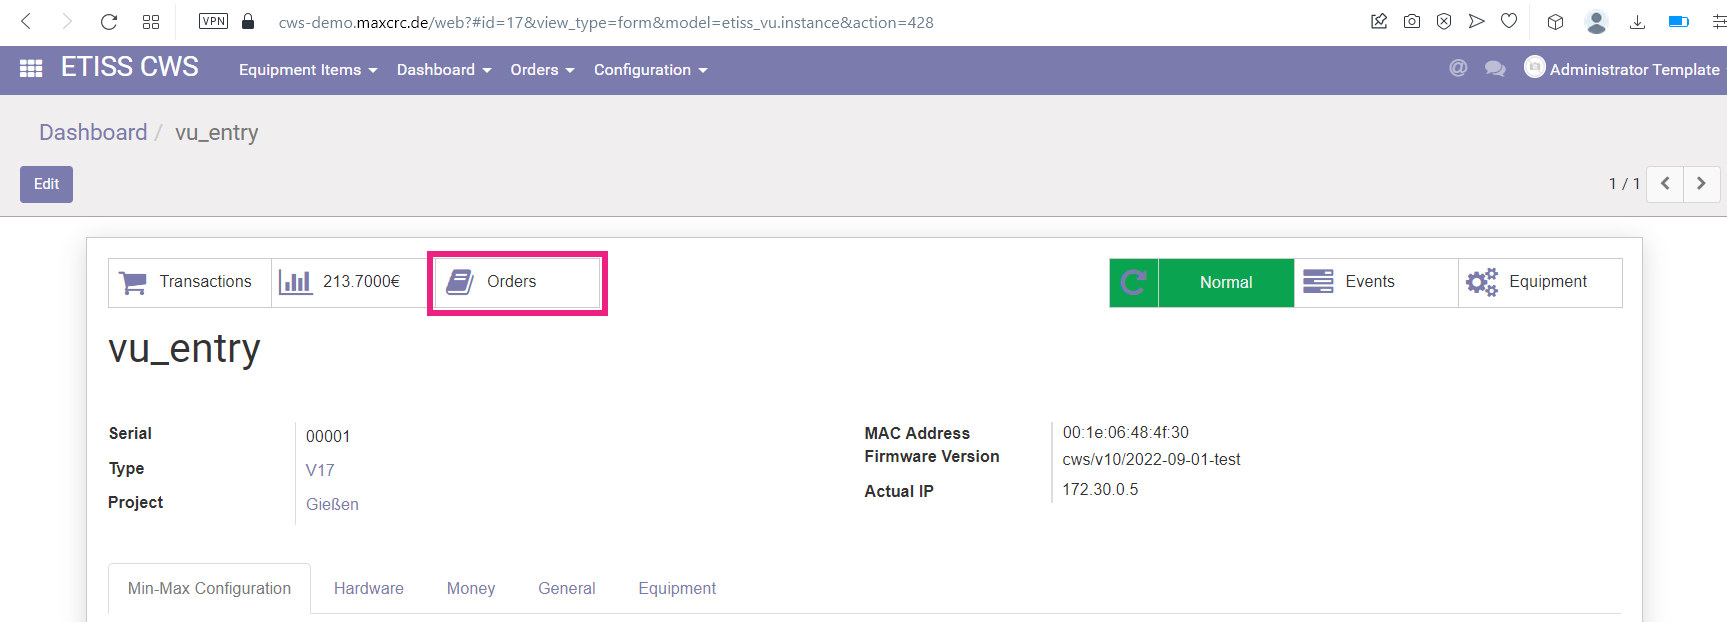
Orders button[Bearbeiten | Quelltext bearbeiten]
This button displays a table with the list of orders that were created on the VU.
If you open any order here, you'll get detailed information about it such as date, amount of money paid, etc.
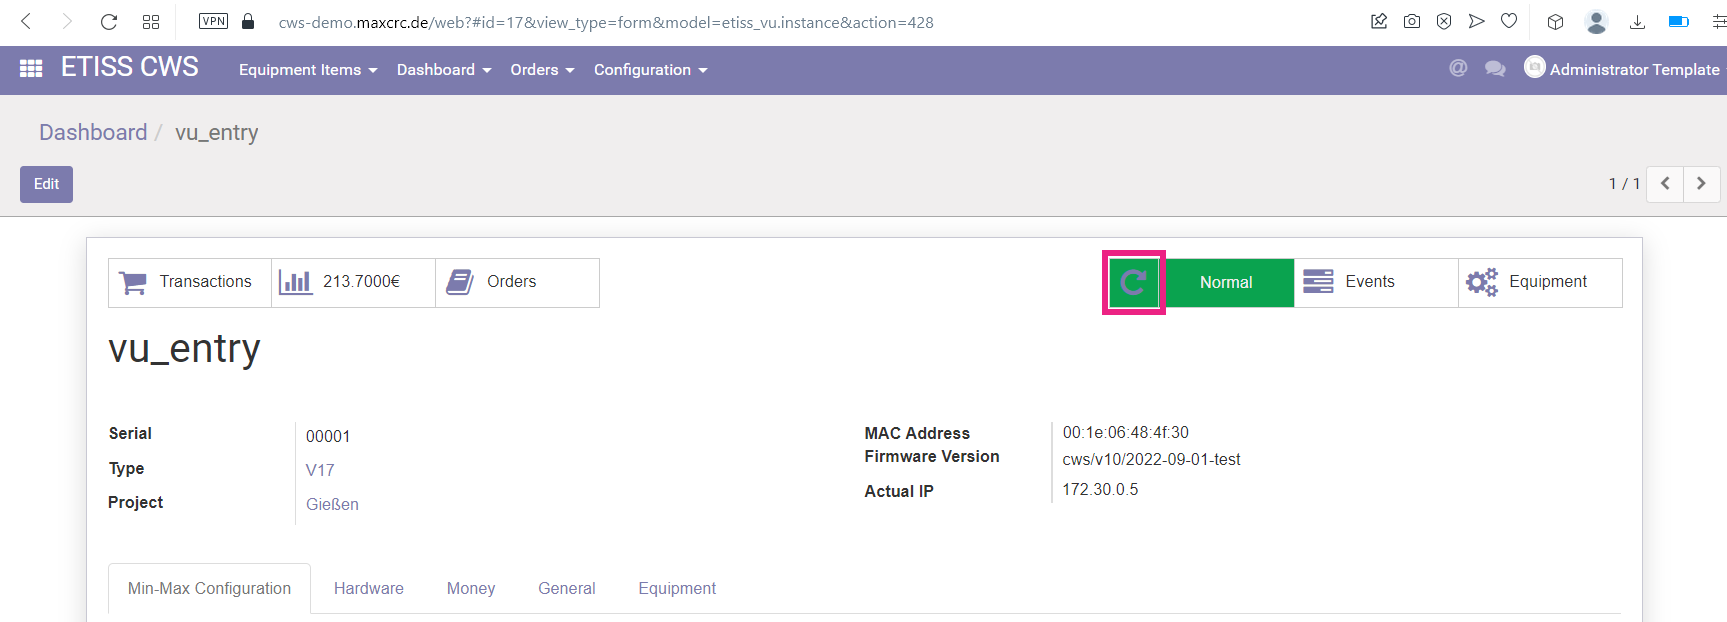
Reload events button[Bearbeiten | Quelltext bearbeiten]
Sometimes a situation can occur when a Vending Unit displays wrong information about it's current state. You can press this button and the system will re-request current information about Vending Unit status and events.
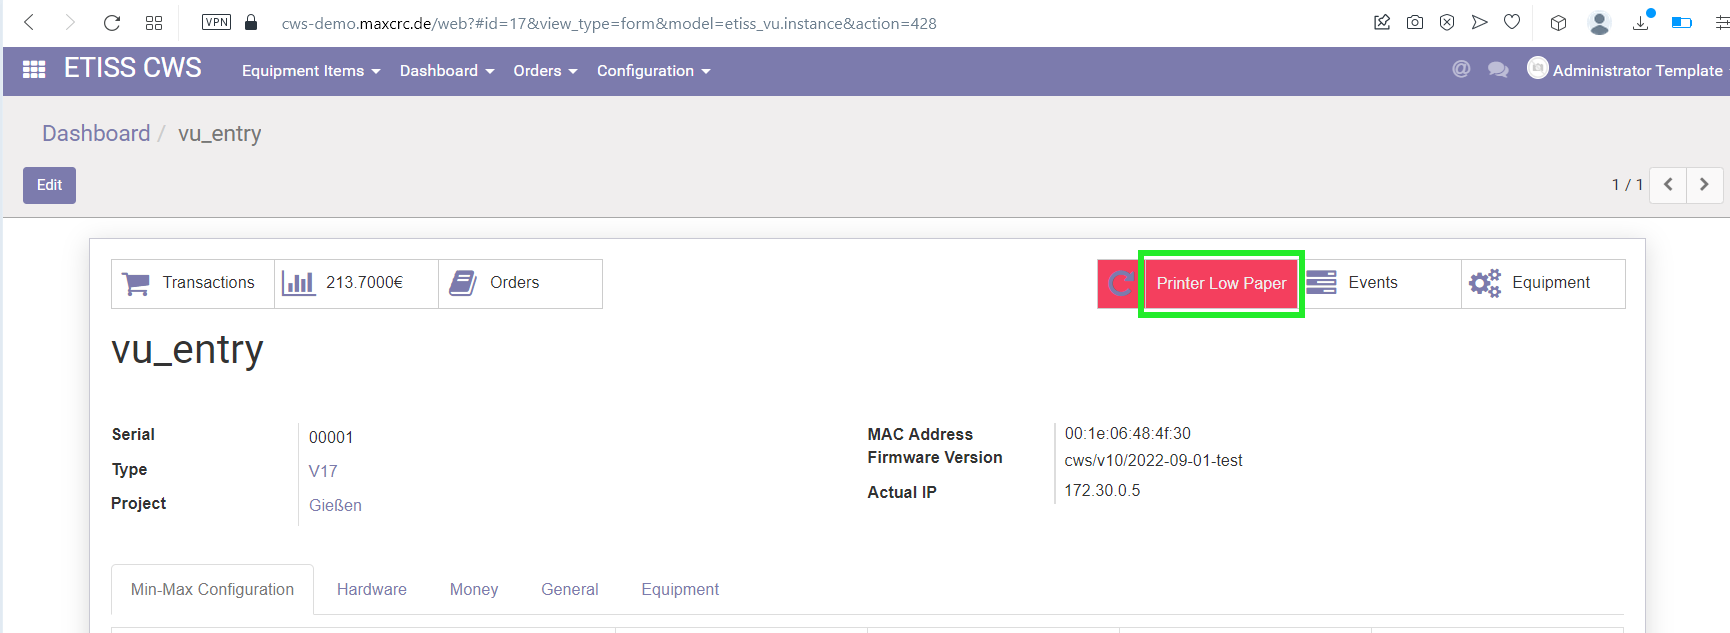
Current events button[Bearbeiten | Quelltext bearbeiten]
When something happens with the VU, you'll see most significant problem displayed on this button.
After pressing this button you'll see a list of current events that happened on the VU and they will be ordered by their weight.
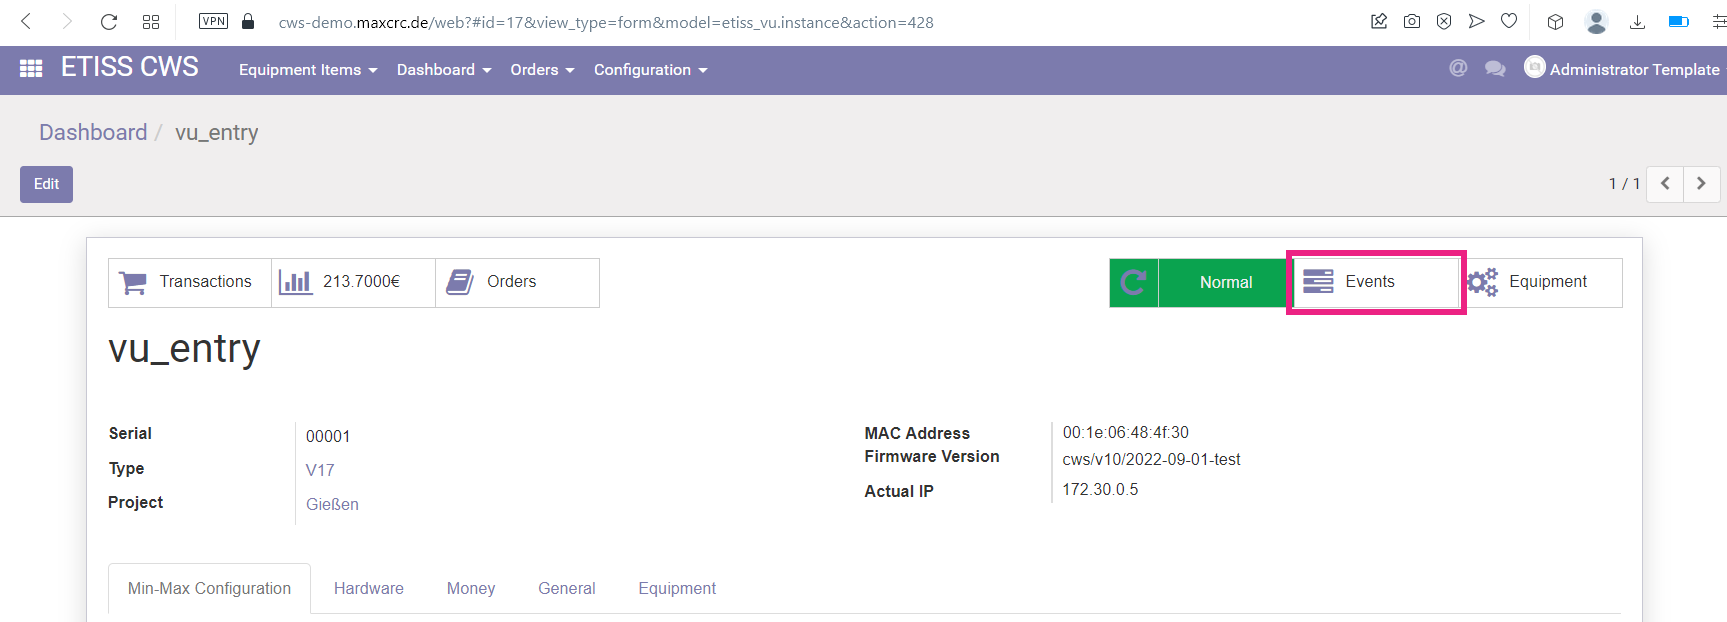
Events button[Bearbeiten | Quelltext bearbeiten]
This button shows the complete history of events that happened on the particular VU.
If, for example, some error has a recurring character, you can find it in the list and see detailed information about it and when it happened before.
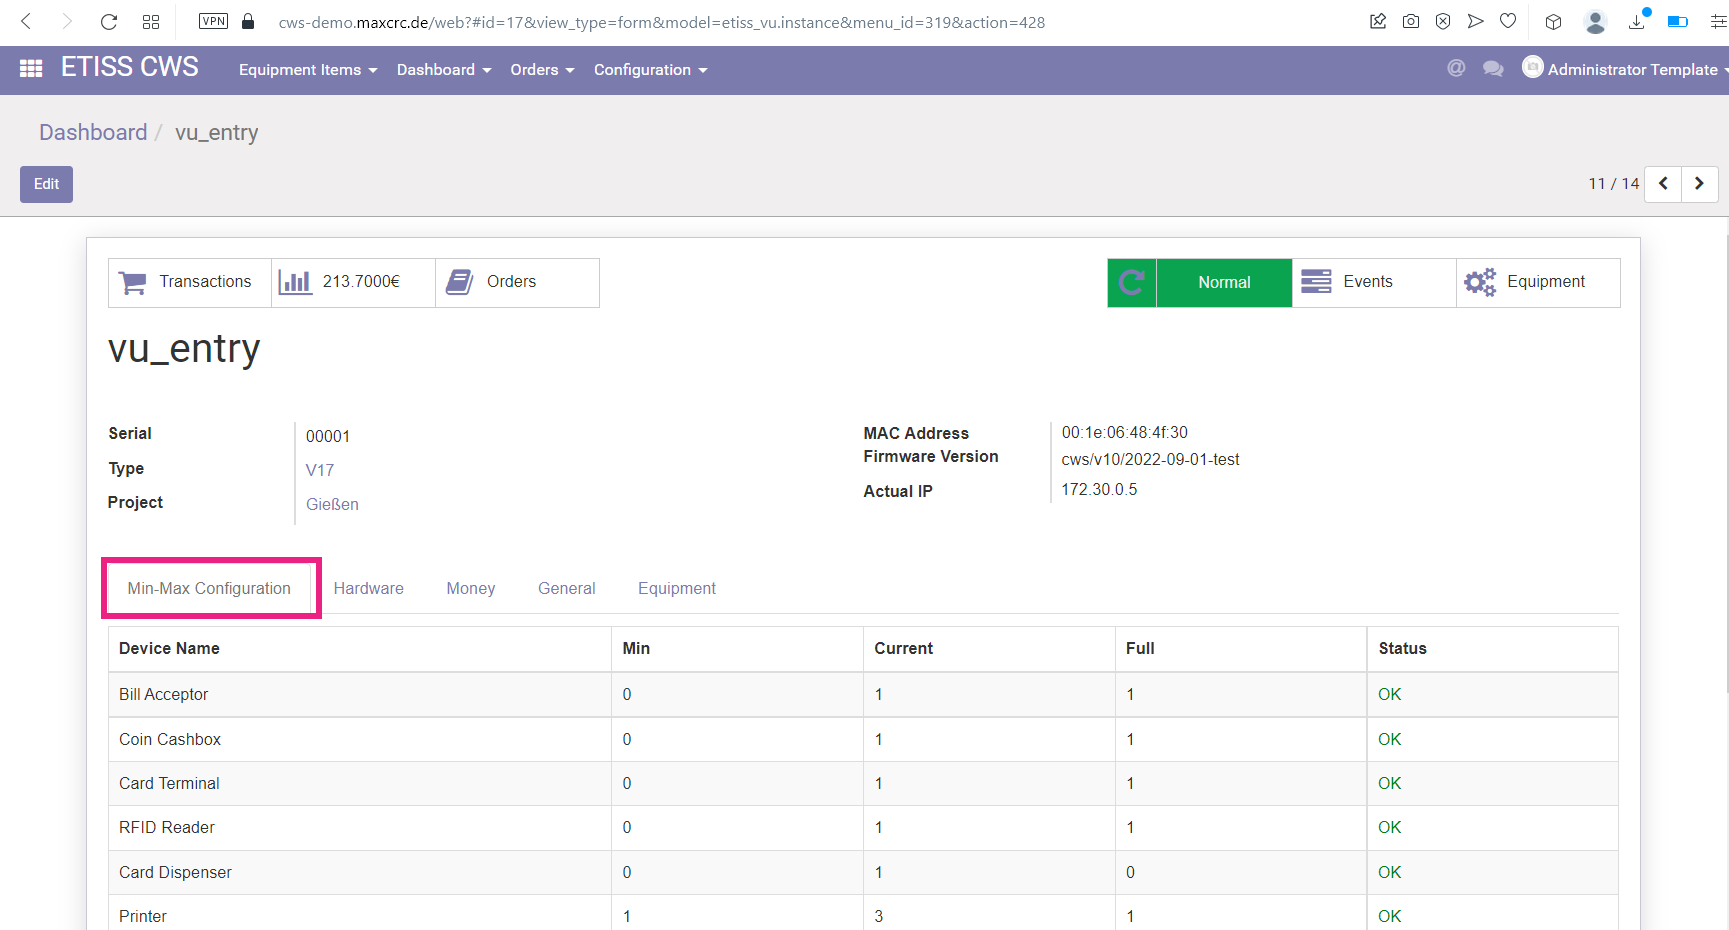
Min-Max configuration tab[Bearbeiten | Quelltext bearbeiten]
This tab shows the minimal, current, and maximal amount of the equipment that can be installed on VU.
Each line represents a group of devices. For example, line Hopper - | 1 | 3 | 3 | says that in order to operate properly, this system needs minimum 1 hopper installed. Currently it has 3 hoppers and the maximum amount of hoppers it supports - 3. To the right you can also see a coulumn which shows the current state of the device.
Hardware tab[Bearbeiten | Quelltext bearbeiten]
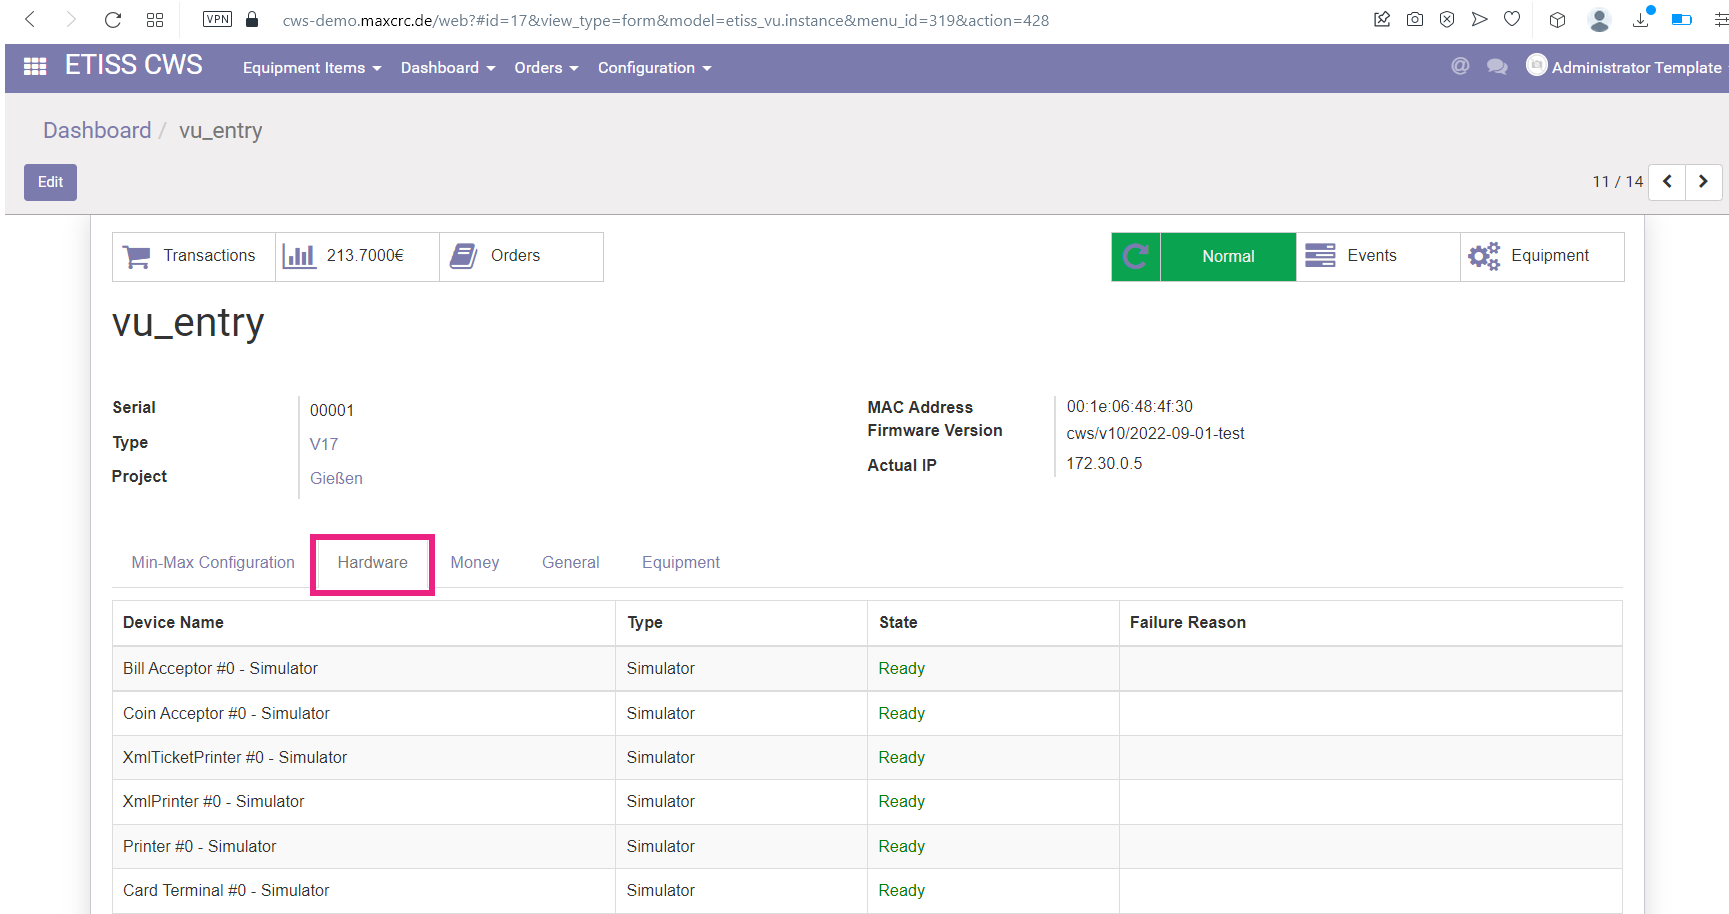
This tab shows the list of available hardware devices each on a separate line. Here you can see whether the given device is a simulator or a real device, state of each device and failure reason in case something happens with it.
Money tab[Bearbeiten | Quelltext bearbeiten]
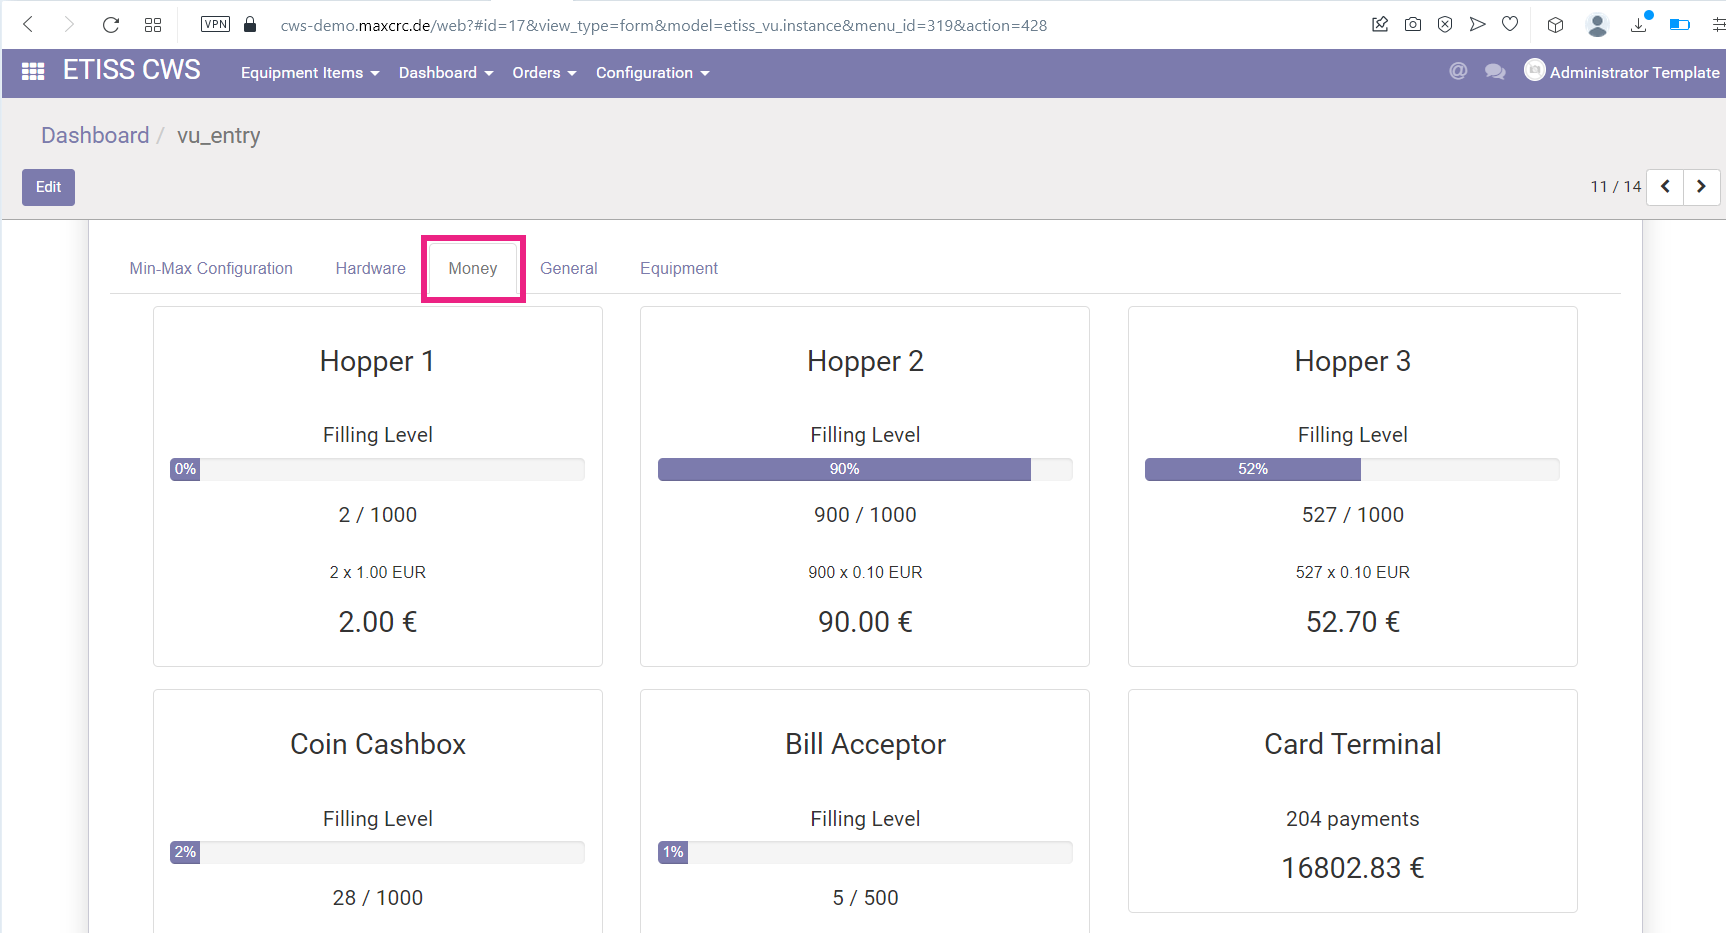
On this tab you can see the state of money devices that deal with money directly, such as Hoppers, Coin Cashboxes, Bill Acceptors, Card Terminal. Each box represents a device. Here you can monitor filling levels, limits, and money denominations that are accepted by each device. From this tab you can't change anything, just see the current state of each device.
General tab[Bearbeiten | Quelltext bearbeiten]
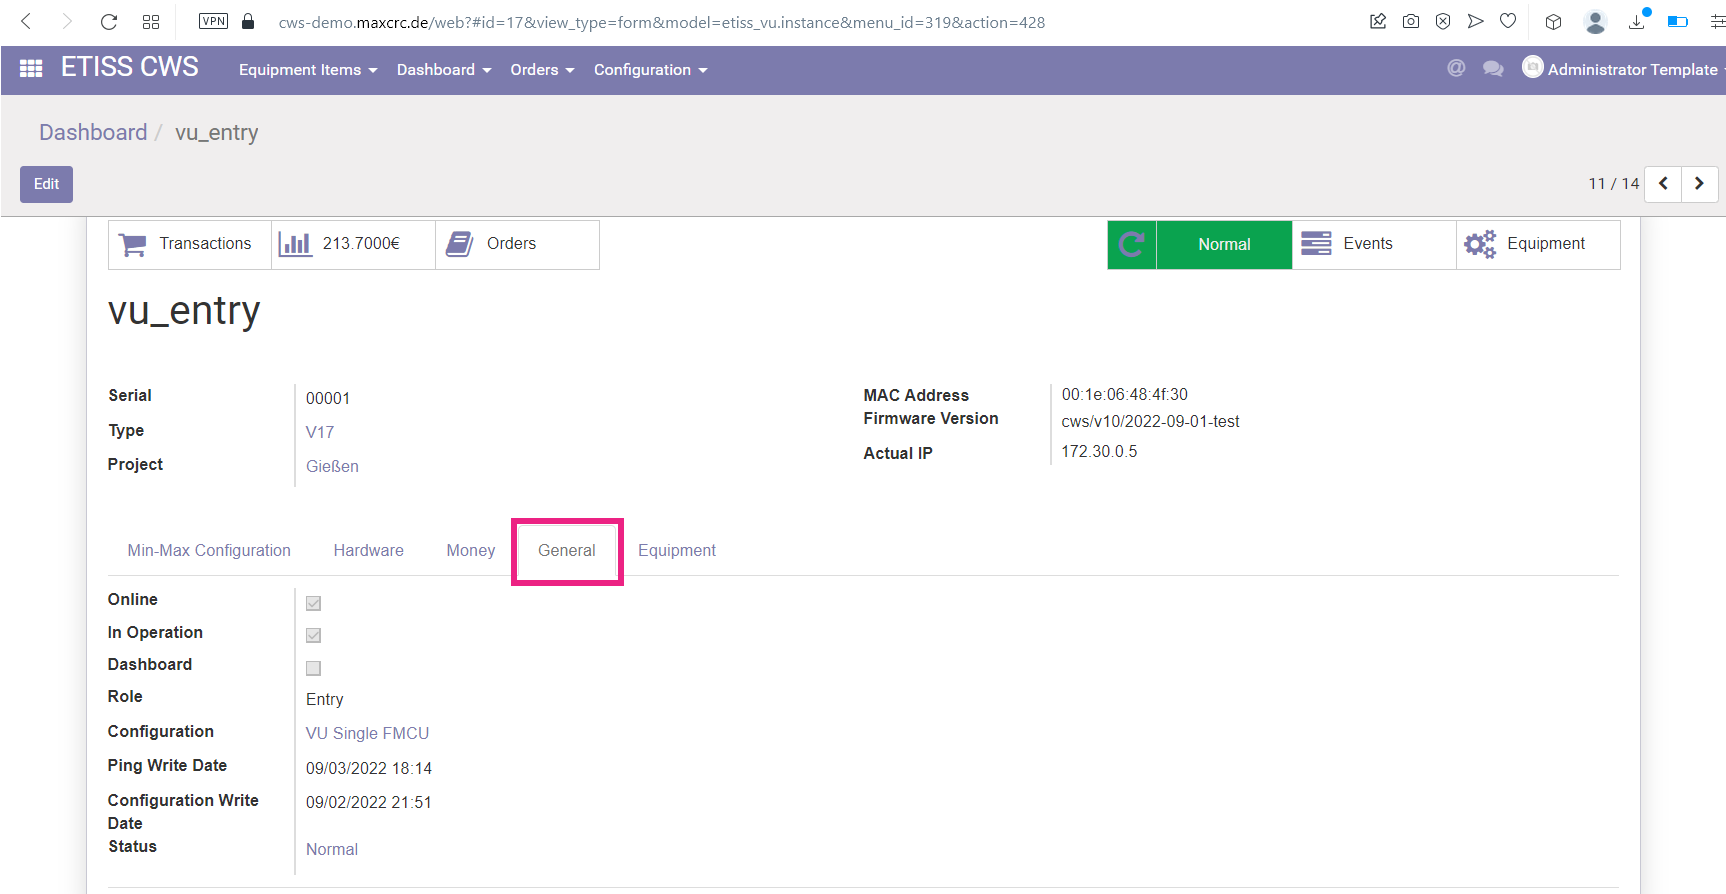
On this tab you can see general information about the given Vending Unit such as:
- Online: Current network status of the VU (Online/Offline)
- In Operation: Currently this parameter is not user. Left here for compatibility
- Dashboard: If checked, creates a dasboard when VU is created
- Role: This determines whether this vending unit is located at an entrance or exit respectively (Entry/Exit)
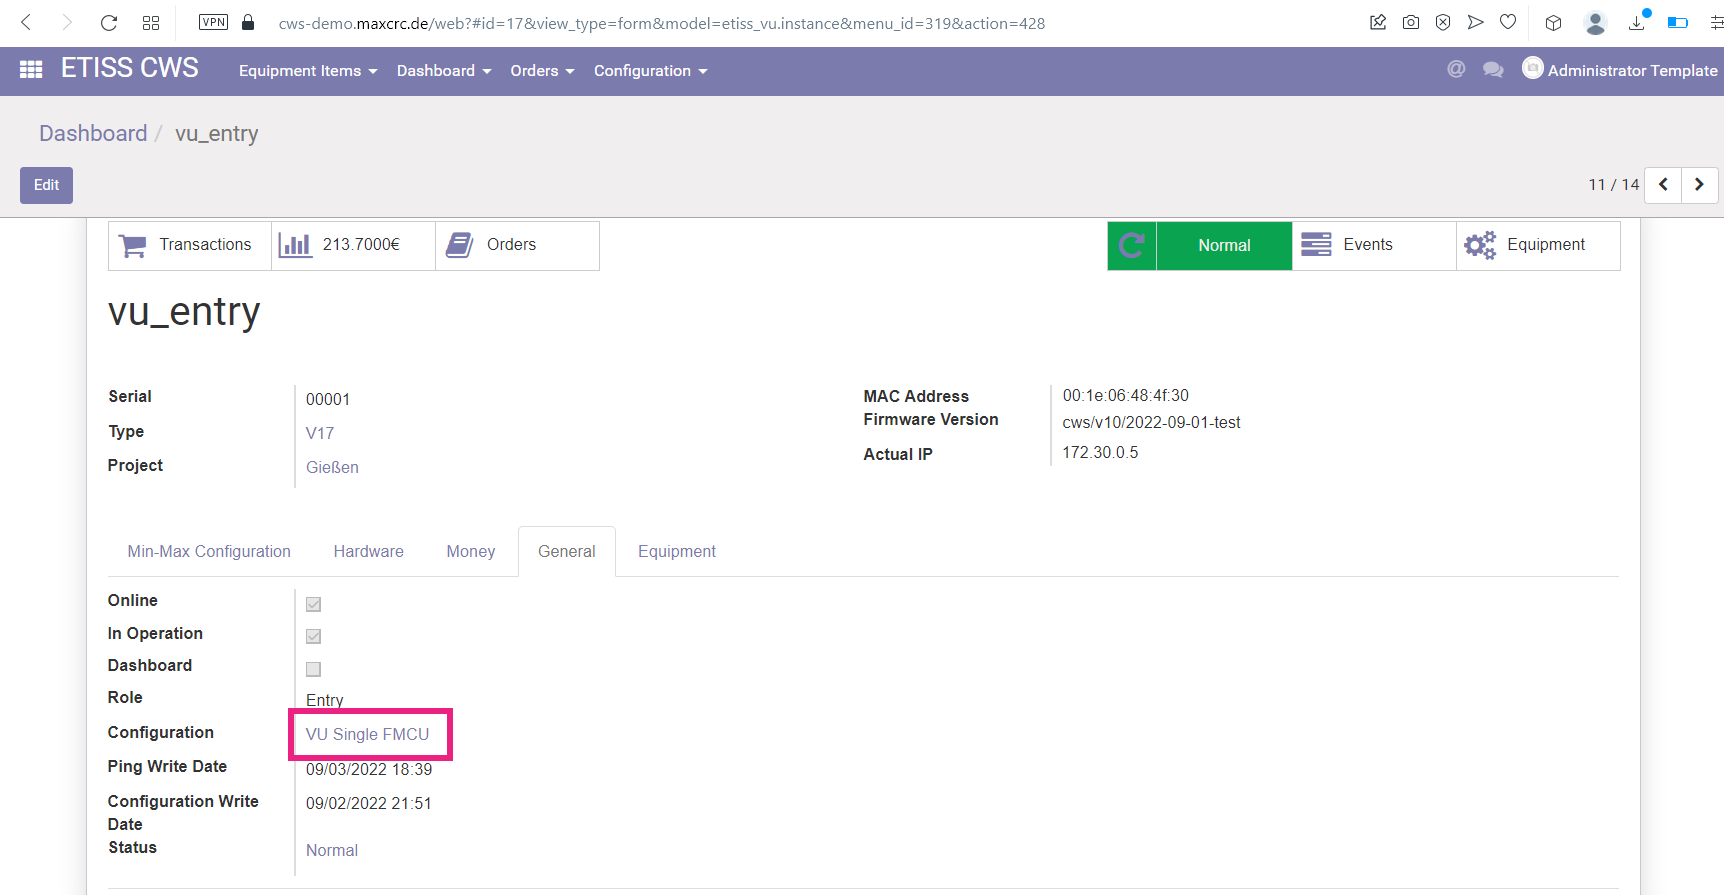
- Configuration: A VU configuration
- Ping Write Date: The last time when VU sent ping to the Odoo server
- Configuration Write Date: The last time when VU configuration has been changed
- Status: Current status of the VU
Equipment tab[Bearbeiten | Quelltext bearbeiten]
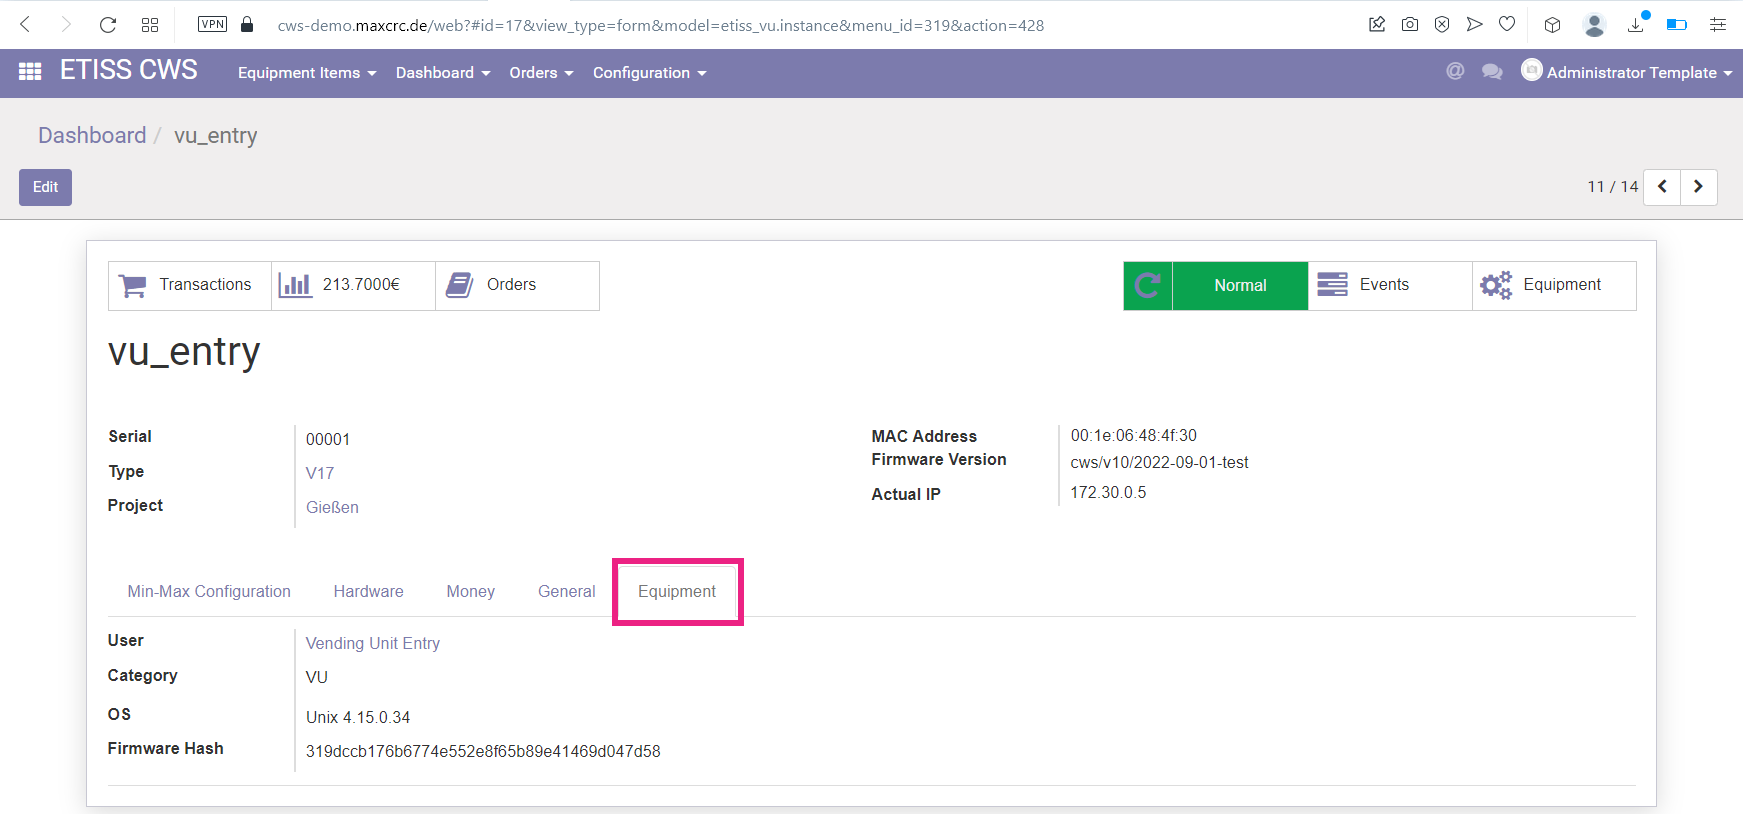
This tab shows equipment-related information such as:
- User: A related user that is used for VU authentication
- Category: The device category. Can be a VU or a Turnstile
- OS: Operation System of the device
- Firmware Hash: The hash of the sofware version that is currently installed on the device
FMCU TABS AND PROPERTIES[Bearbeiten | Quelltext bearbeiten]
Unlike VU, FMCU has different set of tabs and additional button. They're typically named as TS... which means (turnstile).
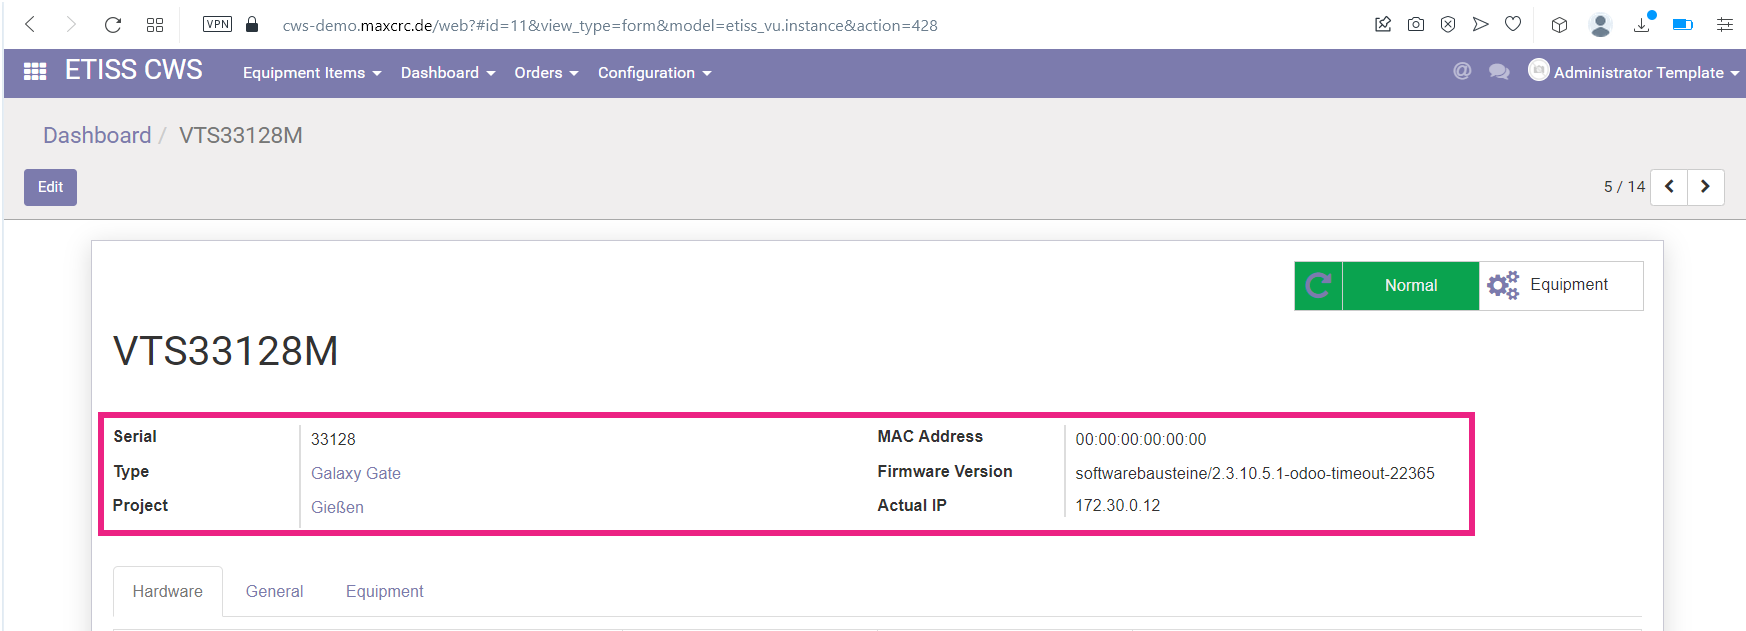
When you click on FMCU from the dashboard, you'll see a tabbed page with it's detailed properties. At first you'll see the most common properties of the VU such as:
- Serial: FMCU serial number
- Type: The FMCU type. There are number of various FMCU types such as Turnstile...
- Project: Project to which this FMCU is assigned
- MAC Address: MAC address of the FMCU
- Firmware version: This shows the current firmware version of the device
- Actual IP: If the device has a real network IP address, it will be displayed here
When you open FMCU properties, you'll notice that it has less tabs than VU. It has only the following tabs: Hardware, General and Equipment. Below is a description of each of these tabs.
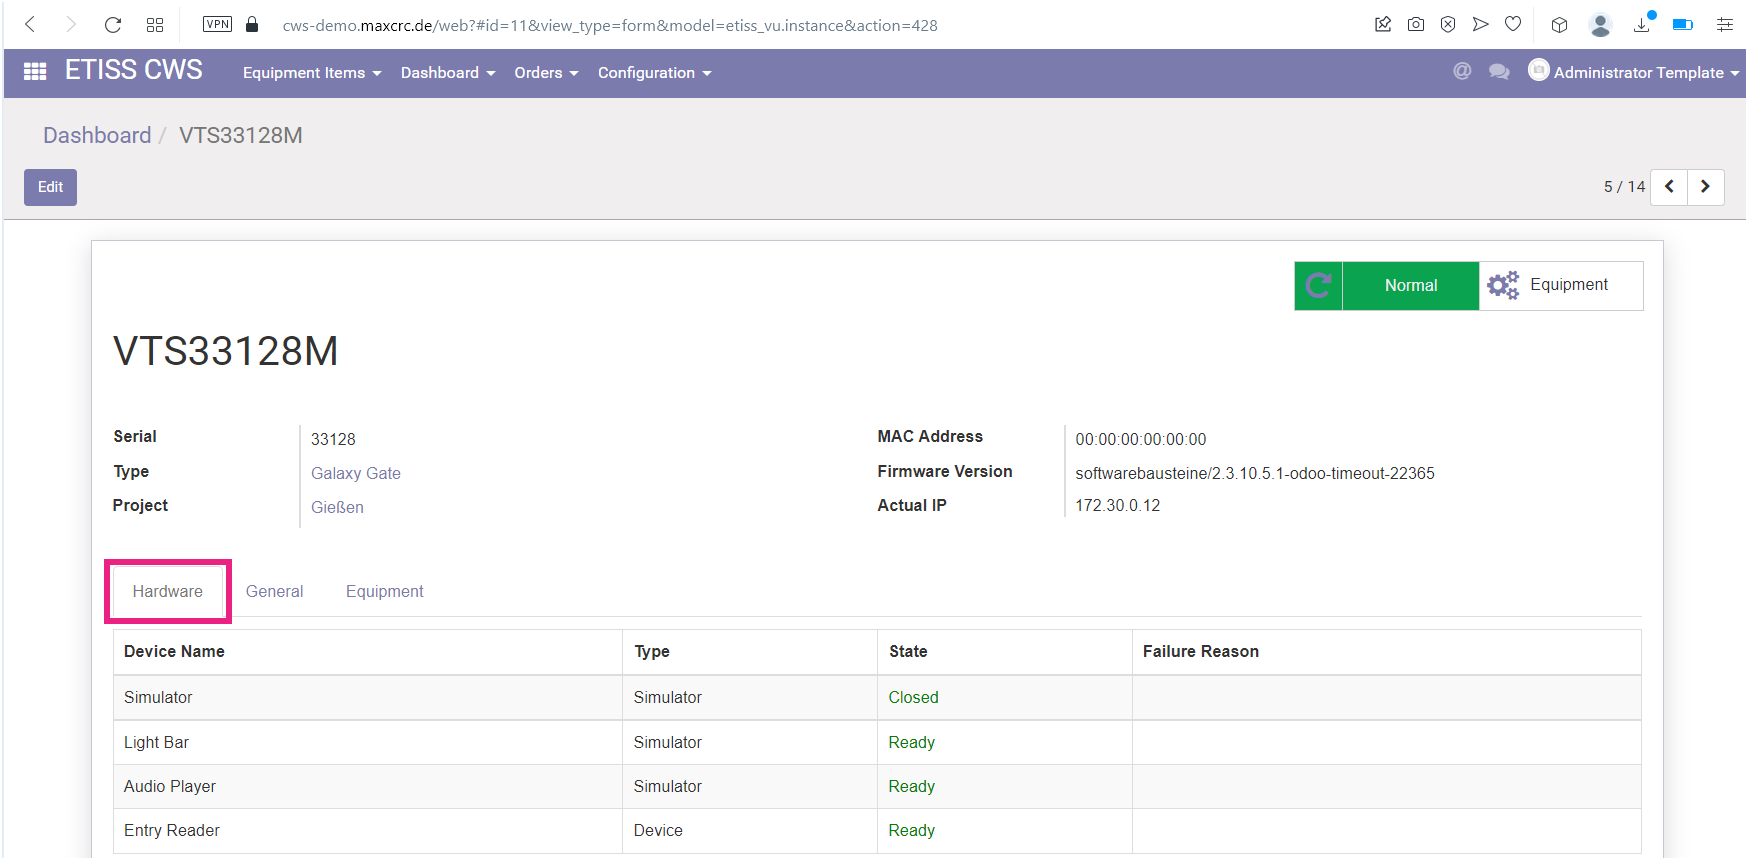
Hardware FMCU tab[Bearbeiten | Quelltext bearbeiten]
This tab lists hardware devices that are installed on the FMCU. Here you can see whether the given device is a simulator or a real device, state of each device and failure reason in case something happens with it.
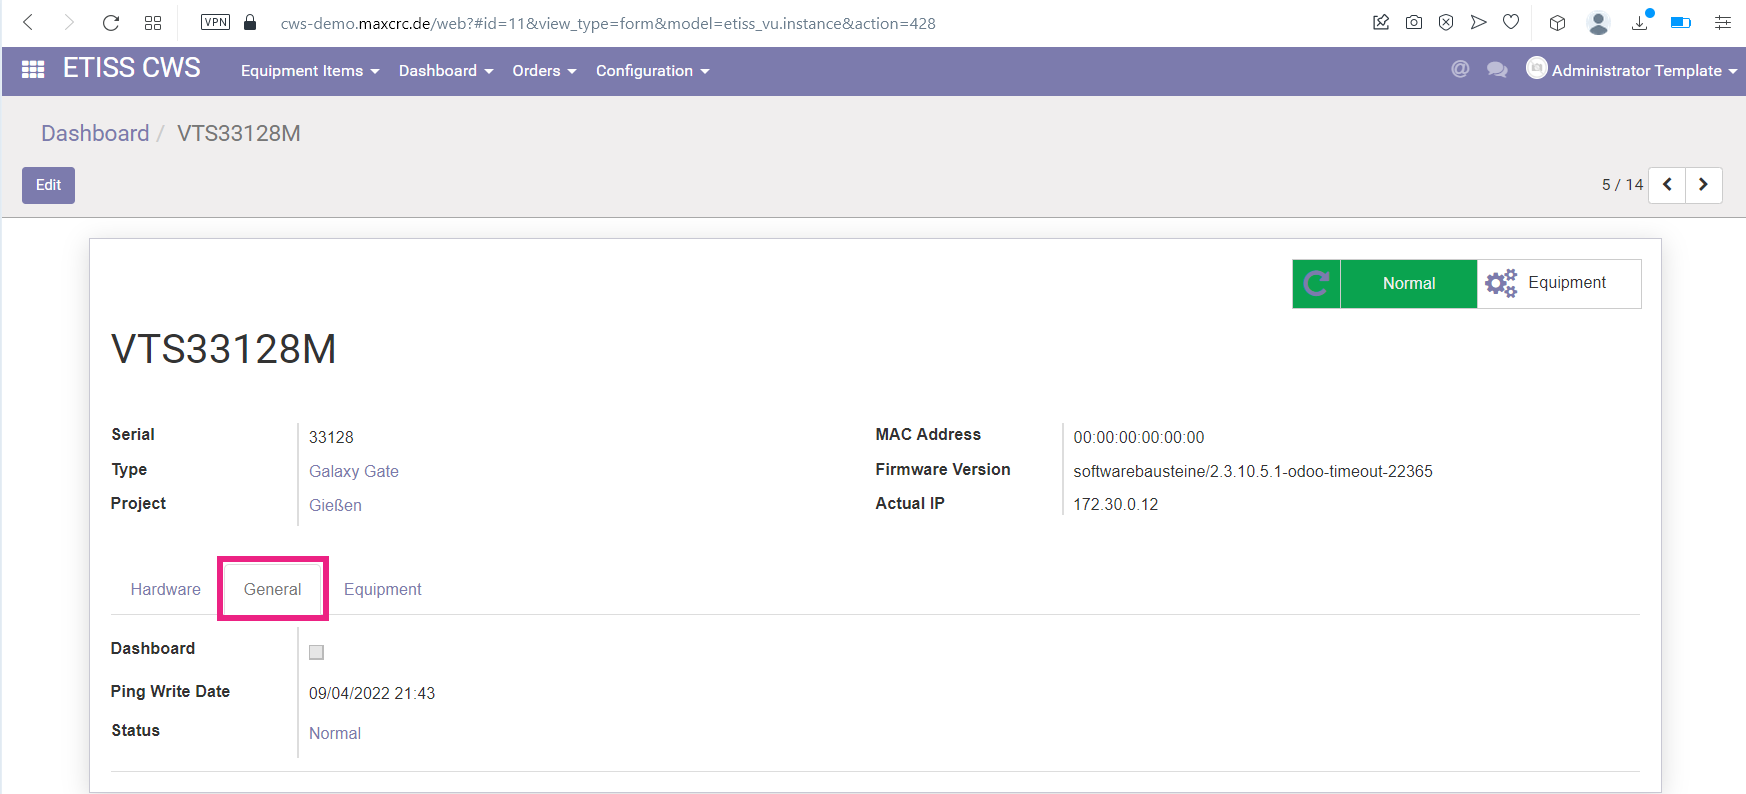
General FMCU tab[Bearbeiten | Quelltext bearbeiten]
On this tab, same as on VU's tab you can see general device parameters such as Status and Ping write date.
- Dashboard: If checked, creates a dasboard when FMCU is created
- Status: Current status of the FMCU
- Ping write date: The last time when FMCU sent ping to the Odoo server
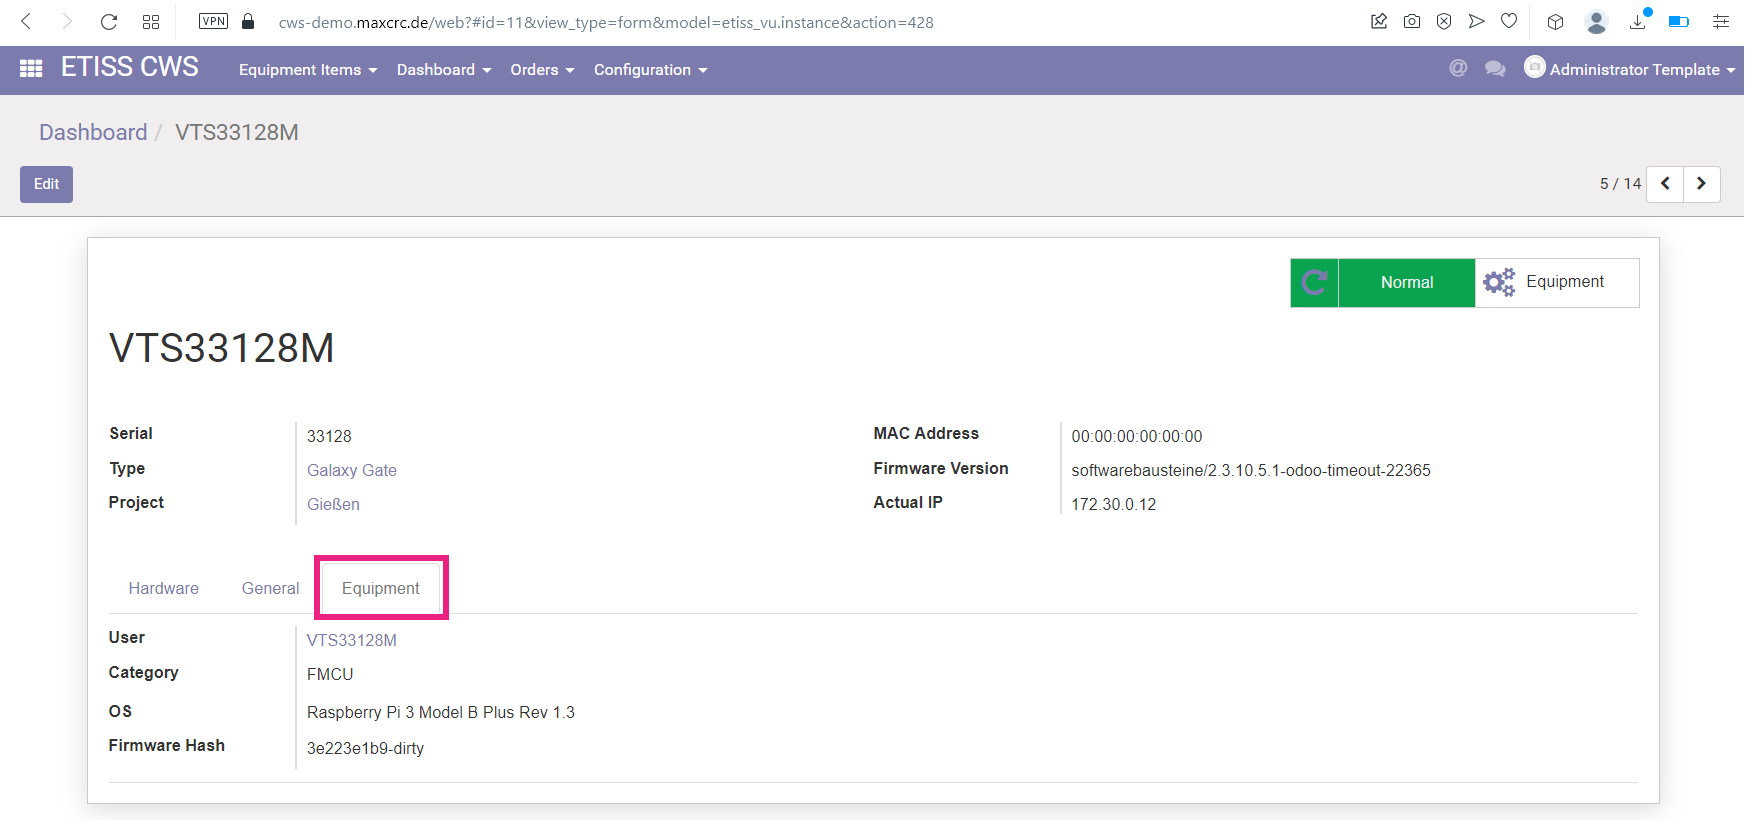
Equipment FMCU tab[Bearbeiten | Quelltext bearbeiten]
This tab shows equipment-related information of FMCU such as:
- User: A related user that is used for FMCU authentication
- Category: The device category. Can be a VU or a FMCU
- OS: Operation System of the device
- Firmaware hash: The hash of the sofware version that is currently installed on the device
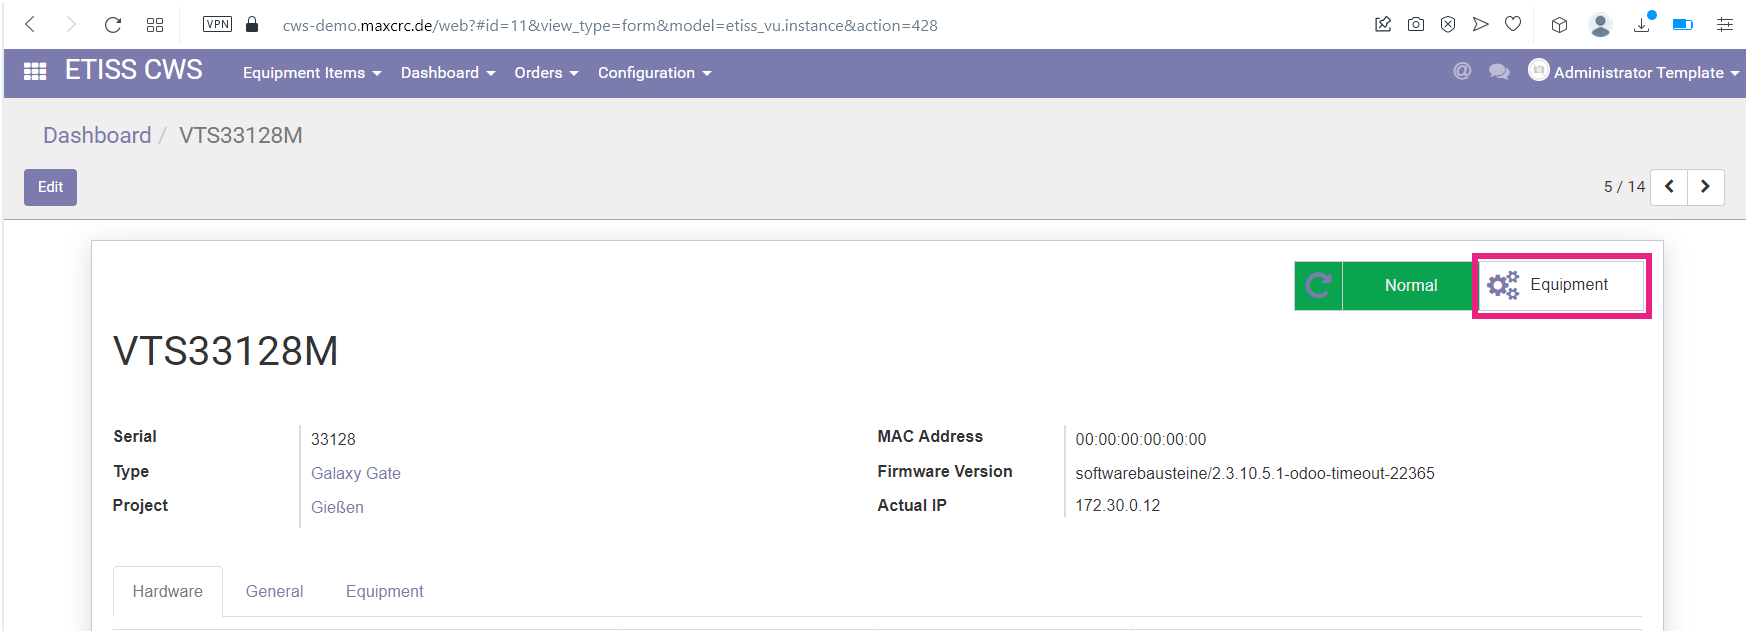
Equipment FMCU button[Bearbeiten | Quelltext bearbeiten]
To work with the device remotely you can press Equipment button.
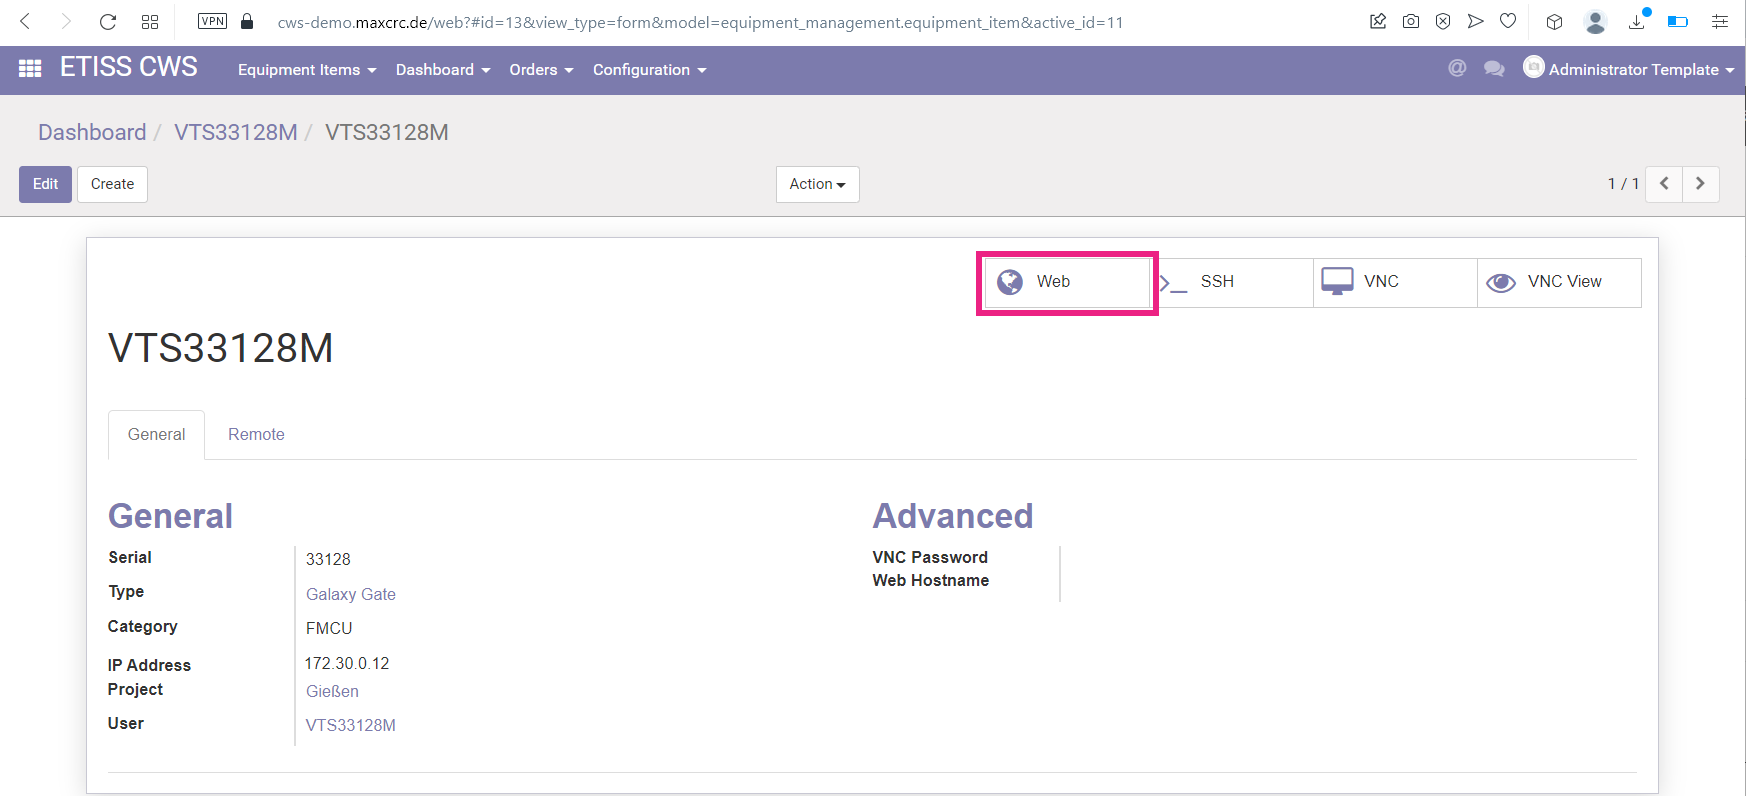
This button has all basic functionality as for VU, but additionally it has a Web button.
Pressing it will lead you to the login dialog to the FMCU software backend, where you'll be able to set and monitor various aspects of the FMCU software.
!fmcu_backend.png!
==REMOTE MONITORING AND CONTROL
[Bearbeiten | Quelltext bearbeiten]
There's a possibility to remotely monitor and access Vending Units listed on dashboard. You can connect to a particular unit via SSH, View or remotely control it with VNC. To do this, click on a Vending Unit and press Equipment button at the right side of the screen.
SSH[Bearbeiten | Quelltext bearbeiten]
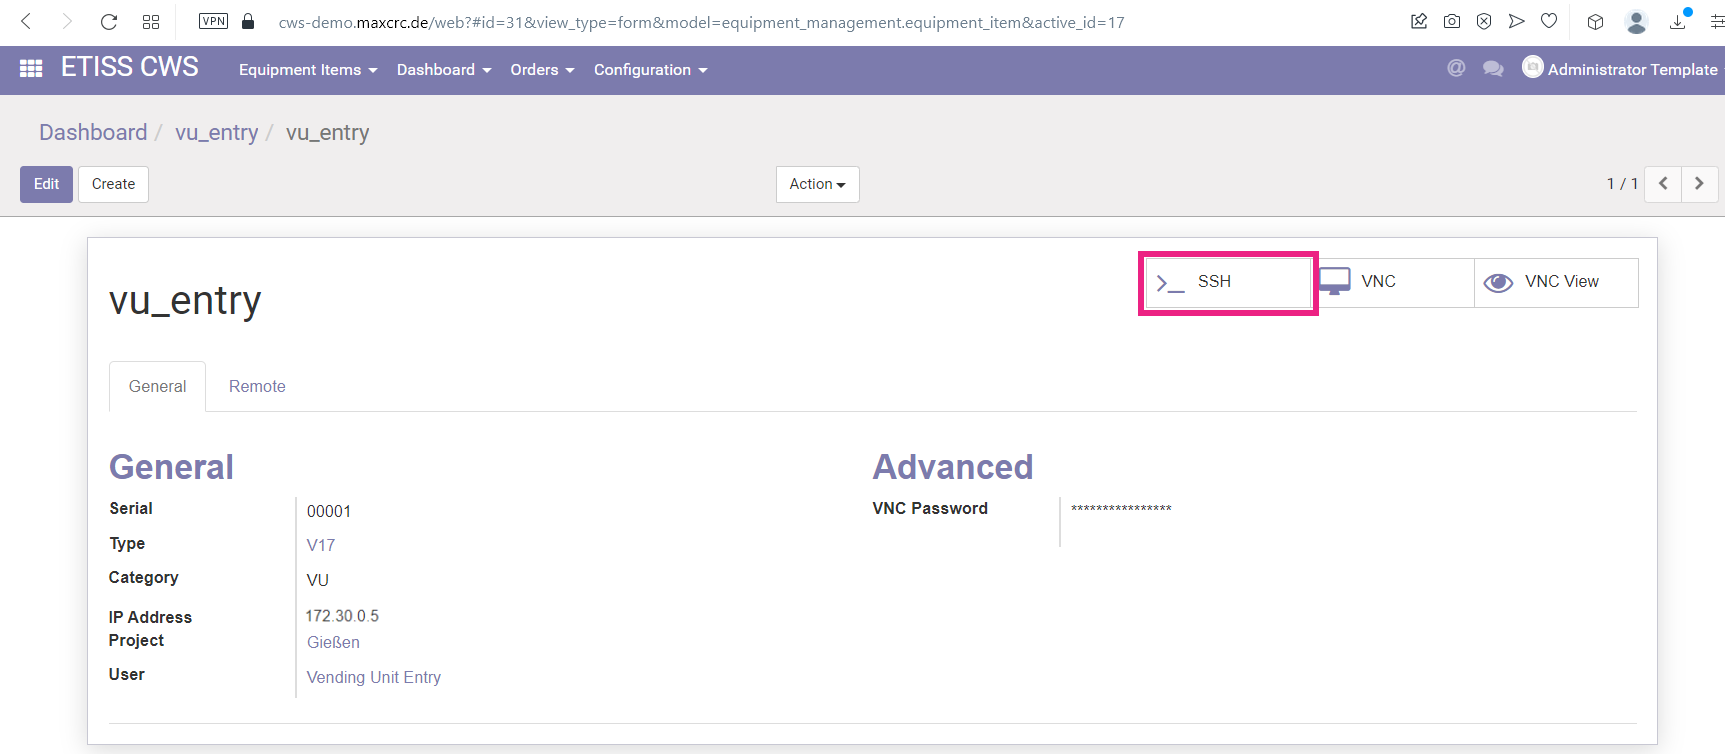
SSH button allows you to connect to particular Vending Unit using SSH protocol.
After you press this button, you'll need to enter the following parameters and press Connect:
- Hostname: IP address or domain name of the Vending Unit to which you're connecting
- Port: SSH port
- Username: A user that's used for SSH connections
- Password: User's password
When connection is successfully established, you'll be securely logged in to the Vending Unit via command line.
VNC[Bearbeiten | Quelltext bearbeiten]
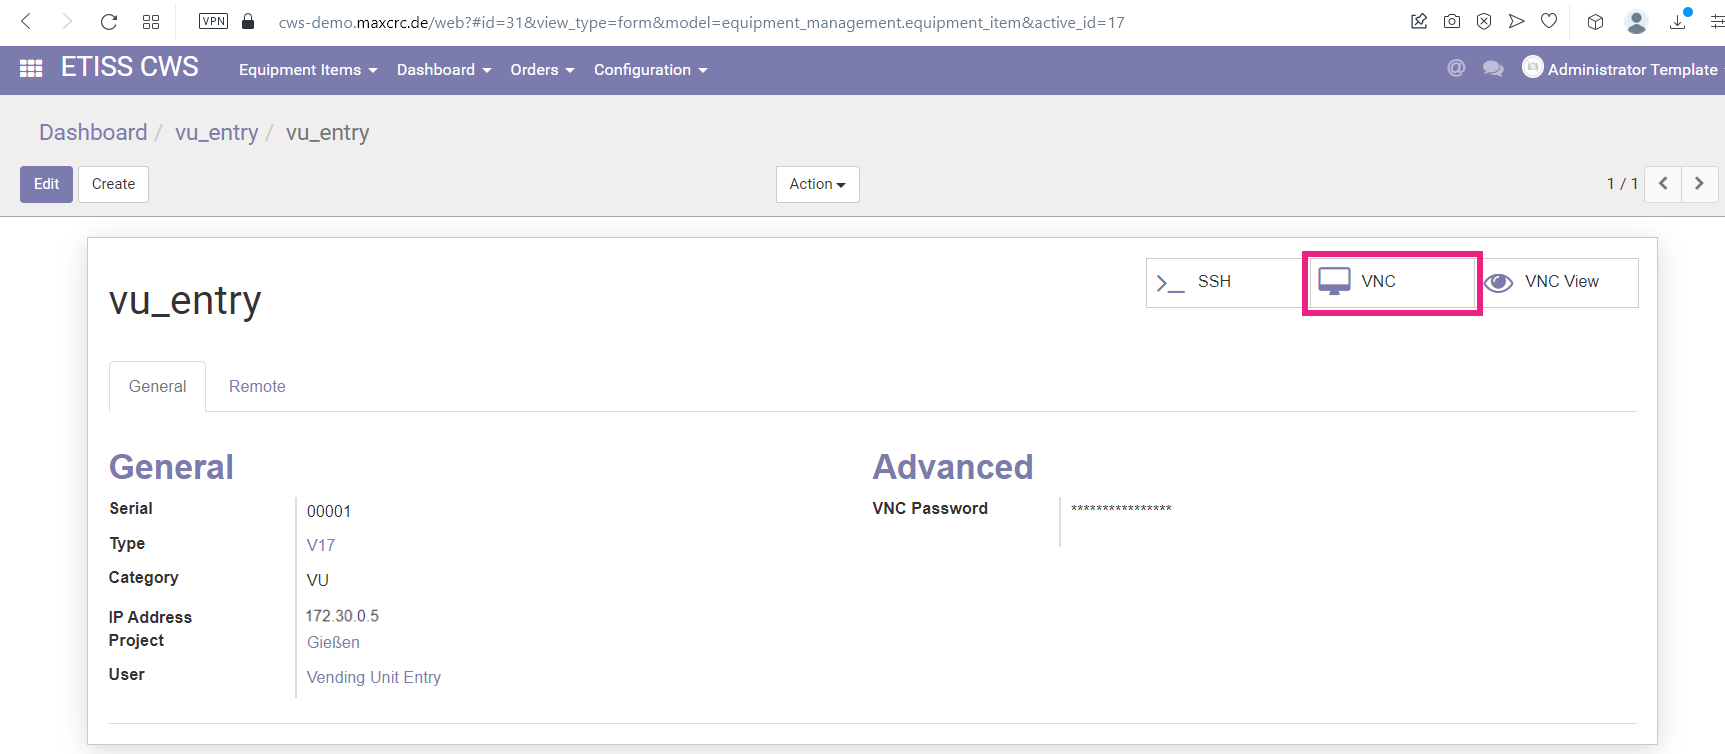
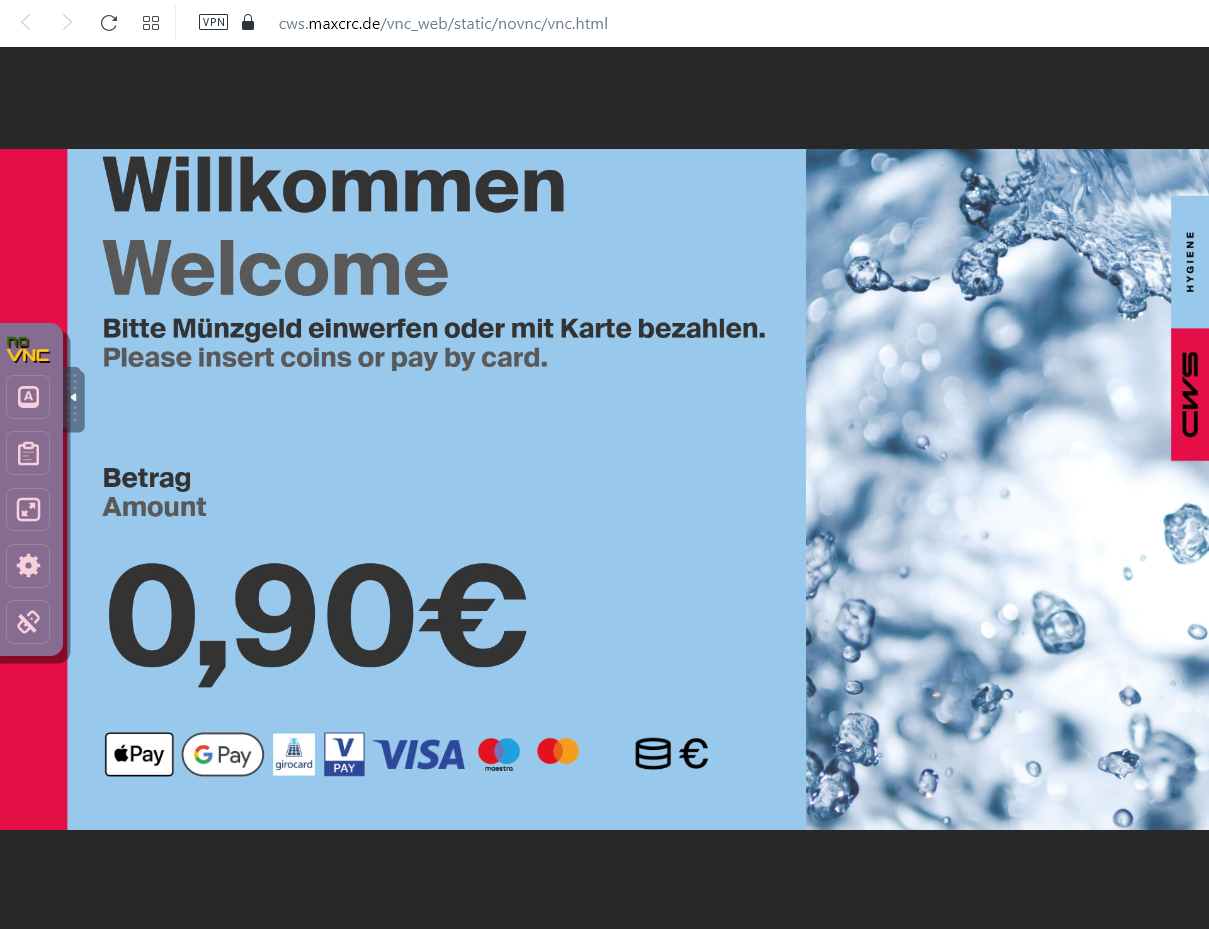
VNC button allows you to view and control the Vending Unit's screen via VNC protocol interactively. It allows to simulate buttons press, navigation and other aspects of the software.
To do this, typically you don't need to enter any additional data. Just press the button and you'll see VU's screen in a separate browser tab. After that you can perform necessarry operations.
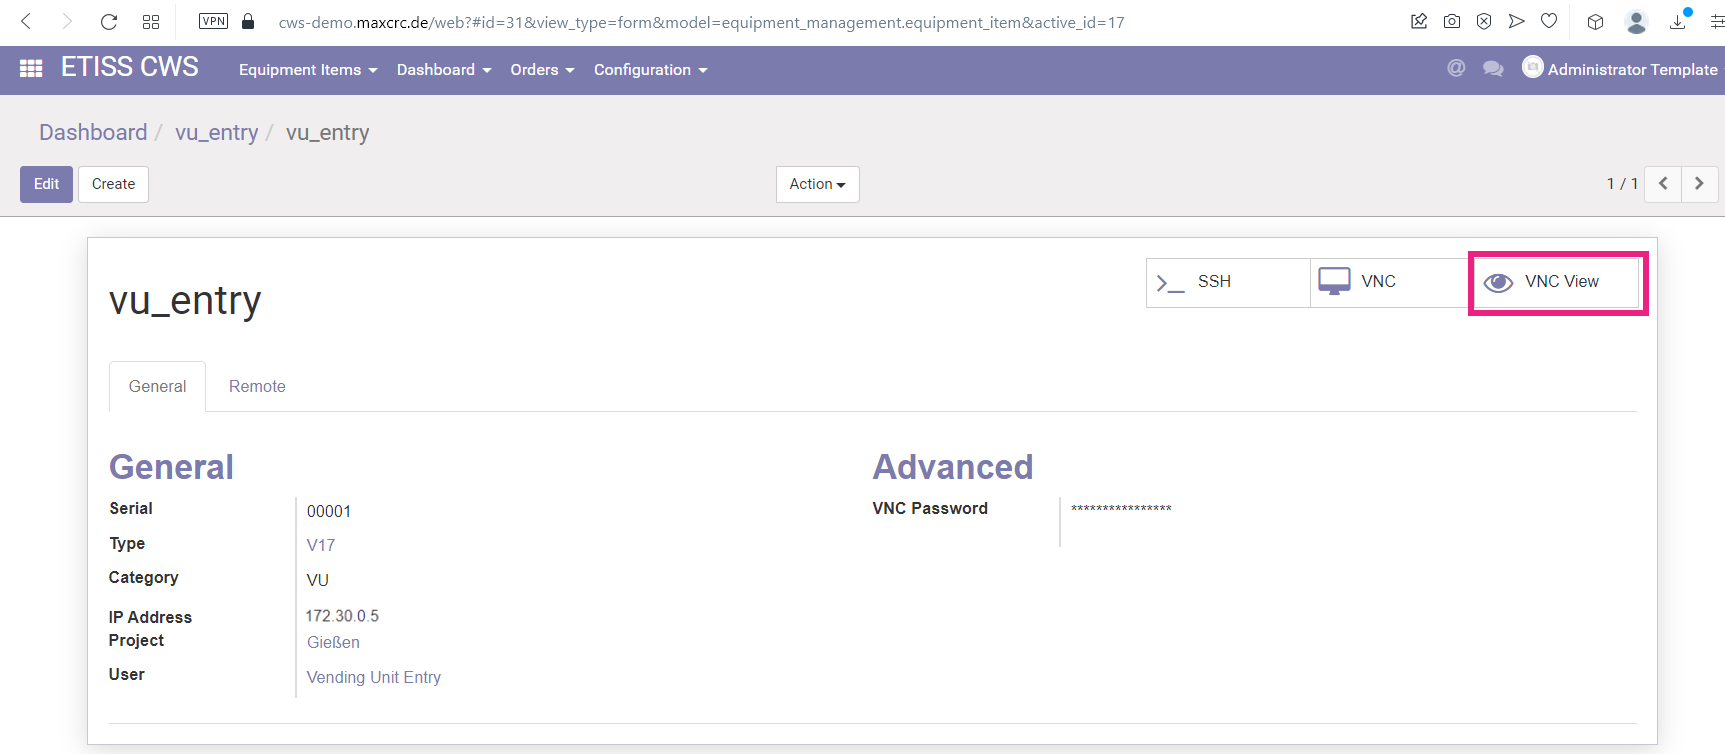
VNC View[Bearbeiten | Quelltext bearbeiten]
This is basically the same as VNC only in view-only mode. You won't be able to simulate navigation or press any buttons. Use this if you want to safely observe what's happening on the VU's screen.
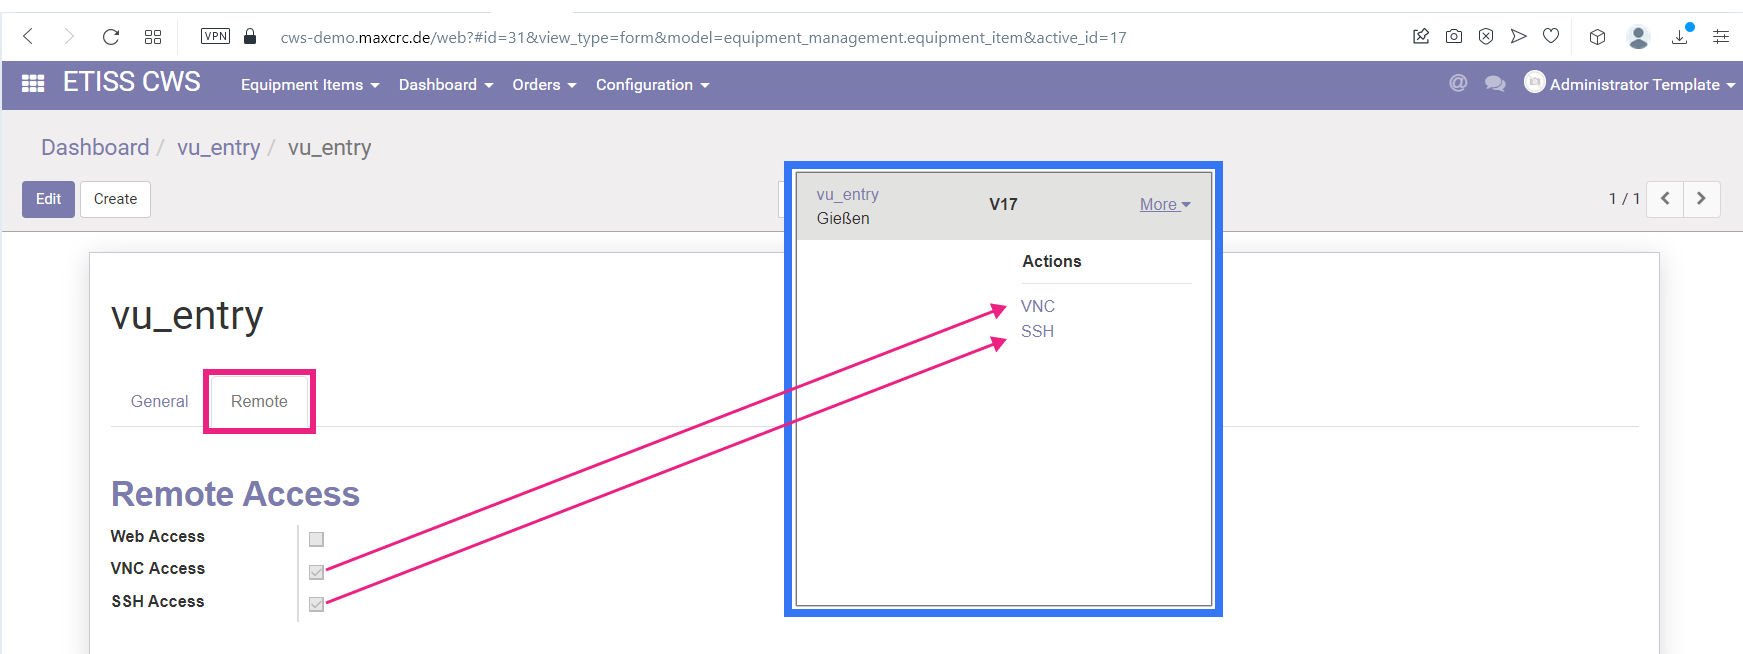
Remote tab[Bearbeiten | Quelltext bearbeiten]
On this tab you can control which remote control buttons are displayed on the VU instance block.
USER MANAGEMENT[Bearbeiten | Quelltext bearbeiten]
Available access levels[Bearbeiten | Quelltext bearbeiten]
The system has 3 access levels:
- Cashier - vu_cashier_template: Works with money, has limited access to other funcitons of the system.
- Service - vu_service_template: Maintains the equipment and can control it's various aspects.
- Administrator - vu_admin_template: Has admin privileges and addess to all functions of Etiss CWS system.
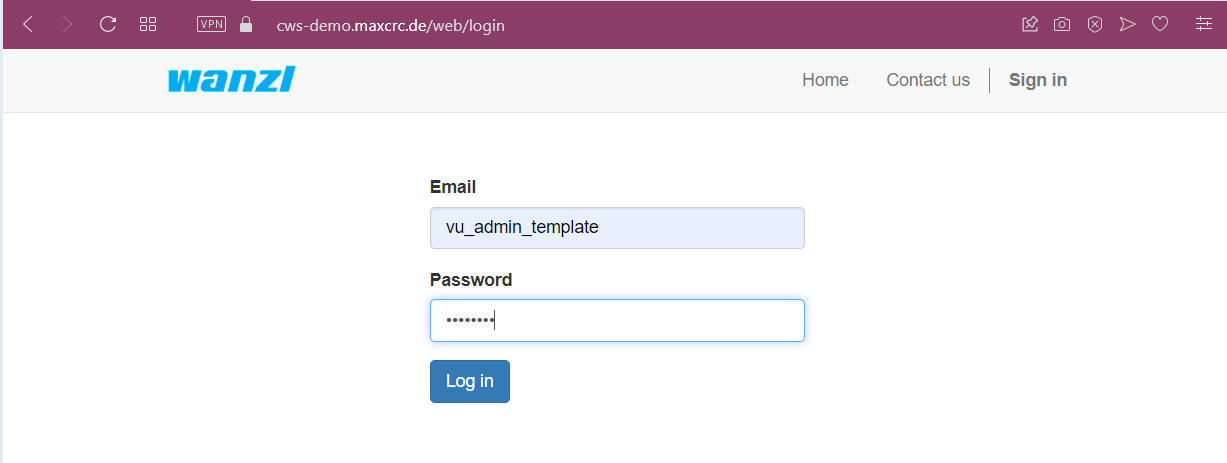
To login into the system using any of these roles, open the login page, enter desired user login (email), eneter password and click Login.
Creating a new user[Bearbeiten | Quelltext bearbeiten]
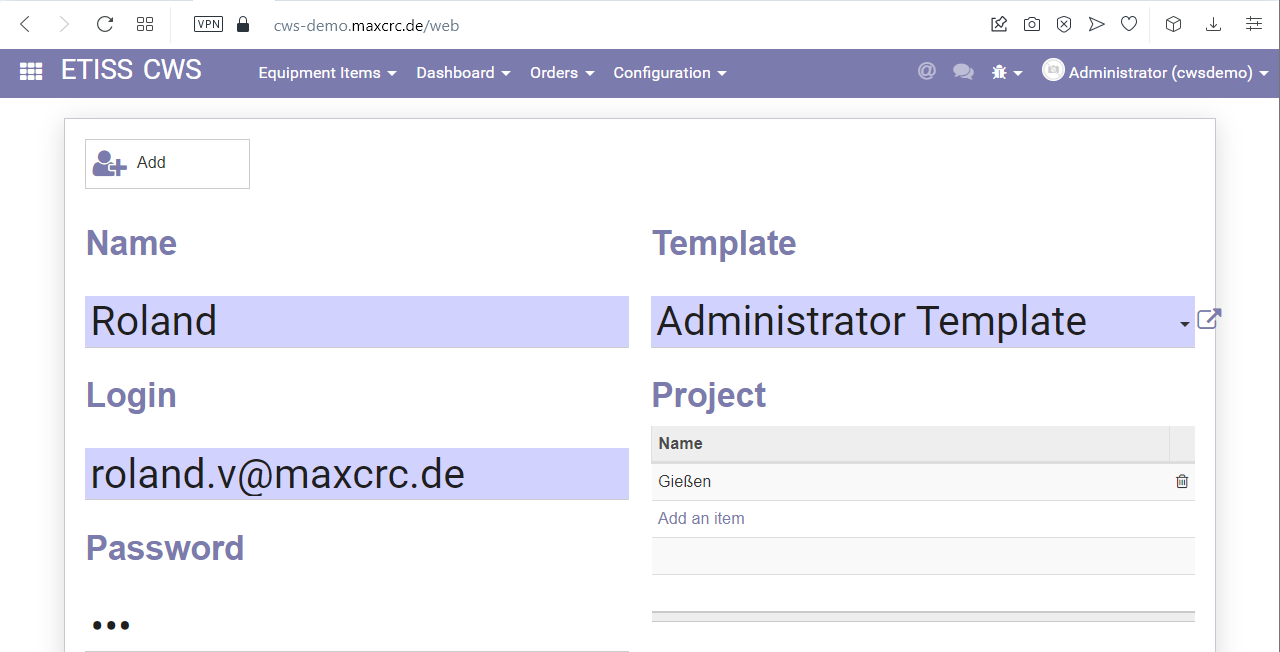
To create a new user navigate to Etiss CWS -> Configuration -> Partner registration menu and fill in following fields:
- Name: User's name
- Login: A login which is going to be user to log in to the system.
- Password: User's password
- Template: Access level template (Cashier template - only works with money, Service template - takes care of the Units, Administrator template - Local GOD.)
- Project: User will see and be able to work only with equipment items that belong to selected here projects.
Assigning a project to a user[Bearbeiten | Quelltext bearbeiten]
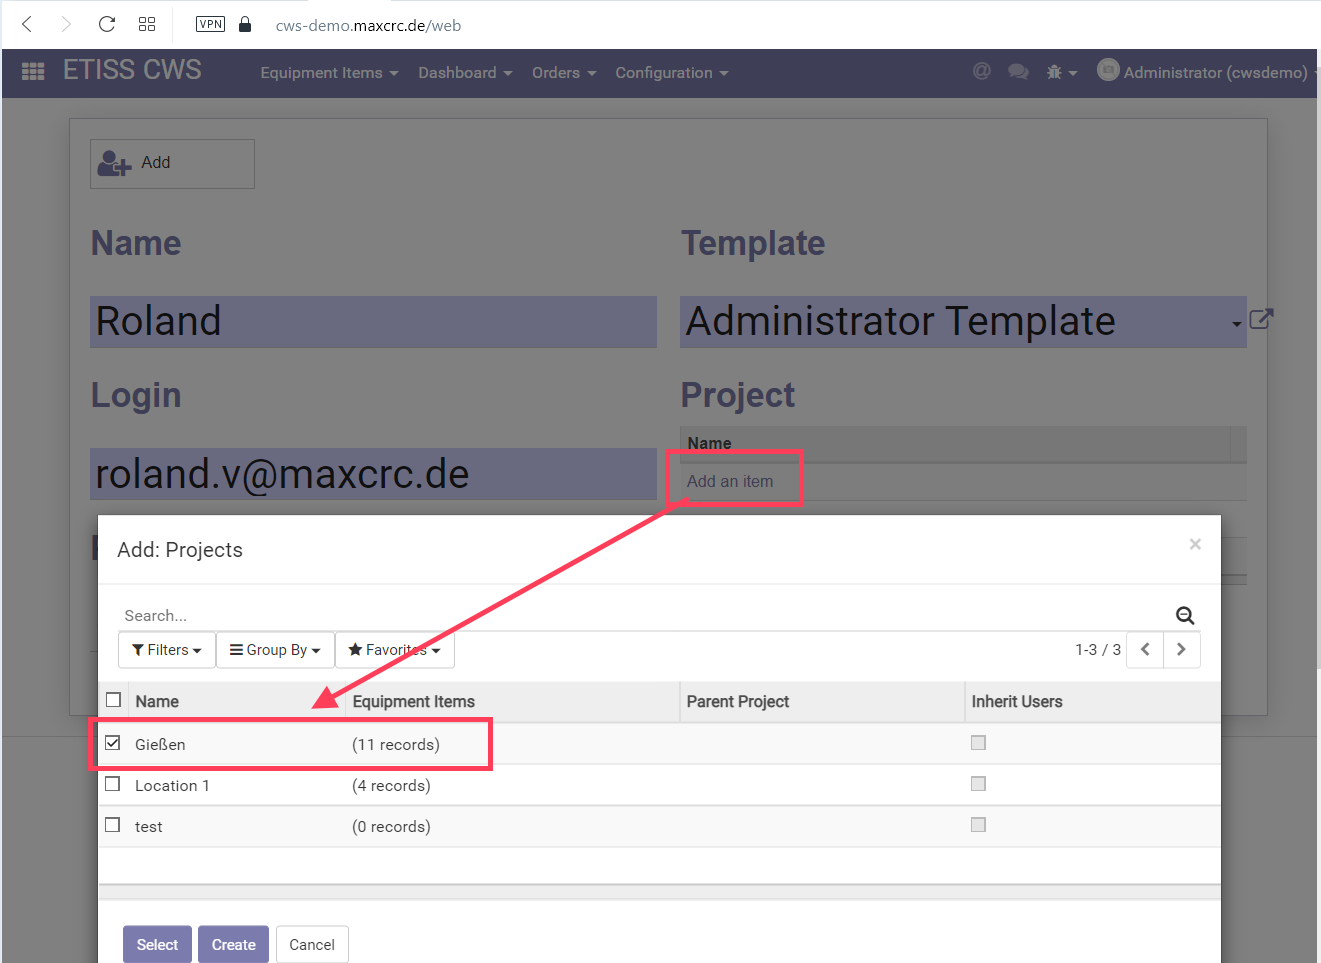
To assign a project while creating a new user, in the Project area click Add item and select the required project and click Add button. If you've already created a user, you can open a project where you'd like to add the user, then select Users tab and add a user there.
TICKETS[Bearbeiten | Quelltext bearbeiten]
Ticket generator[Bearbeiten | Quelltext bearbeiten]
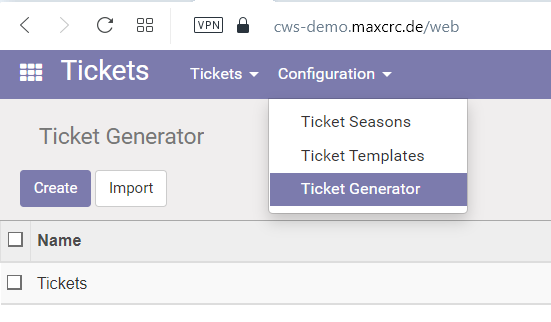
Ticket generator allows to generat a specified number of tickets and print them out if needed. This feature can be used, for example, in case if you need to create a lot of free tickets and give them to people.
To open ticket generator, navigate to Main menu -> Tickets -> Configuration -> Ticket generator
!picture604-1.png!
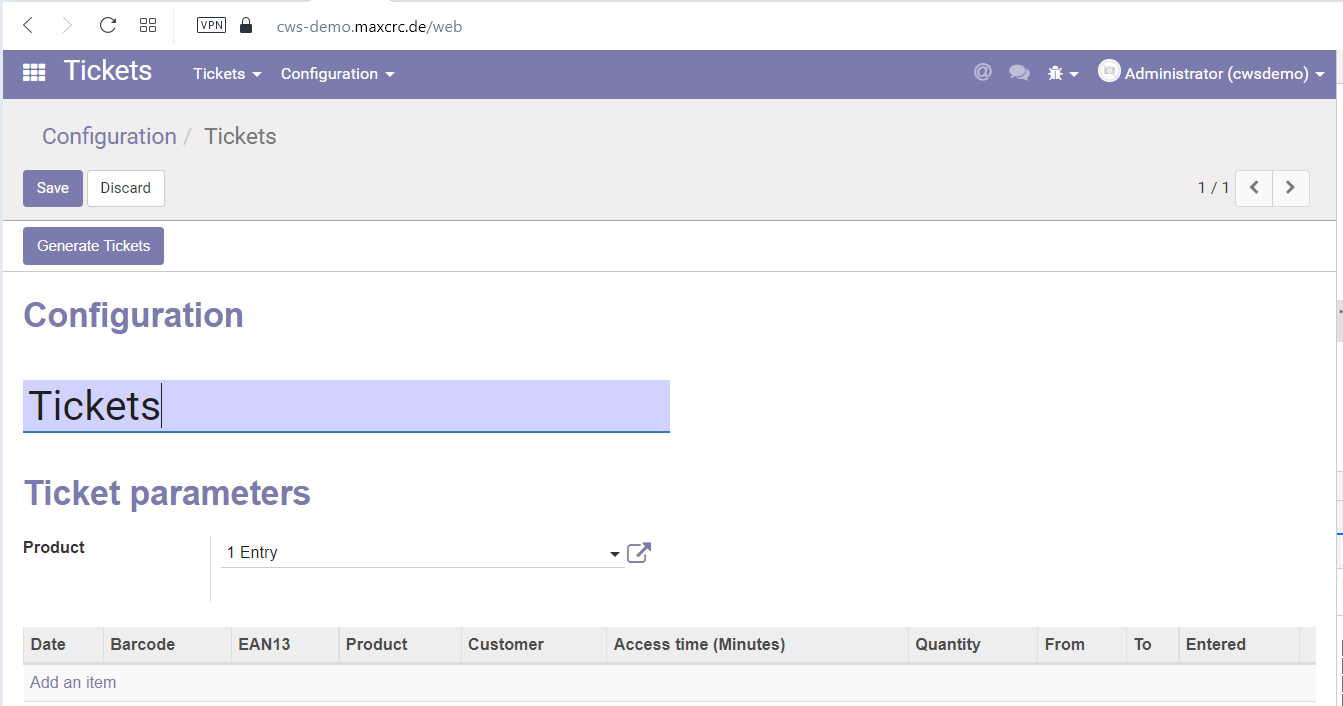
Next, fill in the following fields:
- Name: The name of the generated tickets (not printed anywhere, just a display name)
- Product: The product based on which tickets will be generated. (Ex: to generate free tickets, you need to select free product here)
click Save, and after that click Generate tickets button.
Select the number of tickets to generate and click Generate
Printing generated tickets[Bearbeiten | Quelltext bearbeiten]
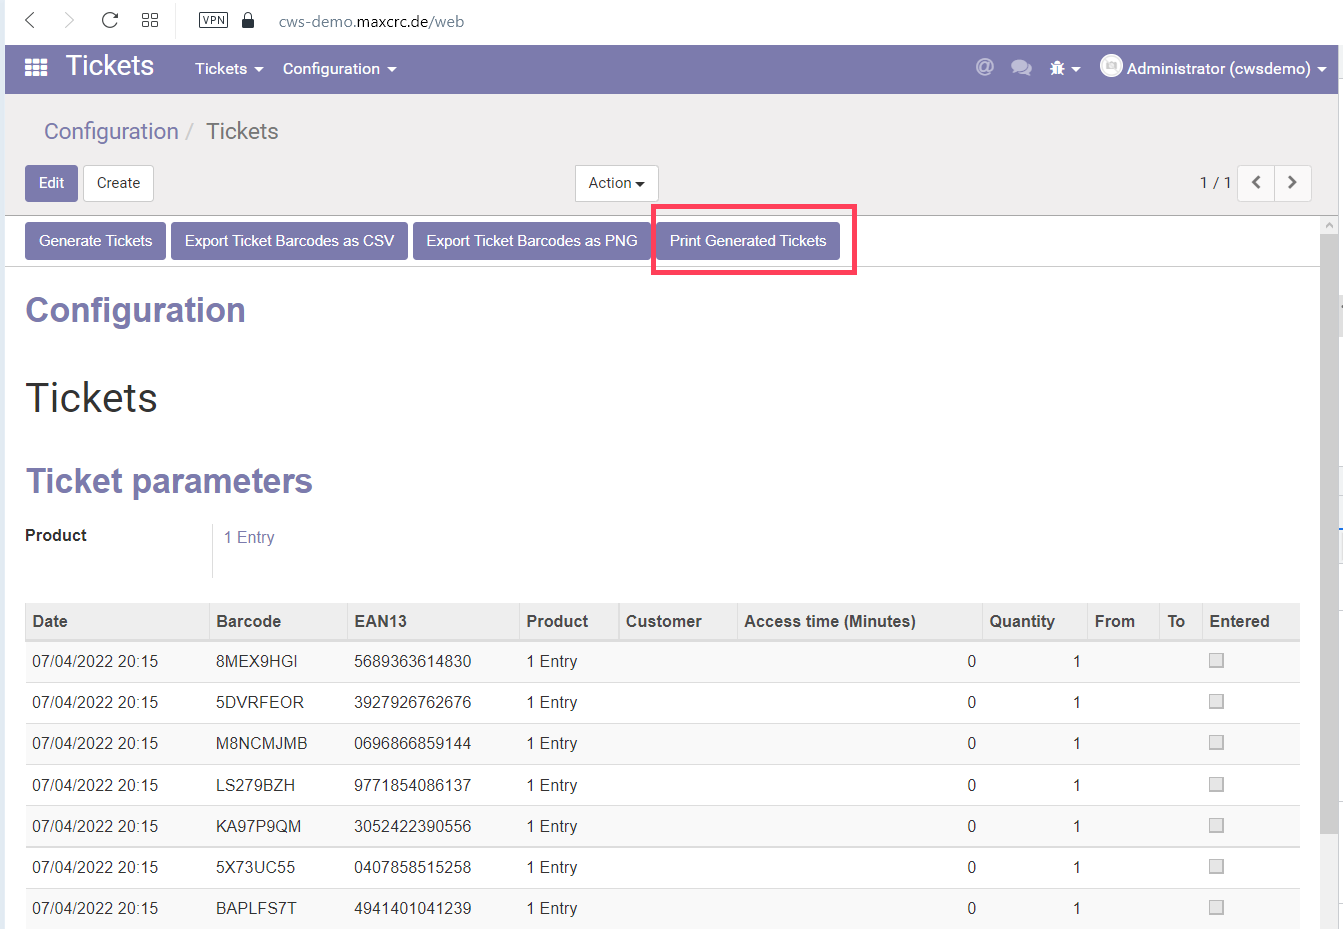
Once tickets were generated, you can print them out by pressing Print generated tickets button.
RFID CARDS[Bearbeiten | Quelltext bearbeiten]
RFID cards generator[Bearbeiten | Quelltext bearbeiten]
RFID card generator can be used with reader to mass register RFID cards. An operator scans the card with the reader, these cards then being added to the list of cards separated by the line break, space, comma, or semicolon. And finally, after selecting the card type, these cards then can be registered in the system in one click.
Generating RFID cards[Bearbeiten | Quelltext bearbeiten]
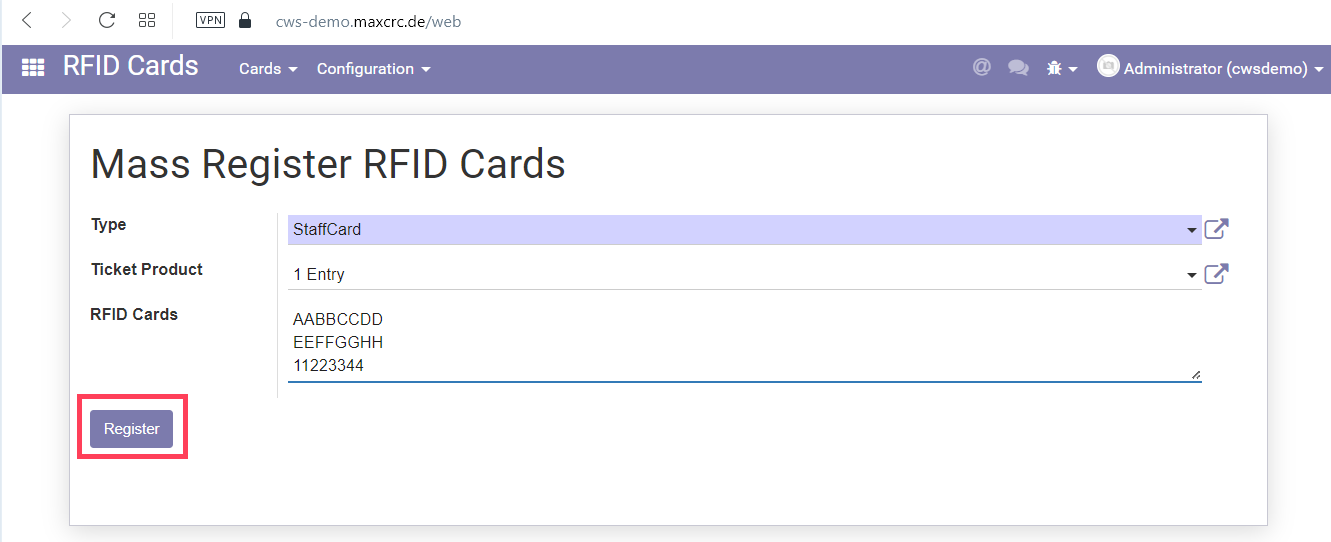
To use RFID cards generator go to RFID cards -> Configuration -> Mass register and fill in the following fields:
- Type: The type of RFID card to be registered
- Ticket product: The product on which the linked ticket will be based
- RFID cards: An array of RFID cards to be registered. These can be obtained from card reader or pasted via clipboard manually. The system understands the following card separation symbols: line break, space, comma, or semicolon.
Assigning a partner to generated card[Bearbeiten | Quelltext bearbeiten]
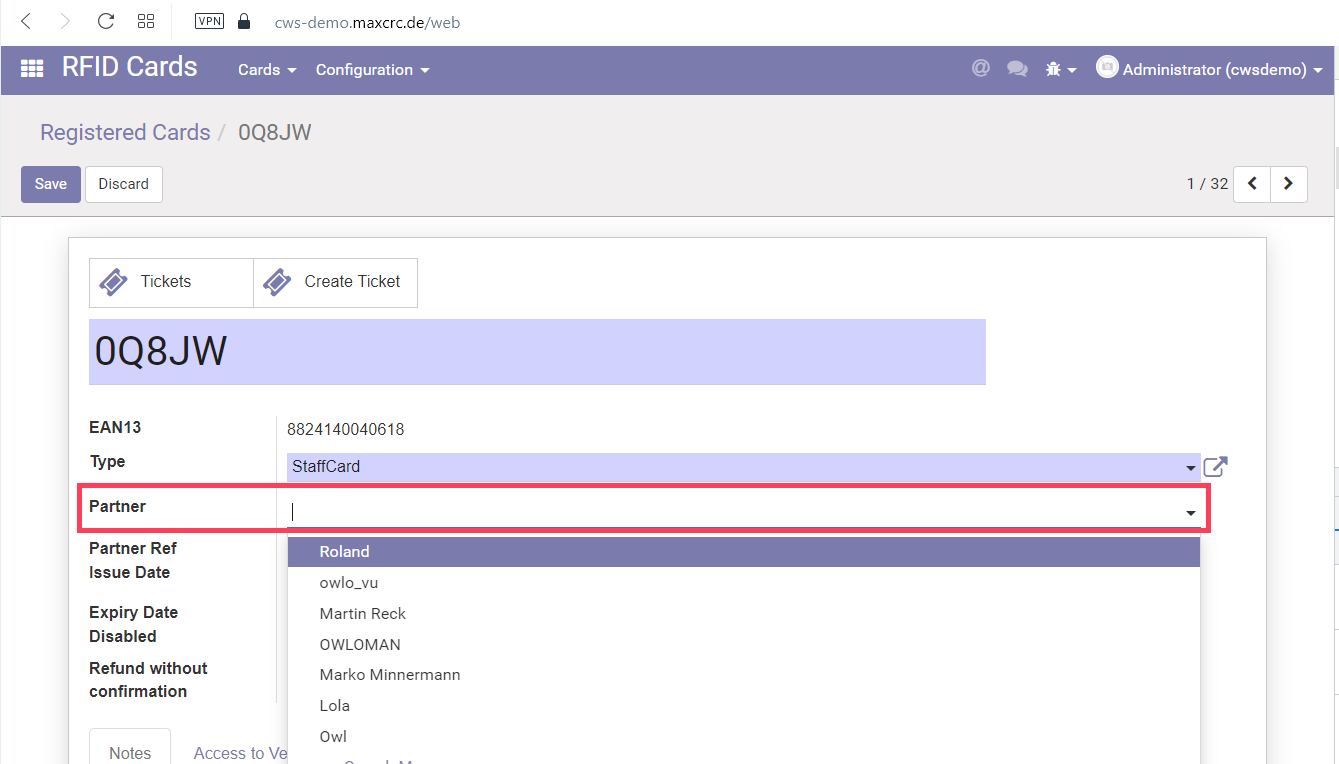
After all necessary cards were successfully generated you can assign a previously created partner to them. This can be done by opening a card and selecting a partner.
From the menu RFID cards -> Cards -> Registered cards open any card, click Edit and in the Partner field select desired partner.
Now this card is associated with a partner.
Assigning a card to Vending Unit[Bearbeiten | Quelltext bearbeiten]
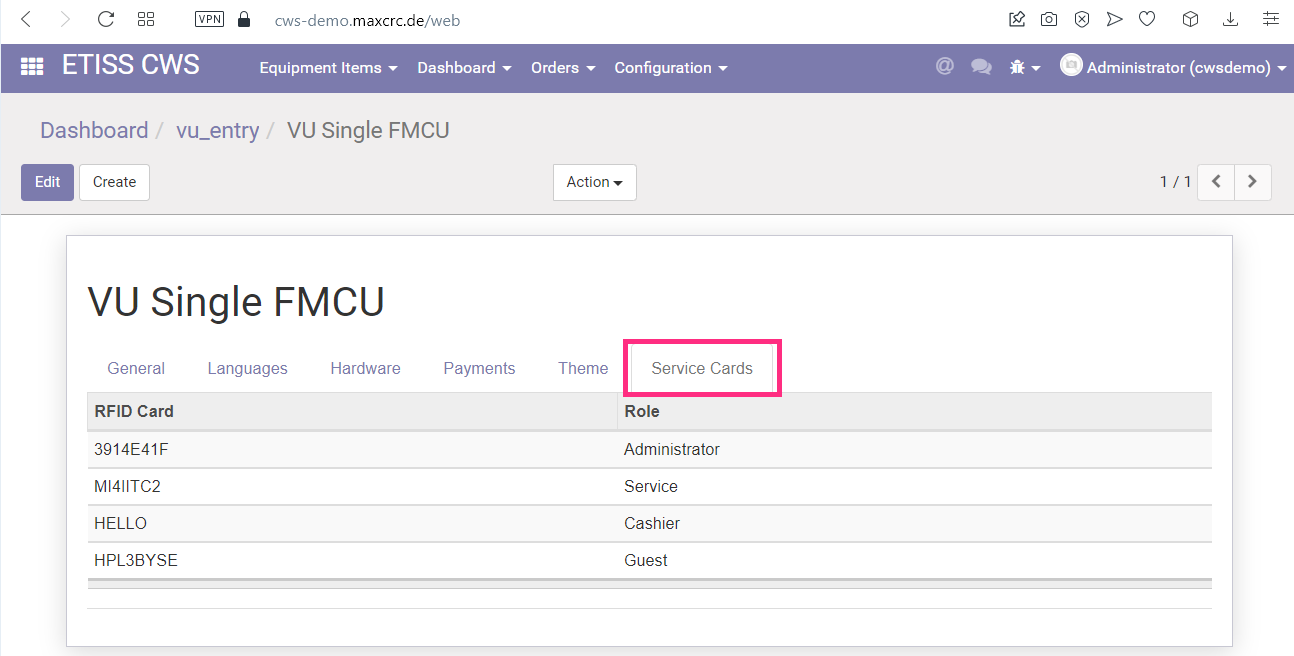
After assigning a partner to a card, this card can be linked to the vending unit with a specified access level. To do this, login as Administrator, find and open a vending unit to which you need to link a card, and click on it's configuration settings. In this case it's VU Single FMCU link.
On the Service cards tab you can add cards and specify their corresponding access level.
Assigning a card to project[Bearbeiten | Quelltext bearbeiten]
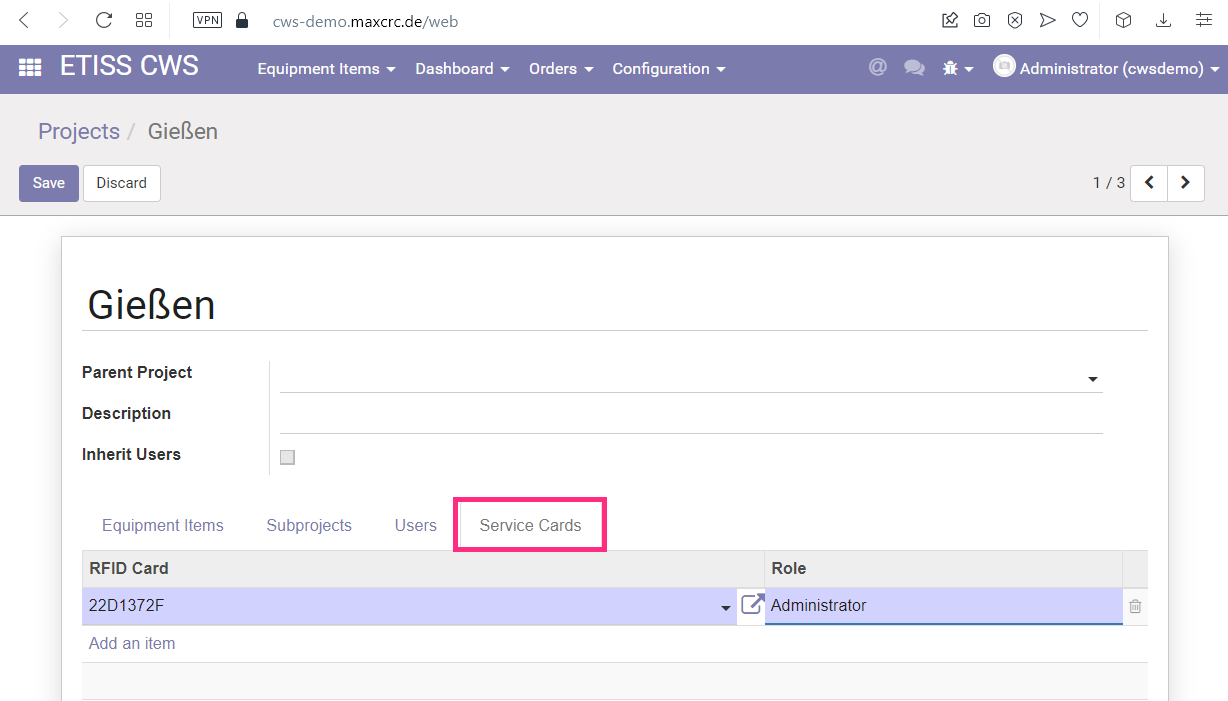
The card also can be linked to a project. But you have to keep in mind that assigning a card to a particular VU configuration has precedence over assigning it to the project.
To assign a card to a project, go to the Etiss CWS -> Configuration -> Projects menu, select a project and on the Service cards tab link a card with corresponding access level.
PRINTING TEMPLATES[Bearbeiten | Quelltext bearbeiten]
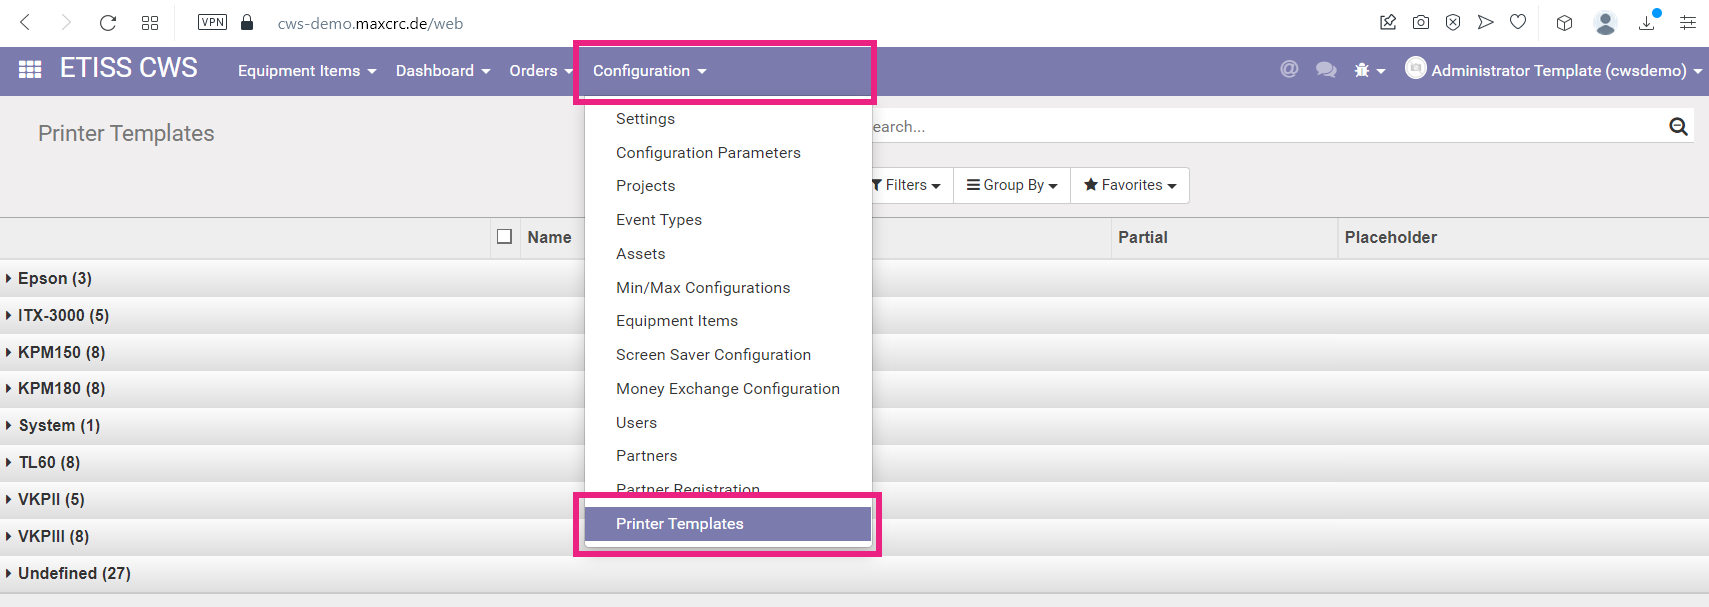
CWS Administrator has access to and can edit all printing templates for supported printers. To open the list of templates navigate to the ETISS CWS/Configuration/Printer templates menu:
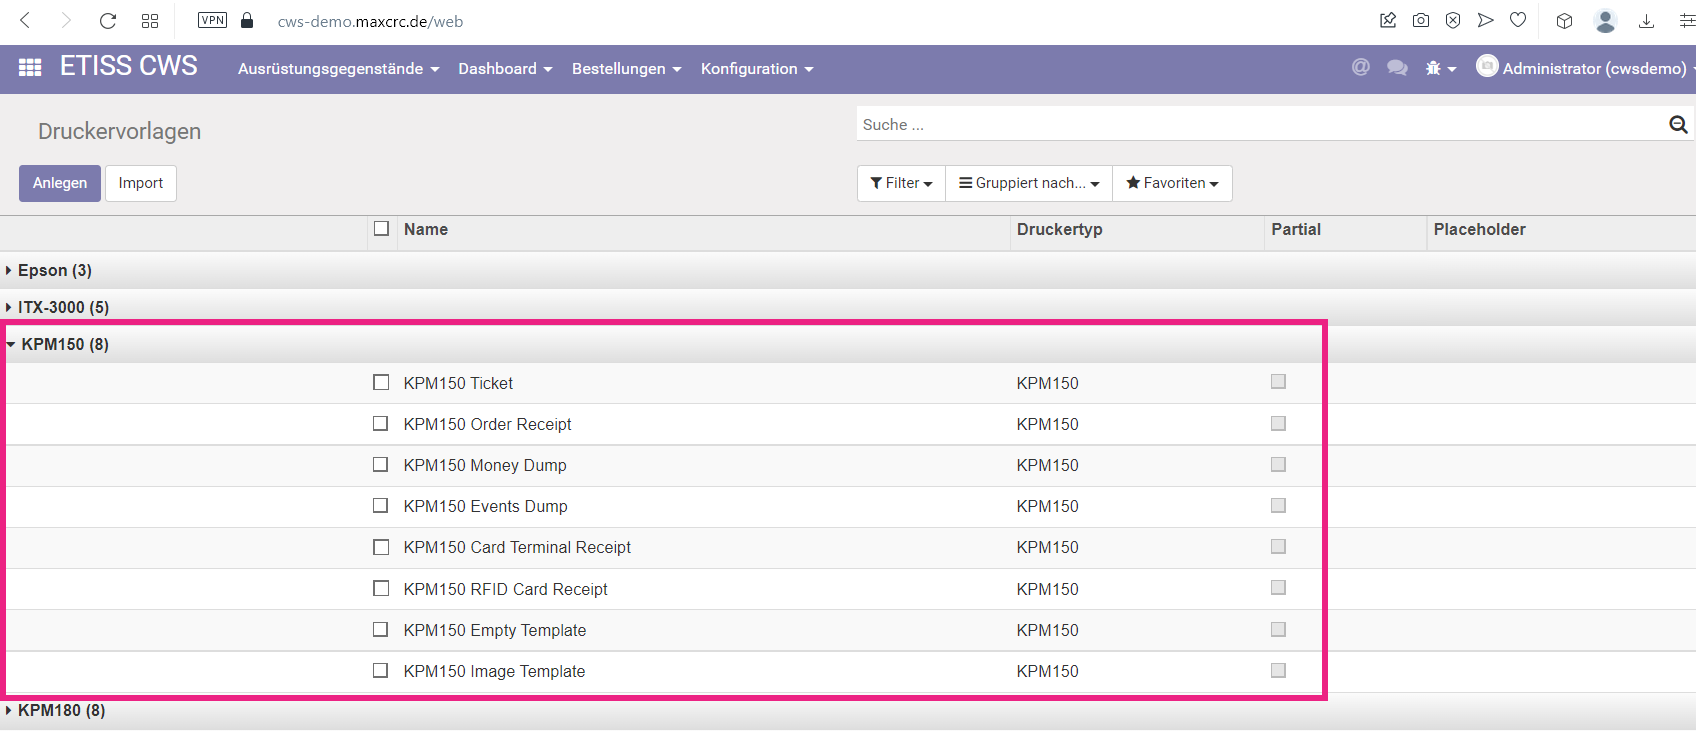
This menu displays all available priniting templates in the system. All templates are groupped by the printer type.
Finding your printer model[Bearbeiten | Quelltext bearbeiten]
If you need to change something in one of the printing templates, you need to understand which printer model is being used in your Vending Unit. Typically a Vending Unit is assigned one printer model and it can't be changed from backend. So, you need to look at the hardware for finding which printer model is used.
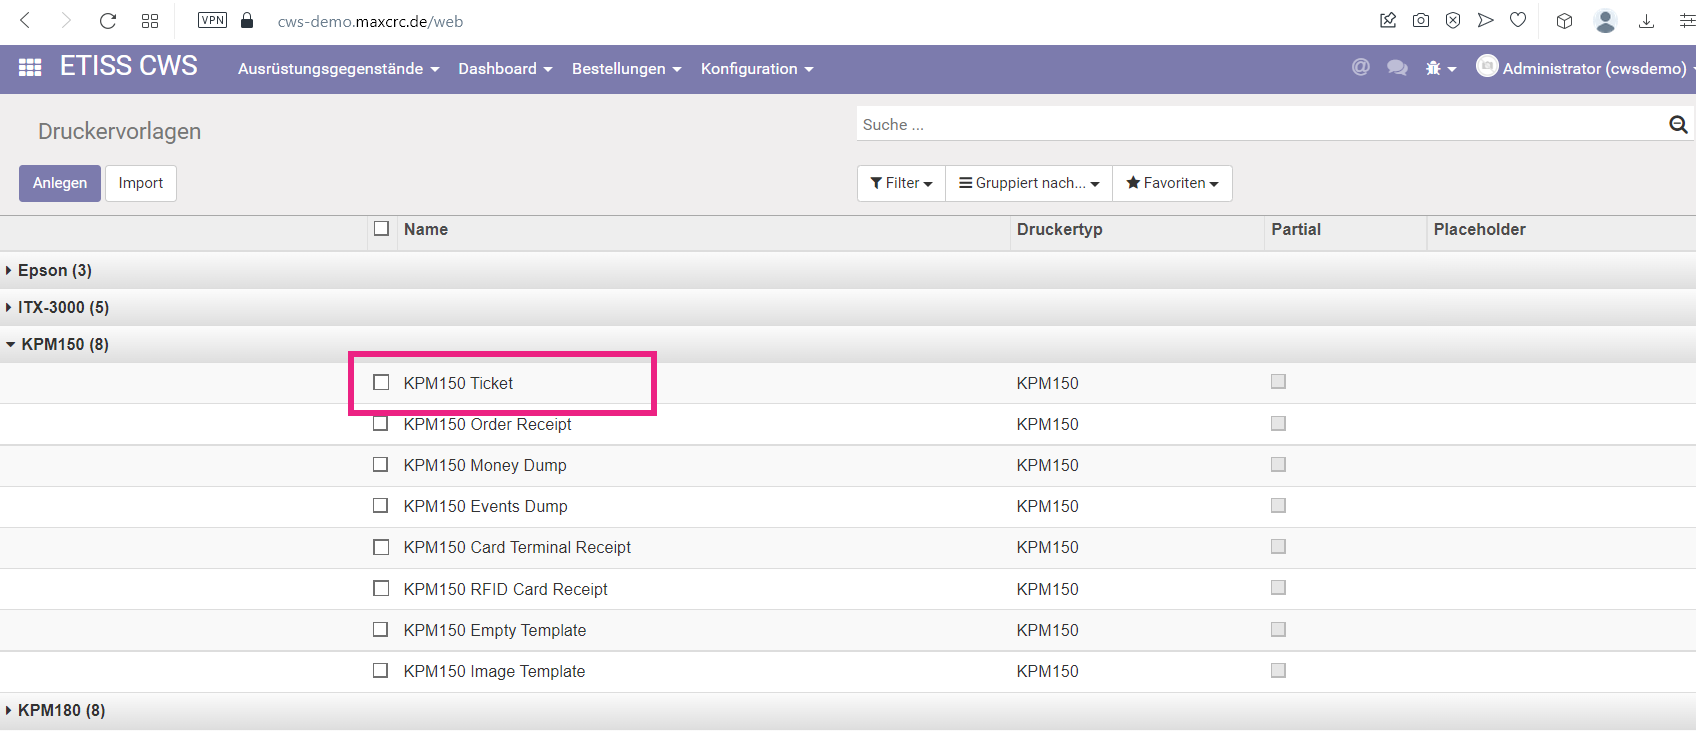
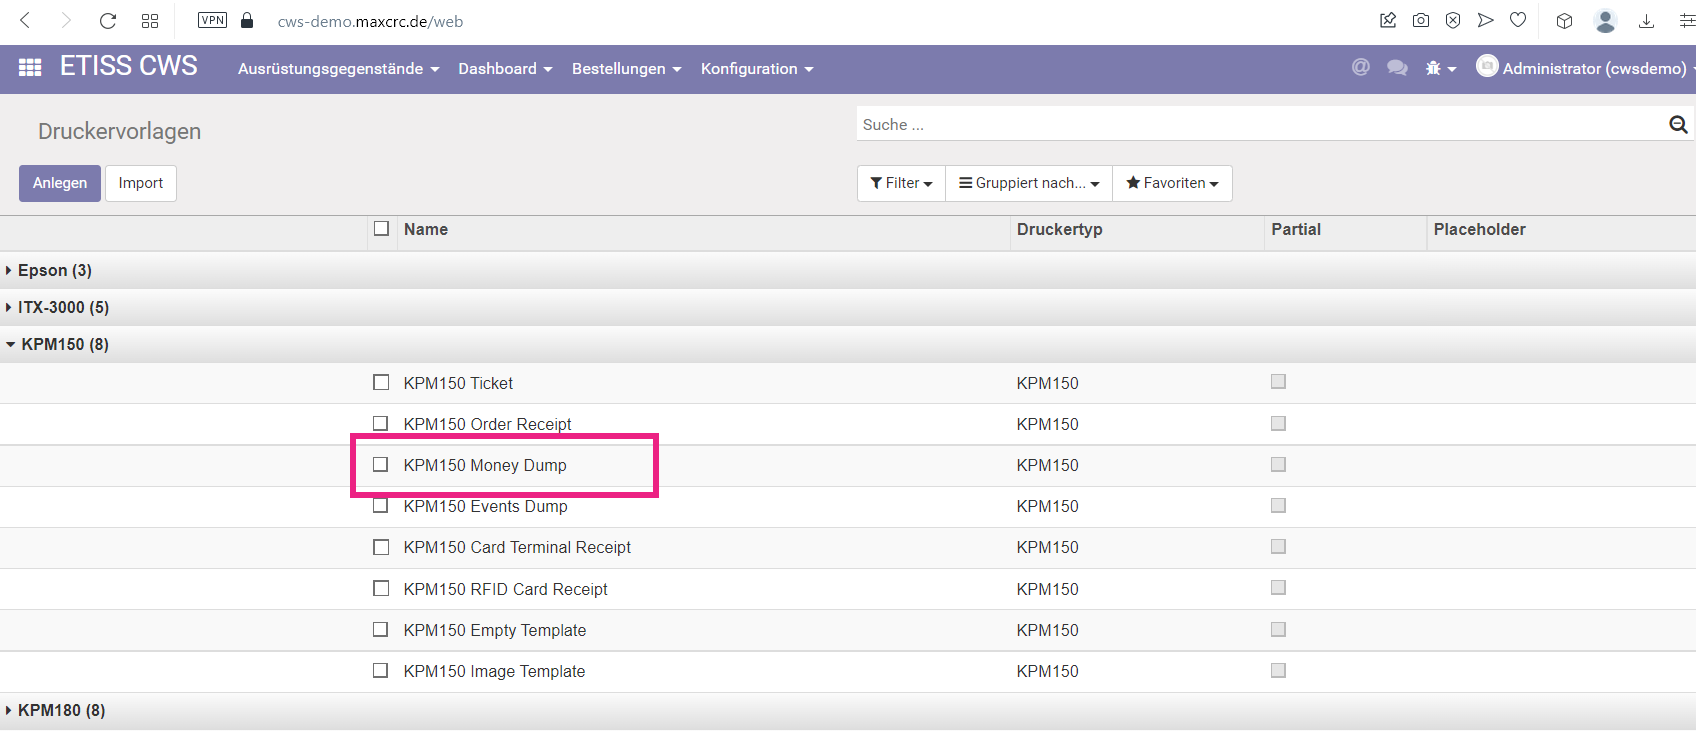
Once you've found out which printer model is used for the particular VU, you can find all printing templates in corresponding section of the template list. For example, if your printer model is KPM 150, all reports that you can change are located in KPM 150 section:
Template structure[Bearbeiten | Quelltext bearbeiten]
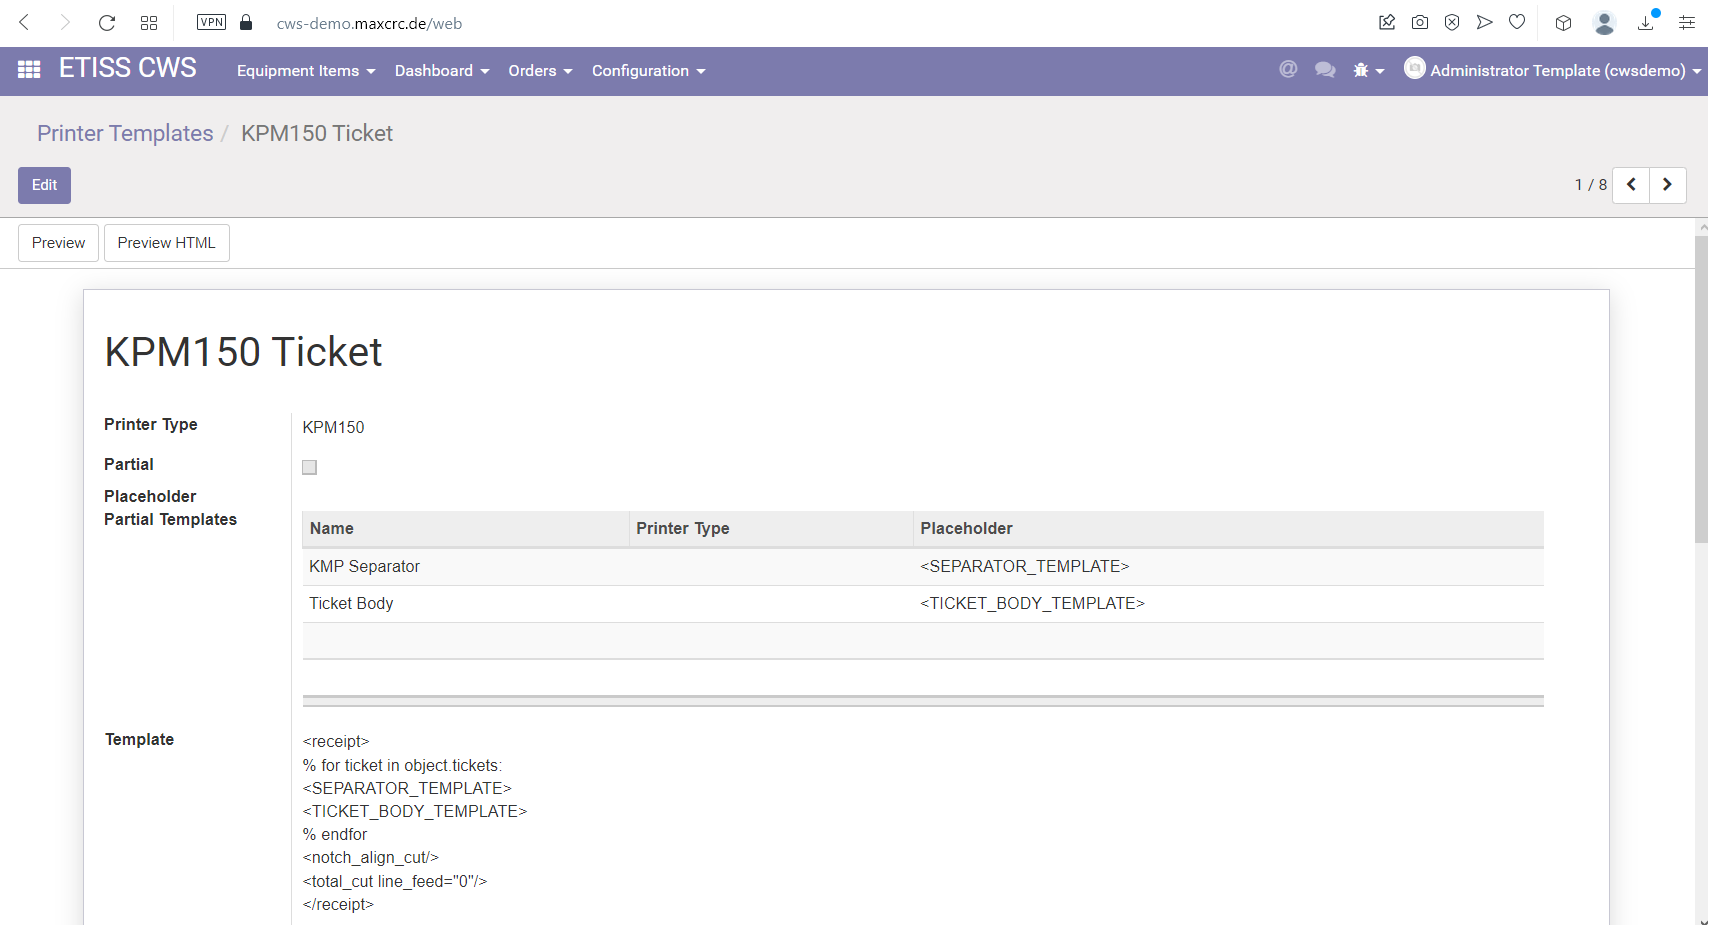
Let's look at the typical printing template. As an example we'll take KPM 150 Ticket template. We'll use KPM 150 printer model throughout this section of documentation.
Each template has a set of properties such as:
- Printer type: The type of the printer to which this template applies
- Partial: This indicates whether this template is a part of another template or not
- Placeholder: A string of text that will be used as a placeholder for insertion of this template into another one
- Partial templates: A list of another templates which are inserted into current one
- Template: The template body
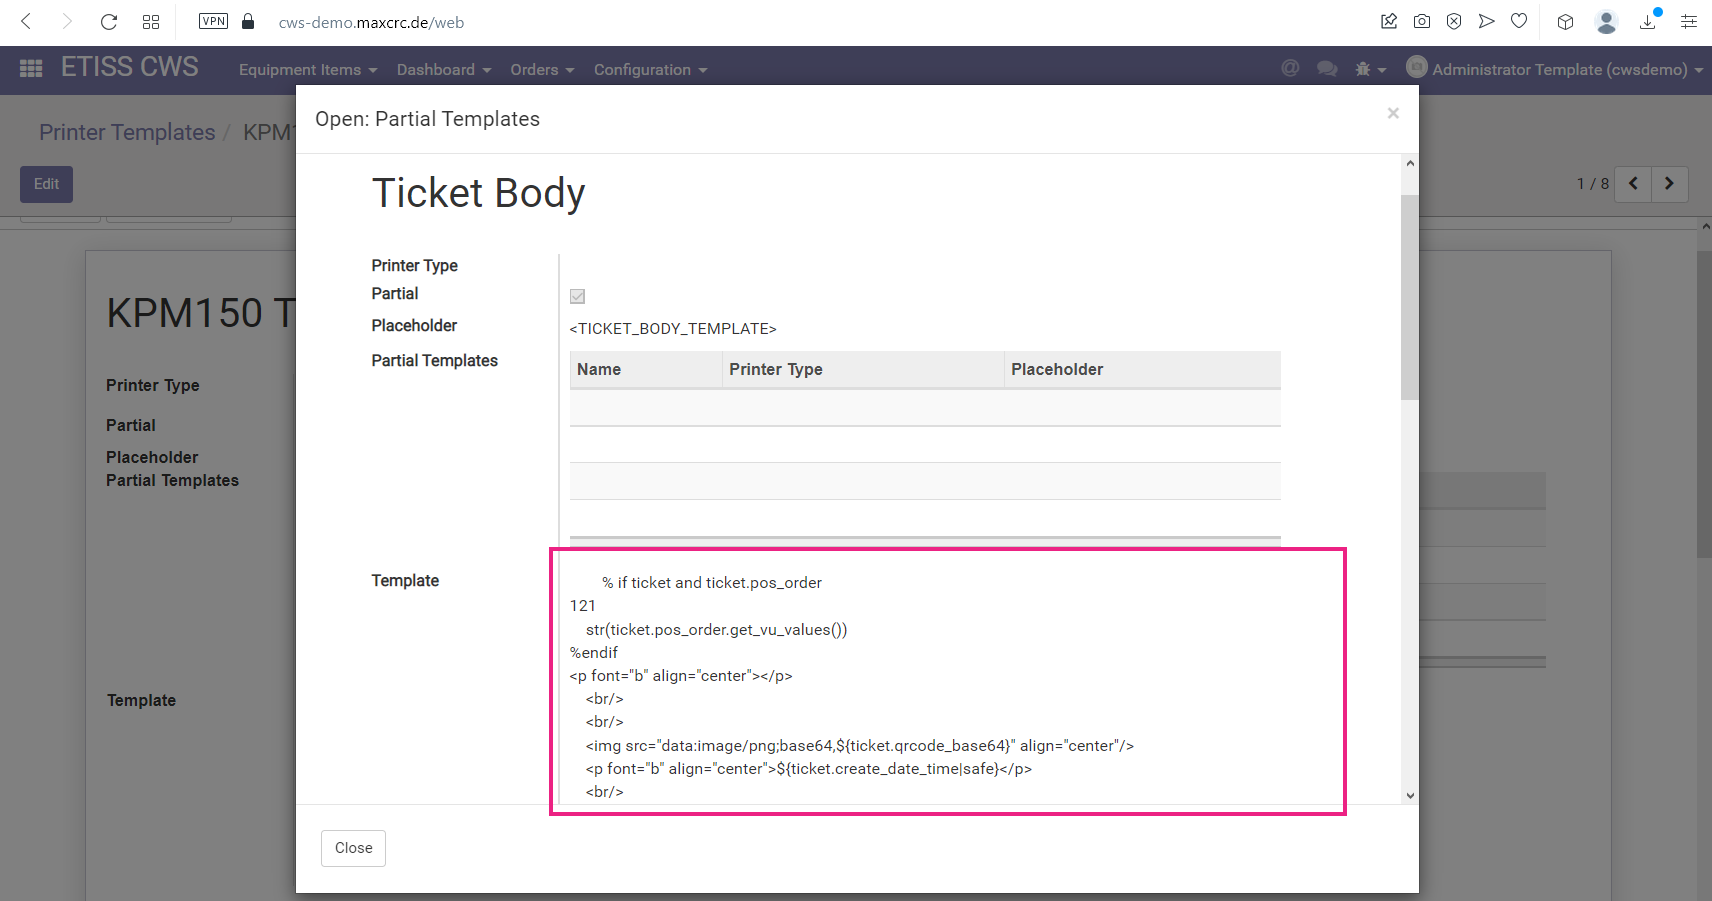
Some of the templates such as Ticket body are used in multiple places across different reports because it's a common part of the template.
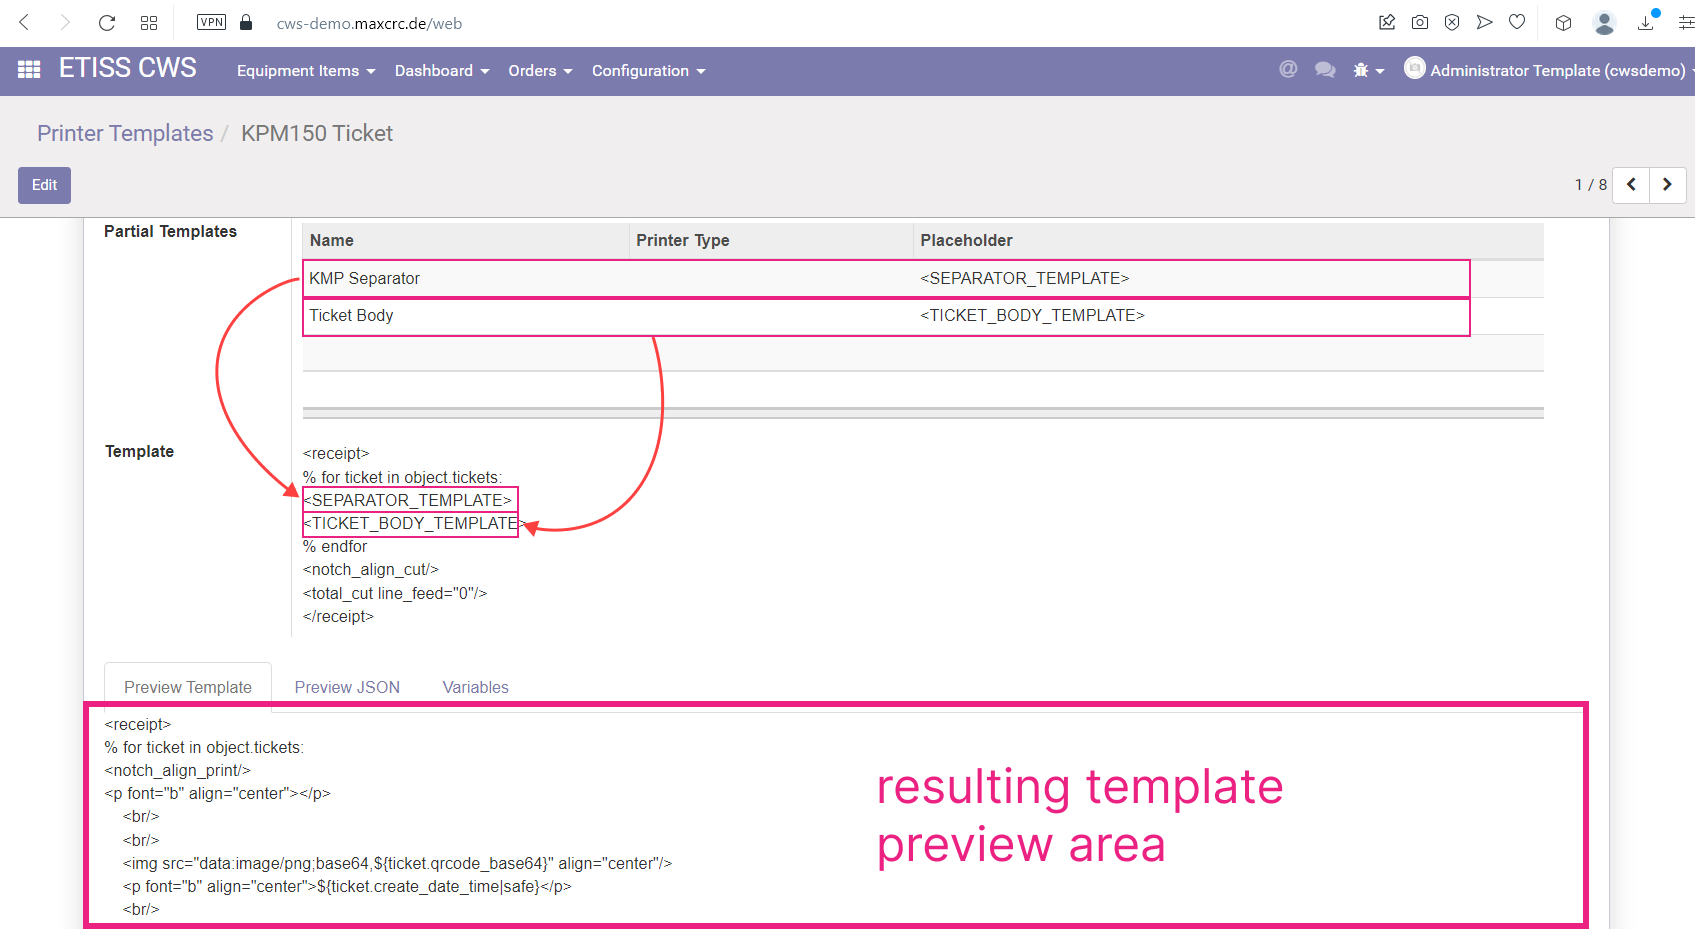 !changing_template_structure.png!
Probably the one template area that's changed most frequently depending on project requirements is ticket body. To change something there, open the ticket body template and in the Template area make necessary chages, then save the template - your changes will be applied.
Ticket template[Bearbeiten | Quelltext bearbeiten]
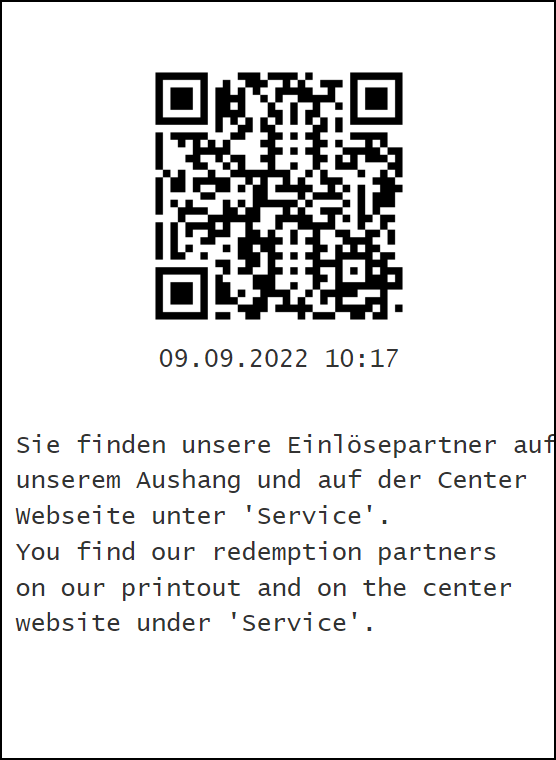
One of the most frequently used templates is a Ticket template. It's used for ticket printing during the purchase process.
!ticket_template_print_example.png!
Order Receipt template[Bearbeiten | Quelltext bearbeiten]
If the customer wants to print a receipt of their purchase, the Order Receipt template is used in this case. In the CWS project order receipts are not used.
Money Dump template[Bearbeiten | Quelltext bearbeiten]
There's a feature of receipt printing when VU door was opened. The Money Dump template is used in this case.
Here's how this template looks on the simulator: 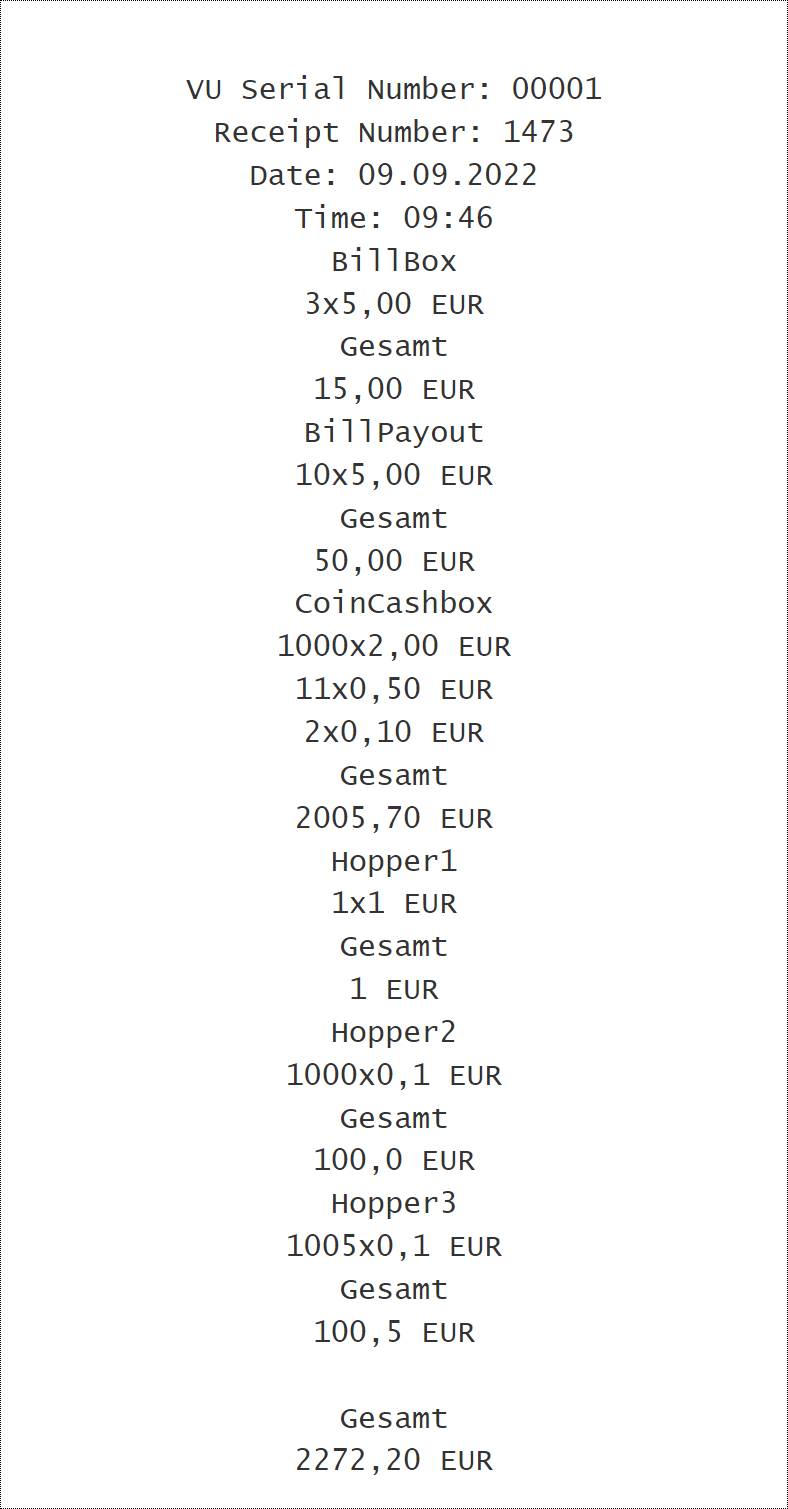
!money_dump_print_example.png!
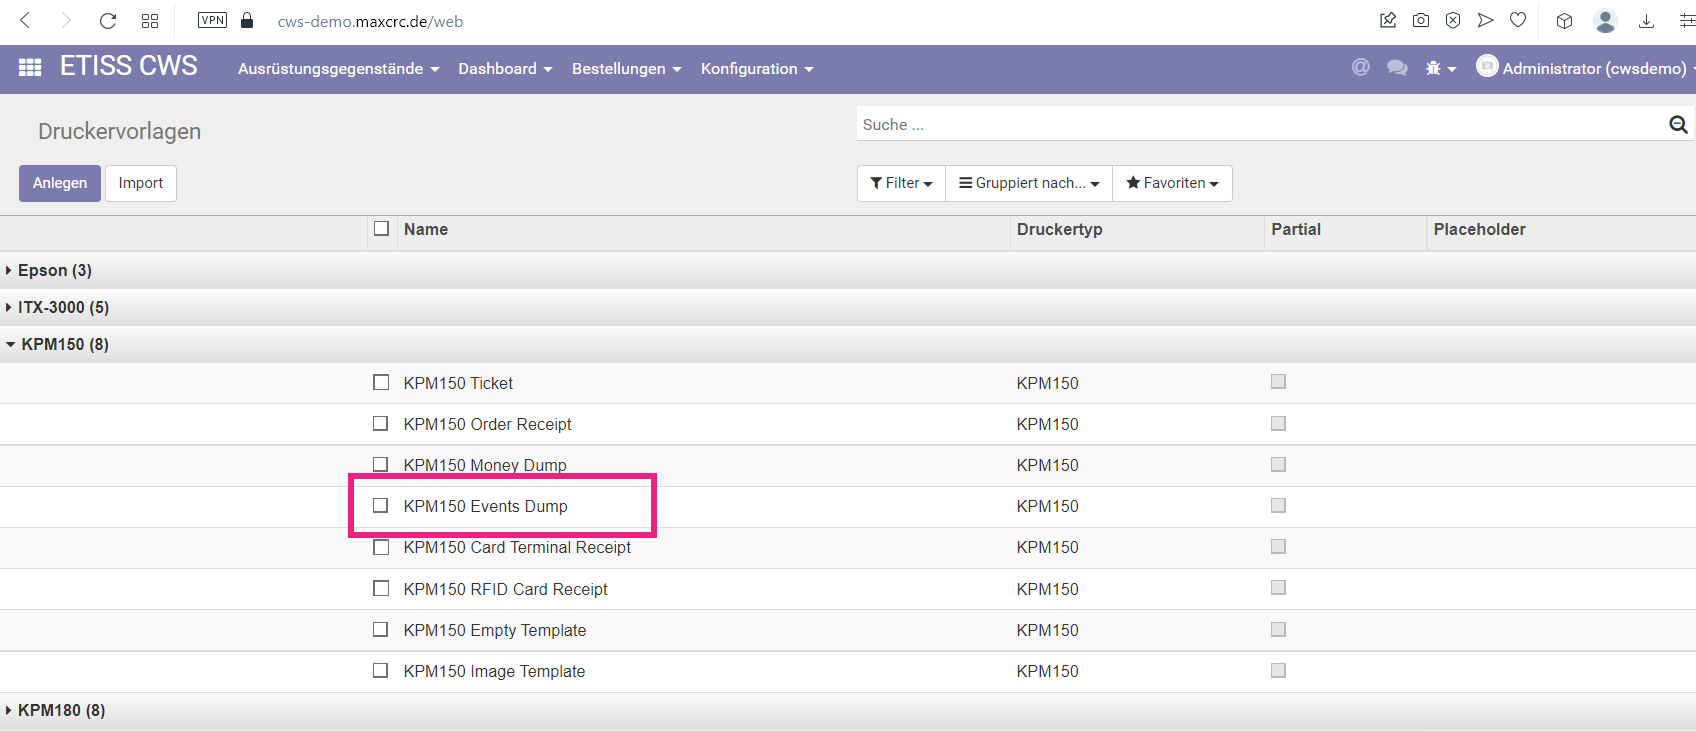
Events Dump template[Bearbeiten | Quelltext bearbeiten]
This template is used to print out all current events that happened on the Vending Unit.
Here's how this template looks on the simulator: 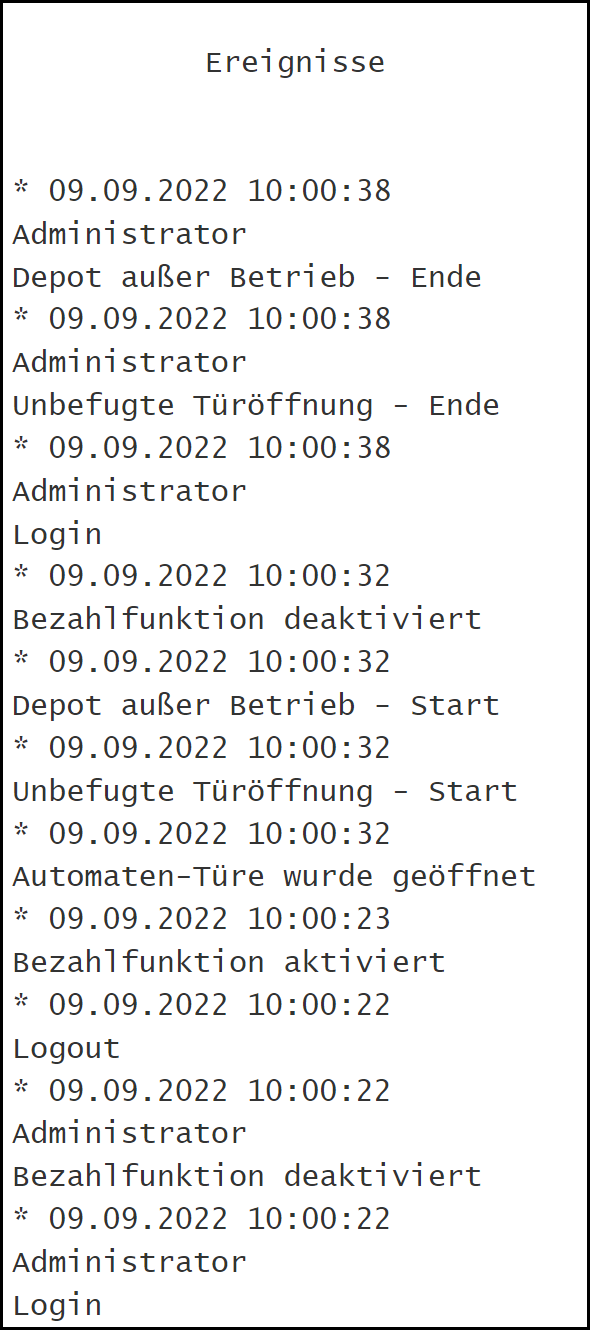
!events_dump_template_example.png!
Card Terminal Receipt template[Bearbeiten | Quelltext bearbeiten]
If the customer wants to print a receipt of their purchase when paying through card terminal, the Card Terminal Receipt template is used in this case. In the CWS project card terminal receipts are not used.
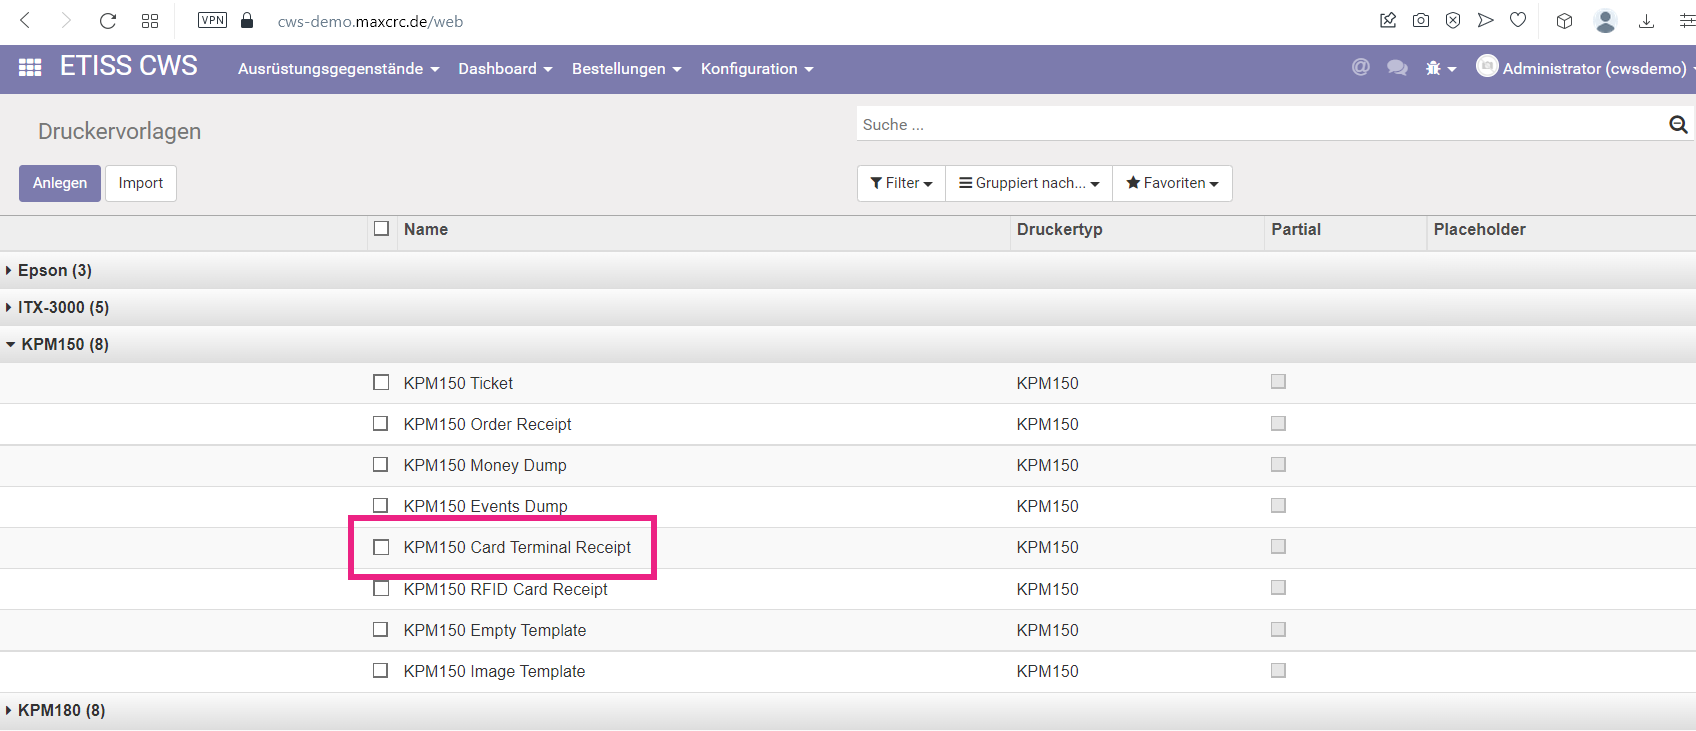 !card_terminal_receipt_template.png!
Additional service templates[Bearbeiten | Quelltext bearbeiten]
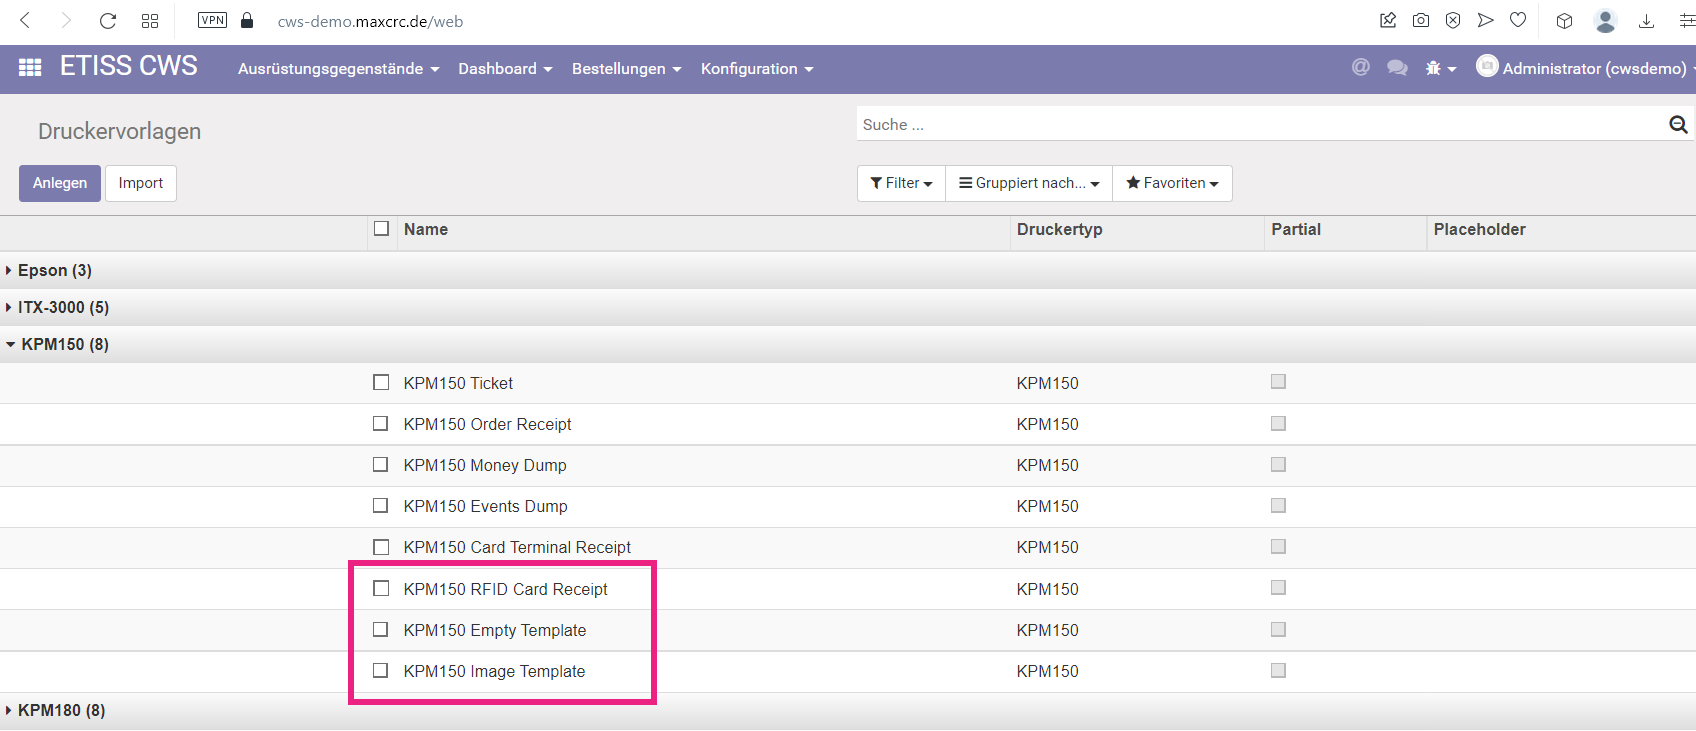
Templates such as RFID Card Receipt, Empty Template, Image Template are used only in special cases for specific projects. They mostly help creating other templates quickly without changing too much code. We won't go in too much detail about them.
{{translate|ETISS CWS ~ User Guide}}


        {{DISPLAYTITLE:ETISS CWS ~ User Guide}}


        ==DASHBOARD==


        ===Main elements description===


        The dashboard is designed to give user a convenient way of managing and controlling equipment items registered in the system. Each dashboard item represents a physical device and consists of the following elements:

[[Datei:etiss-cws-ug-!main_elements.png]]!


        *'''Name''': Equipment item name

        *'''Project''': A project to which this equipment item belongs

        *'''Type''': Equipment item type. In case of Vending Units, this can be either V21 or V7, or other modifications

        *'''Connections''': This link allows to quickly connect ot the item either with ssh, or VNC and check the status.

        *'''Balance''': In case of VU, shows the current amount of money in the Vending Unit.

        *'''Events''': Shows the list of events that have happened recently

        *'''State''': Displays current state of the equipment item


        ===VU state and events===


        When something happens with Vending Unit or other equipment, it sends an event to the server. You can view current status of the unit and events that happened earlier by pressing a button on the dashboard:

[[Datei:etiss-cws-ug-!vu_state.png]]!


        Each event in the list is color-coded and has different weight. More reddish colors have bigger weight and need to be checked immediately. You can see detailed colors description by pressing on the '''Legend''' button.

[[Datei:etiss-cws-ug-legend.png]]!legend.png!


        The events list can be sorted by date, weight, color, etc.

[[Datei:etiss-cws-ug-!events_list.png]]!


        ===Muted events===


        Sometimes you don't want to see a particular event in the list of current events and you want to simply hide it. The ETISS ERP system allows to do that.

        Let's say that we know that our coin cashbox is in overflow state and we don't want to see this event in the list.

[[Datei:etiss-cws-ug-!current_events_listing.png]]!


        To do this, first, open the '''VU - FMCU''' configuration by going into: '''Main menu'''/'''ETISS CWS'''/'''Configuration'''/'''Equipment items''' and select a configuration that your vending unit is currently using. For example, we'll take '''VU Single FMCU''' configuration.

[[Datei:etiss-cws-ug-!selecting_configuration.png]]!


        In the configuration navigate to the '''Muted events''' tab and add an event or a group of events that you don't want to see in the list of current events.

[[Datei:etiss-cws-ug-!hiding_an_event.png]]!


        Save the configuration and reload events on the VU instance.

[[Datei:etiss-cws-ug-!reloading_events.png]]!


        The event will disappear from the dashboard and current events list.

[[Datei:etiss-cws-ug-!event_not_showing.png]]!


        ===Projects===


        Each equipment item can belong to a certain project. You can configure projects in '''Etiss CWS''' -> '''Configuration''' -> '''Projects''' menu. Once you add an item to a project, you can limit visibility of the project items for certain users by assigning a user to the project. After that, each user will be able to see and work only with equipment items that belong to a certain project.

[[Datei:etiss-cws-ug-projects.png]]

            [[Datei:etiss-cws-ug-project_users.png]]!projects.png!

            !project_users.png!


        There's also a nice ability to group equipment items by their project or type.

[[Datei:etiss-cws-ug-!project_grouping.png]]!


        ===VU TABS AND PROPERTIES===


        When you click on Vending Unit from the dashboard, you'll see a tabbed page with it's detailed properties. At first you'll see the most common properties of the VU such as:


        *'''Serial''': VU serial number

        *'''Type''': The VU type. There are number of various VU types such as V17, V21, etc.

        *'''Project''': Project to which this VU is assigned

        *'''MAC Address''': MAC address of the VU

        *'''Firmware version''': This shows the current firmware version of the device

        *'''Actual IP''': If the device has a real network IP address, it will be displayed here


        ====Transactions button====


        This buttons shows all transactions that happened on the VU.

[[Datei:etiss-cws-ug-transactions.png]]!transactions.png!


        You can see here the type of transaction, related money status and other information.

[[Datei:etiss-cws-ug-!transactions_list.png]]!


        ====Money statuses button====


        If you press this button, you'll be presented with the detailed information about money in the VU.

[[Datei:etiss-cws-ug-!money_status.png]]!


        If money amount changes on VU a record is added here, so you won't miss any money-related event on this VU.

[[Datei:etiss-cws-ug-!money_statuses_list.png]]!


        ====Orders button====


        This button displays a table with the list of orders that were created on the VU.

[[Datei:etiss-cws-ug-!orders_button.png]]!


        If you open any order here, you'll get detailed information about it such as date, amount of money paid, etc.

[[Datei:etiss-cws-ug-!orders_list.png]]!


        ====Reload events button====


        Sometimes a situation can occur when a Vending Unit displays wrong information about it's current state. You can press this button and the system will re-request current information about Vending Unit status and events.

[[Datei:etiss-cws-ug-!reset_button.png]]!


        ====Current events button====


        When something happens with the VU, you'll see most significant problem displayed on this button.

[[Datei:etiss-cws-ug-!events_button.png]]!


        After pressing this button you'll see a list of current events that happened on the VU and they will be ordered by their weight.

[[Datei:etiss-cws-ug-!current_events_list.png]]!


        ====Events button====


        This button shows the complete history of events that happened on the particular VU.


        [[Datei:etiss-cws-ug-all_events_list_button.png]]


        If, for example, some error has a recurring character, you can find it in the list and see detailed information about it and when it happened before.

[[Datei:etiss-cws-ug-!events_history.png]]!


        ====Min-Max configuration tab====


        This tab shows the minimal, current, and maximal amount of the equipment that can be installed on VU.

[[Datei:etiss-cws-ug-!minmax_configuration.png]]!


        Each line represents a group of devices. For example, line '''Hopper - | 1 | 3 | 3 |''' says that in order to operate properly, this system needs minimum 1 hopper installed. Currently it has 3 hoppers and the maximum amount of hoppers it supports - 3. To the right you can also see a coulumn which shows the current state of the device.


        ====Hardware tab====

[[Datei:etiss-cws-ug-hardware.png]]!hardware.png!


        This tab shows the list of available hardware devices each on a separate line. Here you can see whether the given device is a simulator or a real device, state of each device and failure reason in case something happens with it.


        ====Money tab====

[[Datei:etiss-cws-ug-money.png]]!money.png!


        On this tab you can see the state of money devices that deal with money directly, such as Hoppers, Coin Cashboxes, Bill Acceptors, Card Terminal. Each box represents a device. Here you can monitor filling levels, limits, and money denominations that are accepted by each device. From this tab you can't change anything, just see the current state of each device.


        ====General tab====

[[Datei:etiss-cws-ug-general.png]]!general.png!


        On this tab you can see general information about the given Vending Unit such as:


        *'''Online''': Current network status of the VU (Online/Offline)

        *'''In Operation''': Currently this parameter is not user. Left here for compatibility

        *'''Dashboard''': If checked, creates a dasboard when VU is created

        *'''Role''': This determines whether this vending unit is located at an entrance or exit respectively (Entry/Exit)

        *'''Configuration''': A VU configuration

        *'''Ping Write Date''': The last time when VU sent ping to the Odoo server

        *'''Configuration Write Date''': The last time when VU configuration has been changed

        *'''Status''': Current status of the VU


        ====Equipment tab====

[[Datei:etiss-cws-ug-equipment.png]]!equipment.png!


        This tab shows equipment-related information such as:


        *'''User''': A related user that is used for VU authentication

        *'''Category''': The device category. Can be a VU or a Turnstile

        *'''OS''': Operation System of the device

        *'''Firmware Hash''': The hash of the sofware version that is currently installed on the device


        ===FMCU TABS AND PROPERTIES===


        Unlike VU, FMCU has different set of tabs and additional button. They're typically named as '''TS...''' which means (turnstile).

[[Datei:etiss-cws-ug-!VU_vs_FMCU.png]]!


        When you click on FMCU from the dashboard, you'll see a tabbed page with it's detailed properties. At first you'll see the most common properties of the VU such as:

[[Datei:etiss-cws-ug-!fmcu_basic_properties.png]]!


        *'''Serial''': FMCU serial number

        *'''Type''':  The FMCU type. There are number of various FMCU types such as Turnstile...

        *'''Project''': Project to which this FMCU is assigned

        *'''MAC Address''':  MAC address of the FMCU

        *'''Firmware version''': This shows the current firmware version of the device

        *'''Actual IP''': If the device has a real network IP address, it will be displayed here


        When you open FMCU properties, you'll notice that it has less tabs than VU. It has only the following tabs: '''Hardware''', '''General''' and '''Equipment'''. Below is a description of each of these tabs.


        ====Hardware FMCU tab====


        This tab lists hardware devices that are installed on the FMCU. Here you can see whether the given device is a simulator or a real device, state of each device and failure reason in case something happens with it.

[[Datei:etiss-cws-ug-!hardware_fmcu_tab.png]]!


        ====General FMCU tab====


        On this tab, same as on VU's tab you can see general device parameters such as '''Status''' and '''Ping write date'''.

[[Datei:etiss-cws-ug-!general_fmcu_tab.png]]!


        *'''Dashboard''': If checked, creates a dasboard when FMCU is created

        *'''Status''': Current status of the FMCU

        *'''Ping write date''':  The last time when FMCU sent ping to the Odoo server


        ====Equipment FMCU tab====

[[Datei:etiss-cws-ug-!equipment_fmcu_tab.png]]!


        This tab shows equipment-related information of FMCU such as:


        *'''User''': A related user that is used for FMCU authentication

        *'''Category''': The device category. Can be a VU or a FMCU

        *'''OS''': Operation System of the device

        *'''Firmaware hash''': The hash of the sofware version that is currently installed on the device


        ====Equipment FMCU button====


        To work with the device remotely you can press '''Equipment''' button.

[[Datei:etiss-cws-ug-!fmcu_equipment_button.png]]!


        This button has all basic functionality as for VU, but additionally it has a '''Web''' button.

[[Datei:etiss-cws-ug-!web_button_fmcu.png]]!


        Pressing it will lead you to the login dialog to the FMCU software backend, where you'll be able to set and monitor various aspects of the FMCU software.

[[Datei:etiss-cws-ug-!fmcu_backend.png]]!


        ==REMOTE MONITORING AND CONTROL==


        There's a possibility to remotely monitor and access Vending Units listed on dashboard. You can connect to a particular unit via SSH, View or remotely control it with VNC.

        To do this, click on a Vending Unit and press '''Equipment''' button at the right side of the screen.

[[Datei:etiss-cws-ug-!equipment_btn.png]]!


        ===SSH===


        '''SSH''' button allows you to connect to particular Vending Unit using SSH protocol.

[[Datei:etiss-cws-ug-ssh.png]]!ssh.png!


        After you press this button, you'll need to enter the following parameters and press '''Connect''':


        *'''Hostname''': IP address or domain name of the Vending Unit to which you're connecting

        *'''Port''': SSH port

        *'''Username''': A user that's used for SSH connections

        *'''Password''': User's password

[[Datei:etiss-cws-ug-!ssh_connection.png]]!


        When connection is successfully established, you'll be securely logged in to the Vending Unit via command line.

[[Datei:etiss-cws-ug-!command_line.png]]!


        ===VNC===


        '''VNC''' button allows you to view and control the Vending Unit's screen via VNC protocol interactively. It allows to simulate buttons press, navigation and other aspects of the software.

[[Datei:etiss-cws-ug-!vnc_button.png]]!


        To do this, typically you don't need to enter any additional data. Just press the button and you'll see VU's screen in a separate browser tab. After that you can perform necessarry operations.

[[Datei:etiss-cws-ug-vnc.png]]!vnc.png!


        ===VNC View===


        This is basically the same as VNC only in view-only mode. You won't be able to simulate navigation or press any buttons. Use this if you want to safely observe what's happening on the VU's screen.

[[Datei:etiss-cws-ug-!vnc_view_button.png]]!


        ===Remote tab===


        On this tab you can control which remote control buttons are displayed on the VU instance block.

[[Datei:etiss-cws-ug-!remote_access_buttons.png]]!


        ==USER MANAGEMENT==


        ===Available access levels===


        The system has 3 access levels:

        *'''Cashier - vu_cashier_template''': Works with money, has limited access to other funcitons of the system.

        *'''Service - vu_service_template''': Maintains the equipment and can control it's various aspects.

        *'''Administrator - vu_admin_template''': Has admin privileges and addess to all functions of Etiss CWS system.


        To login into the system using any of these roles, open the login page, enter desired user login (email), eneter password and click '''Login'''.

[[Datei:etiss-cws-ug-!picture284-1.png]]!


        ===Creating a new user===


        To create a new user navigate to '''Etiss CWS''' -> '''Configuration''' -> '''Partner registration''' menu and fill in following fields:


        *'''Name''': User's name

        *'''Login''': A login which is going to be user to log in to the system.

        *'''Password''': User's password

        *'''Template''': Access level template ('''Cashier template''' - only works with money, '''Service template''' - takes care of the Units, '''Administrator template''' - Local GOD.)

        *'''Project''': User will see and be able to work only with equipment items that belong to selected here projects.

[[Datei:etiss-cws-ug-!user_registration.png]]!


        ===Assigning a project to a user===


        To assign a project while creating a new user, in the '''Project''' area click '''Add item''' and select the required project and click '''Add''' button. If you've already created a user, you can open a project where you'd like to add the user, then select '''Users''' tab and add a user there.

[[Datei:etiss-cws-ug-!assigning_project.png]]!


        ==TICKETS==


        ===Ticket generator===


        Ticket generator allows to generat a specified number of tickets and print them out if needed. This feature can be used, for example, in case if you need to create a lot of free tickets and give them to people.


        To open ticket generator, navigate to '''Main menu''' -> '''Tickets''' -> '''Configuration''' -> '''Ticket generator'''

[[Datei:etiss-cws-ug-!picture704-1.png]]


            [[Datei:etiss-cws-ug-picture604-1.png]]!


            !picture604-1.png!


        Next, fill in the following fields:


        *'''Name''': The name of the generated tickets (not printed anywhere, just a display name)

        *'''Product''': The product based on which tickets will be generated. (Ex: to generate free tickets, you need to select free product here)


        click '''Save''', and after that click '''Generate tickets''' button.

[[Datei:etiss-cws-ug-!picture698-1.png]]!


        Select the number of tickets to generate and click '''Generate'''


        ===Printing generated tickets===


        Once tickets were generated, you can print them out by pressing '''Print generated tickets''' button.

[[Datei:etiss-cws-ug-!picture963-1.png]]!


        ==RFID CARDS==


        ===RFID cards generator===


        RFID card generator can be used with reader to mass register RFID cards. An operator scans the card with the reader, these cards then being added to the list of cards separated by the line break, space, comma, or semicolon. And finally, after selecting the card type, these cards then can be registered in the system in one click.


        ===Generating RFID cards===

[[Datei:etiss-cws-ug-!picture187-1.png]]!


        To use RFID cards generator go to '''RFID cards''' -> '''Configuration''' -> '''Mass register''' and fill in the following fields:


        *'''Type''': The type of RFID card to be registered

        *'''Ticket product''': The product on which the linked ticket will be based

        *'''RFID cards''':  An array of RFID cards to be registered. These can be obtained from card reader or pasted via clipboard manually. The system understands the following card separation symbols: '''line break''', '''space''', '''comma''', or '''semicolon'''.


        ===Assigning a partner to generated card===


        After all necessary cards were successfully generated you can assign a previously created partner to them. This can be done by opening a card and selecting a partner.


        From the menu '''RFID cards''' -> '''Cards''' -> '''Registered cards''' open any card, click '''Edit''' and in the '''Partner''' field select desired partner.

[[Datei:etiss-cws-ug-!picture032-1.png]]!


        Now this card is associated with a partner.


        ===Assigning a card to Vending Unit===


        After assigning a partner to a card, this card can be linked to the vending unit with a specified access level. To do this, login as Administrator, find and open a vending unit to which you need to link a card, and click on it's configuration settings. In this case it's '''VU Single FMCU''' link.

[[Datei:etiss-cws-ug-!configuration_settings.png]]!


        On the '''Service cards''' tab you can add cards and specify their corresponding access level.

[[Datei:etiss-cws-ug-!service_cards.png]]!


        ===Assigning a card to project===


        The card also can be linked to a project. But you have to keep in mind that assigning a card to a particular VU configuration has precedence over assigning it to the project.


        To assign a card to a project, go to the '''Etiss CWS''' -> '''Configuration''' -> '''Projects''' menu, select a project and on the '''Service cards''' tab link a card with corresponding access level.

[[Datei:etiss-cws-ug-!card_role.png]]!


        ===PRINTING TEMPLATES===


        CWS Administrator has access to and can edit all printing templates for supported printers. To open the list of templates navigate to the '''ETISS CWS'''/'''Configuration'''/'''Printer templates''' menu:

[[Datei:etiss-cws-ug-!printer_templates.png]]!


        This menu displays all available priniting templates in the system. All templates are groupped by the printer type.


        ====Finding your printer model====


        If you need to change something in one of the printing templates, you need to understand which printer model is being used in your Vending Unit. Typically a Vending Unit is assigned one printer model and it can't be changed from backend. So, you need to look at the hardware for finding which printer model is used.


        Once you've found out which printer model is used for the particular VU, you can find all printing templates in corresponding section of the template list. For example, if your printer model is '''KPM 150''', all reports that you can change are located in '''KPM 150''' section:

[[Datei:etiss-cws-ug-!kpm_150_templates.png]]!


        ====Template structure====


        Let's look at the typical printing template. As an example we'll take '''KPM 150 Ticket''' template. We'll use '''KPM 150''' printer model throughout this section of documentation.

[[Datei:etiss-cws-ug-!template_structure_1.png]]!


        Each template has a set of properties such as:


        *'''Printer type''': The type of the printer to which this template applies

        *'''Partial''': This indicates whether this template is a part of another template or not

        *'''Placeholder''': A string of text that will be used as a placeholder for insertion of this template into another one

        *'''Partial templates''': A list of  another templates which are inserted into current one

        *'''Template''': The template body


        Some of the templates such as '''Ticket body''' are used in multiple places across different reports because it's a common part of the template.

[[Datei:etiss-cws-ug-!changing_template_structure.png]]!


        Probably the one template area that's changed most frequently depending on project requirements is ticket body. To change something there, open the ticket body template and in the '''Template''' area make necessary chages, then save the template - your changes will be applied.

[[Datei:etiss-cws-ug-!ticket_body_change.png]]!


        ====Ticket template====


        One of the most frequently used templates is a '''Ticket template'''. It's used for ticket printing during the purchase process.

[[Datei:etiss-cws-ug-!ticket_template.png]]!


        Here's how it looks:

[[Datei:etiss-cws-ug-!ticket_template_print_example.png]]!


        ====Order Receipt template====


        If the customer wants to print a receipt of their purchase, the '''Order Receipt template''' is used in this case. In the CWS project order receipts are not used.


        ====Money Dump template====


        There's a feature of receipt printing when VU door was opened. The '''Money Dump''' template is used in this case.

[[Datei:etiss-cws-ug-!money_dump_template.png]]!


        Here's how this template looks on the simulator:

[[Datei:etiss-cws-ug-!money_dump_print_example.png]]!


        ====Events Dump template====


        This template is used to print out all current events that happened on the Vending Unit.

[[Datei:etiss-cws-ug-!events_dump_template.png]]!


        Here's how this template looks on the simulator:

[[Datei:etiss-cws-ug-!events_dump_template_example.png]]!


        ====Card Terminal Receipt template====


        If the customer wants to print a receipt of their purchase when paying through card terminal, the '''Card Terminal Receipt template''' is used in this case. In the CWS project card terminal receipts are not used.

[[Datei:etiss-cws-ug-!card_terminal_receipt_template.png]]!


        ====Additional service templates====


        Templates such as '''RFID Card Receipt''', '''Empty Template''', '''Image Template''' are used only in special cases for specific projects. They mostly help creating other templates quickly without changing too much code. We won't go in too much detail about them.

[[Datei:etiss-cws-ug-!special_templates.png]]


!

[[Kategorie:ETISS Global EN]]| Zeile 9: | Zeile 9: | ||
The dashboard is designed to give user a convenient way of managing and controlling equipment items registered in the system. Each dashboard item represents a physical device and consists of the following elements: | The dashboard is designed to give user a convenient way of managing and controlling equipment items registered in the system. Each dashboard item represents a physical device and consists of the following elements: | ||
| − | + | [[Datei:etiss-cws-ug-main_elements.png]] | |
*'''Name''': Equipment item name | *'''Name''': Equipment item name | ||
| Zeile 23: | Zeile 23: | ||
When something happens with Vending Unit or other equipment, it sends an event to the server. You can view current status of the unit and events that happened earlier by pressing a button on the dashboard: | When something happens with Vending Unit or other equipment, it sends an event to the server. You can view current status of the unit and events that happened earlier by pressing a button on the dashboard: | ||
| − | + | [[Datei:etiss-cws-ug-vu_state.png]] | |
Each event in the list is color-coded and has different weight. More reddish colors have bigger weight and need to be checked immediately. You can see detailed colors description by pressing on the '''Legend''' button. | Each event in the list is color-coded and has different weight. More reddish colors have bigger weight and need to be checked immediately. You can see detailed colors description by pressing on the '''Legend''' button. | ||
| − | + | [[Datei:etiss-cws-ug-legend.png]] | |
The events list can be sorted by date, weight, color, etc. | The events list can be sorted by date, weight, color, etc. | ||
| − | + | [[Datei:etiss-cws-ug-events_list.png]] | |
===Muted events=== | ===Muted events=== | ||
| Zeile 38: | Zeile 38: | ||
Let's say that we know that our coin cashbox is in overflow state and we don't want to see this event in the list. | Let's say that we know that our coin cashbox is in overflow state and we don't want to see this event in the list. | ||
| − | + | [[Datei:etiss-cws-ug-current_events_listing.png]] | |
To do this, first, open the '''VU - FMCU''' configuration by going into: '''Main menu'''/'''ETISS CWS'''/'''Configuration'''/'''Equipment items''' and select a configuration that your vending unit is currently using. For example, we'll take '''VU Single FMCU''' configuration. | To do this, first, open the '''VU - FMCU''' configuration by going into: '''Main menu'''/'''ETISS CWS'''/'''Configuration'''/'''Equipment items''' and select a configuration that your vending unit is currently using. For example, we'll take '''VU Single FMCU''' configuration. | ||
| − | + | [[Datei:etiss-cws-ug-selecting_configuration.png]] | |
In the configuration navigate to the '''Muted events''' tab and add an event or a group of events that you don't want to see in the list of current events. | In the configuration navigate to the '''Muted events''' tab and add an event or a group of events that you don't want to see in the list of current events. | ||
| − | + | [[Datei:etiss-cws-ug-hiding_an_event.png]] | |
Save the configuration and reload events on the VU instance. | Save the configuration and reload events on the VU instance. | ||
| − | + | [[Datei:etiss-cws-ug-reloading_events.png]] | |
The event will disappear from the dashboard and current events list. | The event will disappear from the dashboard and current events list. | ||
| − | + | [[Datei:etiss-cws-ug-event_not_showing.png]] | |
===Projects=== | ===Projects=== | ||
| Zeile 60: | Zeile 60: | ||
Each equipment item can belong to a certain project. You can configure projects in '''Etiss CWS''' -> '''Configuration''' -> '''Projects''' menu. Once you add an item to a project, you can limit visibility of the project items for certain users by assigning a user to the project. After that, each user will be able to see and work only with equipment items that belong to a certain project. | Each equipment item can belong to a certain project. You can configure projects in '''Etiss CWS''' -> '''Configuration''' -> '''Projects''' menu. Once you add an item to a project, you can limit visibility of the project items for certain users by assigning a user to the project. After that, each user will be able to see and work only with equipment items that belong to a certain project. | ||
| − | + | [[Datei:etiss-cws-ug-projects.png]] | |
| − | + | [[Datei:etiss-cws-ug-project_users.png]] | |
There's also a nice ability to group equipment items by their project or type. | There's also a nice ability to group equipment items by their project or type. | ||
| − | + | [[Datei:etiss-cws-ug-project_grouping.png]] | |
===VU TABS AND PROPERTIES=== | ===VU TABS AND PROPERTIES=== | ||
| Zeile 82: | Zeile 82: | ||
This buttons shows all transactions that happened on the VU. | This buttons shows all transactions that happened on the VU. | ||
| − | + | [[Datei:etiss-cws-ug-transactions.png]] | |
You can see here the type of transaction, related money status and other information. | You can see here the type of transaction, related money status and other information. | ||
| − | + | [[Datei:etiss-cws-ug-transactions_list.png]] | |
====Money statuses button==== | ====Money statuses button==== | ||
| Zeile 92: | Zeile 92: | ||
If you press this button, you'll be presented with the detailed information about money in the VU. | If you press this button, you'll be presented with the detailed information about money in the VU. | ||
| − | + | [[Datei:etiss-cws-ug-money_status.png]] | |
If money amount changes on VU a record is added here, so you won't miss any money-related event on this VU. | If money amount changes on VU a record is added here, so you won't miss any money-related event on this VU. | ||
| − | + | [[Datei:etiss-cws-ug-money_statuses_list.png]] | |
====Orders button==== | ====Orders button==== | ||
| Zeile 102: | Zeile 102: | ||
This button displays a table with the list of orders that were created on the VU. | This button displays a table with the list of orders that were created on the VU. | ||
| − | + | [[Datei:etiss-cws-ug-orders_button.png]] | |
If you open any order here, you'll get detailed information about it such as date, amount of money paid, etc. | If you open any order here, you'll get detailed information about it such as date, amount of money paid, etc. | ||
| − | + | [[Datei:etiss-cws-ug-orders_list.png]] | |
====Reload events button==== | ====Reload events button==== | ||
| Zeile 112: | Zeile 112: | ||
Sometimes a situation can occur when a Vending Unit displays wrong information about it's current state. You can press this button and the system will re-request current information about Vending Unit status and events. | Sometimes a situation can occur when a Vending Unit displays wrong information about it's current state. You can press this button and the system will re-request current information about Vending Unit status and events. | ||
| − | + | [[Datei:etiss-cws-ug-reset_button.png]] | |
====Current events button==== | ====Current events button==== | ||
| Zeile 118: | Zeile 118: | ||
When something happens with the VU, you'll see most significant problem displayed on this button. | When something happens with the VU, you'll see most significant problem displayed on this button. | ||
| − | + | [[Datei:etiss-cws-ug-events_button.png]] | |
After pressing this button you'll see a list of current events that happened on the VU and they will be ordered by their weight. | After pressing this button you'll see a list of current events that happened on the VU and they will be ordered by their weight. | ||
| − | + | [[Datei:etiss-cws-ug-current_events_list.png]] | |
====Events button==== | ====Events button==== | ||
| Zeile 132: | Zeile 132: | ||
If, for example, some error has a recurring character, you can find it in the list and see detailed information about it and when it happened before. | If, for example, some error has a recurring character, you can find it in the list and see detailed information about it and when it happened before. | ||
| − | + | [[Datei:etiss-cws-ug-events_history.png]] | |
====Min-Max configuration tab==== | ====Min-Max configuration tab==== | ||
| Zeile 138: | Zeile 138: | ||
This tab shows the minimal, current, and maximal amount of the equipment that can be installed on VU. | This tab shows the minimal, current, and maximal amount of the equipment that can be installed on VU. | ||
| − | + | [[Datei:etiss-cws-ug-minmax_configuration.png]] | |
Each line represents a group of devices. For example, line '''Hopper - | 1 | 3 | 3 |''' says that in order to operate properly, this system needs minimum 1 hopper installed. Currently it has 3 hoppers and the maximum amount of hoppers it supports - 3. To the right you can also see a coulumn which shows the current state of the device. | Each line represents a group of devices. For example, line '''Hopper - | 1 | 3 | 3 |''' says that in order to operate properly, this system needs minimum 1 hopper installed. Currently it has 3 hoppers and the maximum amount of hoppers it supports - 3. To the right you can also see a coulumn which shows the current state of the device. | ||
| Zeile 144: | Zeile 144: | ||
====Hardware tab==== | ====Hardware tab==== | ||
| − | + | [[Datei:etiss-cws-ug-hardware.png]] | |
This tab shows the list of available hardware devices each on a separate line. Here you can see whether the given device is a simulator or a real device, state of each device and failure reason in case something happens with it. | This tab shows the list of available hardware devices each on a separate line. Here you can see whether the given device is a simulator or a real device, state of each device and failure reason in case something happens with it. | ||
| Zeile 150: | Zeile 150: | ||
====Money tab==== | ====Money tab==== | ||
| − | + | [[Datei:etiss-cws-ug-money.png]] | |
On this tab you can see the state of money devices that deal with money directly, such as Hoppers, Coin Cashboxes, Bill Acceptors, Card Terminal. Each box represents a device. Here you can monitor filling levels, limits, and money denominations that are accepted by each device. From this tab you can't change anything, just see the current state of each device. | On this tab you can see the state of money devices that deal with money directly, such as Hoppers, Coin Cashboxes, Bill Acceptors, Card Terminal. Each box represents a device. Here you can monitor filling levels, limits, and money denominations that are accepted by each device. From this tab you can't change anything, just see the current state of each device. | ||
| Zeile 156: | Zeile 156: | ||
====General tab==== | ====General tab==== | ||
| − | + | [[Datei:etiss-cws-ug-general.png]] | |
On this tab you can see general information about the given Vending Unit such as: | On this tab you can see general information about the given Vending Unit such as: | ||
| Zeile 171: | Zeile 171: | ||
====Equipment tab==== | ====Equipment tab==== | ||
| − | + | [[Datei:etiss-cws-ug-equipment.png]] | |
This tab shows equipment-related information such as: | This tab shows equipment-related information such as: | ||
| Zeile 184: | Zeile 184: | ||
Unlike VU, FMCU has different set of tabs and additional button. They're typically named as '''TS...''' which means (turnstile). | Unlike VU, FMCU has different set of tabs and additional button. They're typically named as '''TS...''' which means (turnstile). | ||
| − | + | [[Datei:etiss-cws-ug-VU_vs_FMCU.png]] | |
When you click on FMCU from the dashboard, you'll see a tabbed page with it's detailed properties. At first you'll see the most common properties of the VU such as: | When you click on FMCU from the dashboard, you'll see a tabbed page with it's detailed properties. At first you'll see the most common properties of the VU such as: | ||
| − | + | [[Datei:etiss-cws-ug-fmcu_basic_properties.png]] | |
*'''Serial''': FMCU serial number | *'''Serial''': FMCU serial number | ||
| Zeile 203: | Zeile 203: | ||
This tab lists hardware devices that are installed on the FMCU. Here you can see whether the given device is a simulator or a real device, state of each device and failure reason in case something happens with it. | This tab lists hardware devices that are installed on the FMCU. Here you can see whether the given device is a simulator or a real device, state of each device and failure reason in case something happens with it. | ||
| − | + | [[Datei:etiss-cws-ug-hardware_fmcu_tab.png]] | |
====General FMCU tab==== | ====General FMCU tab==== | ||
| Zeile 209: | Zeile 209: | ||
On this tab, same as on VU's tab you can see general device parameters such as '''Status''' and '''Ping write date'''. | On this tab, same as on VU's tab you can see general device parameters such as '''Status''' and '''Ping write date'''. | ||
| − | + | [[Datei:etiss-cws-ug-general_fmcu_tab.png]] | |
*'''Dashboard''': If checked, creates a dasboard when FMCU is created | *'''Dashboard''': If checked, creates a dasboard when FMCU is created | ||
| Zeile 217: | Zeile 217: | ||
====Equipment FMCU tab==== | ====Equipment FMCU tab==== | ||
| − | + | [[Datei:etiss-cws-ug-equipment_fmcu_tab.png]] | |
This tab shows equipment-related information of FMCU such as: | This tab shows equipment-related information of FMCU such as: | ||
| Zeile 230: | Zeile 230: | ||
To work with the device remotely you can press '''Equipment''' button. | To work with the device remotely you can press '''Equipment''' button. | ||
| − | + | [[Datei:etiss-cws-ug-fmcu_equipment_button.png]] | |
This button has all basic functionality as for VU, but additionally it has a '''Web''' button. | This button has all basic functionality as for VU, but additionally it has a '''Web''' button. | ||
| − | + | [[Datei:etiss-cws-ug-web_button_fmcu.png]] | |
Pressing it will lead you to the login dialog to the FMCU software backend, where you'll be able to set and monitor various aspects of the FMCU software. | Pressing it will lead you to the login dialog to the FMCU software backend, where you'll be able to set and monitor various aspects of the FMCU software. | ||
| − | + | [[Datei:etiss-cws-ug-fmcu_backend.png]] | |
| − | ==REMOTE MONITORING AND CONTROL | + | ==REMOTE MONITORING AND CONTROL== |
There's a possibility to remotely monitor and access Vending Units listed on dashboard. You can connect to a particular unit via SSH, View or remotely control it with VNC. | There's a possibility to remotely monitor and access Vending Units listed on dashboard. You can connect to a particular unit via SSH, View or remotely control it with VNC. | ||
To do this, click on a Vending Unit and press '''Equipment''' button at the right side of the screen. | To do this, click on a Vending Unit and press '''Equipment''' button at the right side of the screen. | ||
| − | + | [[Datei:etiss-cws-ug-equipment_btn.png]] | |
===SSH=== | ===SSH=== | ||
| Zeile 251: | Zeile 251: | ||
'''SSH''' button allows you to connect to particular Vending Unit using SSH protocol. | '''SSH''' button allows you to connect to particular Vending Unit using SSH protocol. | ||
| − | + | [[Datei:etiss-cws-ug-ssh.png]] | |
After you press this button, you'll need to enter the following parameters and press '''Connect''': | After you press this button, you'll need to enter the following parameters and press '''Connect''': | ||
| Zeile 260: | Zeile 260: | ||
*'''Password''': User's password | *'''Password''': User's password | ||
| − | + | [[Datei:etiss-cws-ug-ssh_connection.png]] | |
When connection is successfully established, you'll be securely logged in to the Vending Unit via command line. | When connection is successfully established, you'll be securely logged in to the Vending Unit via command line. | ||
| − | + | [[Datei:etiss-cws-ug-command_line.png]] | |
===VNC=== | ===VNC=== | ||
| Zeile 270: | Zeile 270: | ||
'''VNC''' button allows you to view and control the Vending Unit's screen via VNC protocol interactively. It allows to simulate buttons press, navigation and other aspects of the software. | '''VNC''' button allows you to view and control the Vending Unit's screen via VNC protocol interactively. It allows to simulate buttons press, navigation and other aspects of the software. | ||
| − | + | [[Datei:etiss-cws-ug-vnc_button.png]] | |
To do this, typically you don't need to enter any additional data. Just press the button and you'll see VU's screen in a separate browser tab. After that you can perform necessarry operations. | To do this, typically you don't need to enter any additional data. Just press the button and you'll see VU's screen in a separate browser tab. After that you can perform necessarry operations. | ||
| − | + | [[Datei:etiss-cws-ug-vnc.png]] | |
===VNC View=== | ===VNC View=== | ||
| Zeile 280: | Zeile 280: | ||
This is basically the same as VNC only in view-only mode. You won't be able to simulate navigation or press any buttons. Use this if you want to safely observe what's happening on the VU's screen. | This is basically the same as VNC only in view-only mode. You won't be able to simulate navigation or press any buttons. Use this if you want to safely observe what's happening on the VU's screen. | ||
| − | + | [[Datei:etiss-cws-ug-vnc_view_button.png]] | |
===Remote tab=== | ===Remote tab=== | ||
| Zeile 286: | Zeile 286: | ||
On this tab you can control which remote control buttons are displayed on the VU instance block. | On this tab you can control which remote control buttons are displayed on the VU instance block. | ||
| − | + | [[Datei:etiss-cws-ug-remote_access_buttons.png]] | |
==USER MANAGEMENT== | ==USER MANAGEMENT== | ||
| Zeile 299: | Zeile 299: | ||
To login into the system using any of these roles, open the login page, enter desired user login (email), eneter password and click '''Login'''. | To login into the system using any of these roles, open the login page, enter desired user login (email), eneter password and click '''Login'''. | ||
| − | + | [[Datei:etiss-cws-ug-picture284-1.png]] | |
===Creating a new user=== | ===Creating a new user=== | ||
| Zeile 311: | Zeile 311: | ||
*'''Project''': User will see and be able to work only with equipment items that belong to selected here projects. | *'''Project''': User will see and be able to work only with equipment items that belong to selected here projects. | ||
| − | + | [[Datei:etiss-cws-ug-user_registration.png]] | |
===Assigning a project to a user=== | ===Assigning a project to a user=== | ||
| Zeile 317: | Zeile 317: | ||
To assign a project while creating a new user, in the '''Project''' area click '''Add item''' and select the required project and click '''Add''' button. If you've already created a user, you can open a project where you'd like to add the user, then select '''Users''' tab and add a user there. | To assign a project while creating a new user, in the '''Project''' area click '''Add item''' and select the required project and click '''Add''' button. If you've already created a user, you can open a project where you'd like to add the user, then select '''Users''' tab and add a user there. | ||
| − | + | [[Datei:etiss-cws-ug-assigning_project.png]] | |
==TICKETS== | ==TICKETS== | ||
| Zeile 327: | Zeile 327: | ||
To open ticket generator, navigate to '''Main menu''' -> '''Tickets''' -> '''Configuration''' -> '''Ticket generator''' | To open ticket generator, navigate to '''Main menu''' -> '''Tickets''' -> '''Configuration''' -> '''Ticket generator''' | ||
| − | + | [[Datei:etiss-cws-ug-picture704-1.png]] | |
| − | + | [[Datei:etiss-cws-ug-picture604-1.png]] | |
Next, fill in the following fields: | Next, fill in the following fields: | ||
| Zeile 338: | Zeile 338: | ||
click '''Save''', and after that click '''Generate tickets''' button. | click '''Save''', and after that click '''Generate tickets''' button. | ||
| − | + | [[Datei:etiss-cws-ug-picture698-1.png]] | |
Select the number of tickets to generate and click '''Generate''' | Select the number of tickets to generate and click '''Generate''' | ||
| Zeile 346: | Zeile 346: | ||
Once tickets were generated, you can print them out by pressing '''Print generated tickets''' button. | Once tickets were generated, you can print them out by pressing '''Print generated tickets''' button. | ||
| − | + | [[Datei:etiss-cws-ug-picture963-1.png]] | |
==RFID CARDS== | ==RFID CARDS== | ||
| Zeile 356: | Zeile 356: | ||
===Generating RFID cards=== | ===Generating RFID cards=== | ||
| − | + | [[Datei:etiss-cws-ug-picture187-1.png]] | |
To use RFID cards generator go to '''RFID cards''' -> '''Configuration''' -> '''Mass register''' and fill in the following fields: | To use RFID cards generator go to '''RFID cards''' -> '''Configuration''' -> '''Mass register''' and fill in the following fields: | ||
| Zeile 370: | Zeile 370: | ||
From the menu '''RFID cards''' -> '''Cards''' -> '''Registered cards''' open any card, click '''Edit''' and in the '''Partner''' field select desired partner. | From the menu '''RFID cards''' -> '''Cards''' -> '''Registered cards''' open any card, click '''Edit''' and in the '''Partner''' field select desired partner. | ||
| − | + | [[Datei:etiss-cws-ug-picture032-1.png]] | |
Now this card is associated with a partner. | Now this card is associated with a partner. | ||
| Zeile 378: | Zeile 378: | ||
After assigning a partner to a card, this card can be linked to the vending unit with a specified access level. To do this, login as Administrator, find and open a vending unit to which you need to link a card, and click on it's configuration settings. In this case it's '''VU Single FMCU''' link. | After assigning a partner to a card, this card can be linked to the vending unit with a specified access level. To do this, login as Administrator, find and open a vending unit to which you need to link a card, and click on it's configuration settings. In this case it's '''VU Single FMCU''' link. | ||
| − | + | [[Datei:etiss-cws-ug-configuration_settings.png]] | |
On the '''Service cards''' tab you can add cards and specify their corresponding access level. | On the '''Service cards''' tab you can add cards and specify their corresponding access level. | ||
| − | + | [[Datei:etiss-cws-ug-service_cards.png]] | |
===Assigning a card to project=== | ===Assigning a card to project=== | ||
| Zeile 390: | Zeile 390: | ||
To assign a card to a project, go to the '''Etiss CWS''' -> '''Configuration''' -> '''Projects''' menu, select a project and on the '''Service cards''' tab link a card with corresponding access level. | To assign a card to a project, go to the '''Etiss CWS''' -> '''Configuration''' -> '''Projects''' menu, select a project and on the '''Service cards''' tab link a card with corresponding access level. | ||
| − | + | [[Datei:etiss-cws-ug-card_role.png]] | |
===PRINTING TEMPLATES=== | ===PRINTING TEMPLATES=== | ||
| Zeile 396: | Zeile 396: | ||
CWS Administrator has access to and can edit all printing templates for supported printers. To open the list of templates navigate to the '''ETISS CWS'''/'''Configuration'''/'''Printer templates''' menu: | CWS Administrator has access to and can edit all printing templates for supported printers. To open the list of templates navigate to the '''ETISS CWS'''/'''Configuration'''/'''Printer templates''' menu: | ||
| − | + | [[Datei:etiss-cws-ug-printer_templates.png]] | |
This menu displays all available priniting templates in the system. All templates are groupped by the printer type. | This menu displays all available priniting templates in the system. All templates are groupped by the printer type. | ||
| Zeile 406: | Zeile 406: | ||
Once you've found out which printer model is used for the particular VU, you can find all printing templates in corresponding section of the template list. For example, if your printer model is '''KPM 150''', all reports that you can change are located in '''KPM 150''' section: | Once you've found out which printer model is used for the particular VU, you can find all printing templates in corresponding section of the template list. For example, if your printer model is '''KPM 150''', all reports that you can change are located in '''KPM 150''' section: | ||
| − | + | [[Datei:etiss-cws-ug-kpm_150_templates.png]] | |
====Template structure==== | ====Template structure==== | ||
| Zeile 412: | Zeile 412: | ||
Let's look at the typical printing template. As an example we'll take '''KPM 150 Ticket''' template. We'll use '''KPM 150''' printer model throughout this section of documentation. | Let's look at the typical printing template. As an example we'll take '''KPM 150 Ticket''' template. We'll use '''KPM 150''' printer model throughout this section of documentation. | ||
| − | + | [[Datei:etiss-cws-ug-template_structure_1.png]] | |
Each template has a set of properties such as: | Each template has a set of properties such as: | ||
| Zeile 424: | Zeile 424: | ||
Some of the templates such as '''Ticket body''' are used in multiple places across different reports because it's a common part of the template. | Some of the templates such as '''Ticket body''' are used in multiple places across different reports because it's a common part of the template. | ||
| − | + | [[Datei:etiss-cws-ug-changing_template_structure.png]] | |
Probably the one template area that's changed most frequently depending on project requirements is ticket body. To change something there, open the ticket body template and in the '''Template''' area make necessary chages, then save the template - your changes will be applied. | Probably the one template area that's changed most frequently depending on project requirements is ticket body. To change something there, open the ticket body template and in the '''Template''' area make necessary chages, then save the template - your changes will be applied. | ||
| − | + | [[Datei:etiss-cws-ug-ticket_body_change.png]] | |
====Ticket template==== | ====Ticket template==== | ||
| Zeile 434: | Zeile 434: | ||
One of the most frequently used templates is a '''Ticket template'''. It's used for ticket printing during the purchase process. | One of the most frequently used templates is a '''Ticket template'''. It's used for ticket printing during the purchase process. | ||
| − | + | [[Datei:etiss-cws-ug-ticket_template.png]] | |
Here's how it looks: | Here's how it looks: | ||
| − | + | [[Datei:etiss-cws-ug-ticket_template_print_example.png]] | |
====Order Receipt template==== | ====Order Receipt template==== | ||
| Zeile 448: | Zeile 448: | ||
There's a feature of receipt printing when VU door was opened. The '''Money Dump''' template is used in this case. | There's a feature of receipt printing when VU door was opened. The '''Money Dump''' template is used in this case. | ||
| − | + | [[Datei:etiss-cws-ug-money_dump_template.png]] | |
Here's how this template looks on the simulator: | Here's how this template looks on the simulator: | ||
| − | + | [[Datei:etiss-cws-ug-money_dump_print_example.png]] | |
====Events Dump template==== | ====Events Dump template==== | ||
| Zeile 458: | Zeile 458: | ||
This template is used to print out all current events that happened on the Vending Unit. | This template is used to print out all current events that happened on the Vending Unit. | ||
| − | + | [[Datei:etiss-cws-ug-events_dump_template.png]] | |
Here's how this template looks on the simulator: | Here's how this template looks on the simulator: | ||
| − | + | [[Datei:etiss-cws-ug-events_dump_template_example.png]] | |
====Card Terminal Receipt template==== | ====Card Terminal Receipt template==== | ||
| Zeile 468: | Zeile 468: | ||
If the customer wants to print a receipt of their purchase when paying through card terminal, the '''Card Terminal Receipt template''' is used in this case. In the CWS project card terminal receipts are not used. | If the customer wants to print a receipt of their purchase when paying through card terminal, the '''Card Terminal Receipt template''' is used in this case. In the CWS project card terminal receipts are not used. | ||
| − | + | [[Datei:etiss-cws-ug-card_terminal_receipt_template.png]] | |
====Additional service templates==== | ====Additional service templates==== | ||
| Zeile 474: | Zeile 474: | ||
Templates such as '''RFID Card Receipt''', '''Empty Template''', '''Image Template''' are used only in special cases for specific projects. They mostly help creating other templates quickly without changing too much code. We won't go in too much detail about them. | Templates such as '''RFID Card Receipt''', '''Empty Template''', '''Image Template''' are used only in special cases for specific projects. They mostly help creating other templates quickly without changing too much code. We won't go in too much detail about them. | ||
| − | + | [[Datei:etiss-cws-ug-special_templates.png]] | |
| + | |||
[[Kategorie:ETISS Global EN]] | [[Kategorie:ETISS Global EN]] | ||
