Etiss-Global-Bedienungsanleitung: Unterschied zwischen den Versionen
Writer (Diskussion | Beiträge) (Markierung: 2017-Quelltext-Bearbeitung) |
Writer (Diskussion | Beiträge) (Markierung: 2017-Quelltext-Bearbeitung) |
Inhaltsverzeichnis
General description[Bearbeiten | Quelltext bearbeiten]
Equipment Items Generator is used to generate vending units, turnstiles, FMCU's with specified parameters. It makes the task of registering physical equipment in the system a lot easier.
Note that this generator is used to basically clone existing units with various settings. To be able to use it, you need to have at least one unit as a template. Otherwise, if you're starting from scratch you'll need to create everything manually.
Generating Vending Units[Bearbeiten | Quelltext bearbeiten]
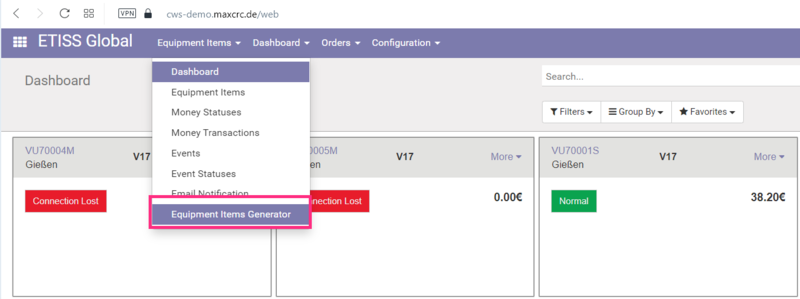
To generate one or several vending units navigate to the "Etiss Global" -> "Equipment items" menu, and select "Equipment items generator".
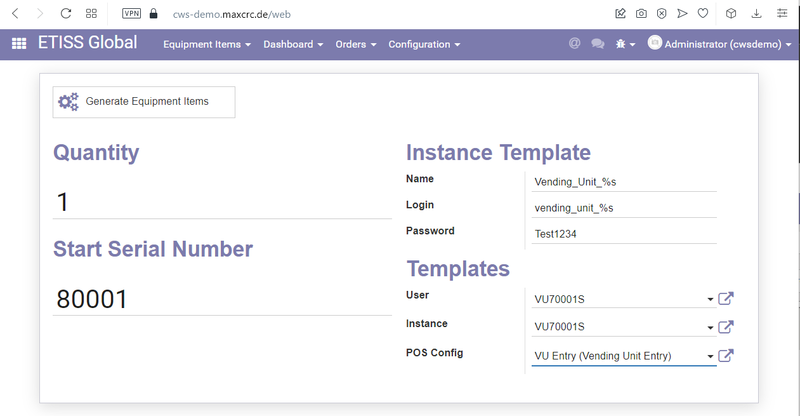
You'll be presented with the following view:
On this form, fill in all necessary fields:
- Quantity: The number of vending units to generate.
- Start serial number: The starting value of the serial numbers to generate.
- Name: Vending unit name (note that %s value will be substituted with the VU serial number during the generation process for each generated unit).
- Login: Vending unit user login (the system creates associated user with login and password to establish a connection between VU and the server).
- Password: Vending unit user password (it's not a required field, if you omit the password it will be generated randomly).
- User: The user template which will be used for linked user creation. The system will use this user's groups, visibility setting, etc. (this will mostly establish required access level for the user).
- Instance: An existing VU instance on which to base all generated instances. The system will use this instance's type, configuration, etc. (If you're generating V21 units, select existing V21 instance here).
- POS Config: An existing "Point of Sale" config which will be copied to all generated VU instances.
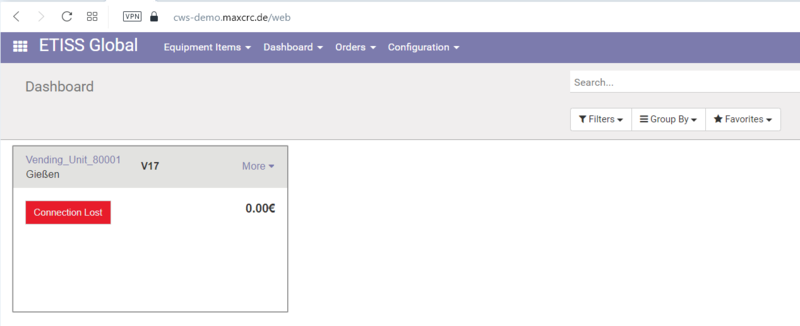
Once all fields are filled in, press the Generate Equipment Items button and wait for the generation process to finish. After that you'll see your new vending units created.
VU Server Connection Settings[Bearbeiten | Quelltext bearbeiten]
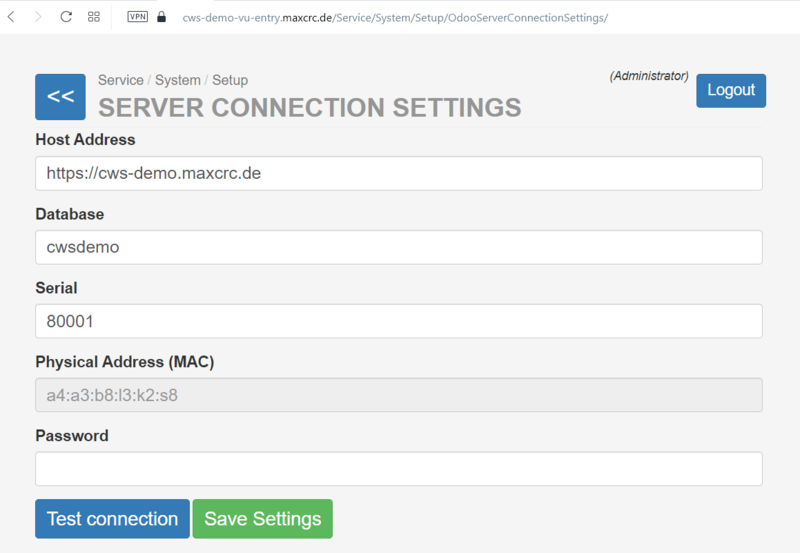
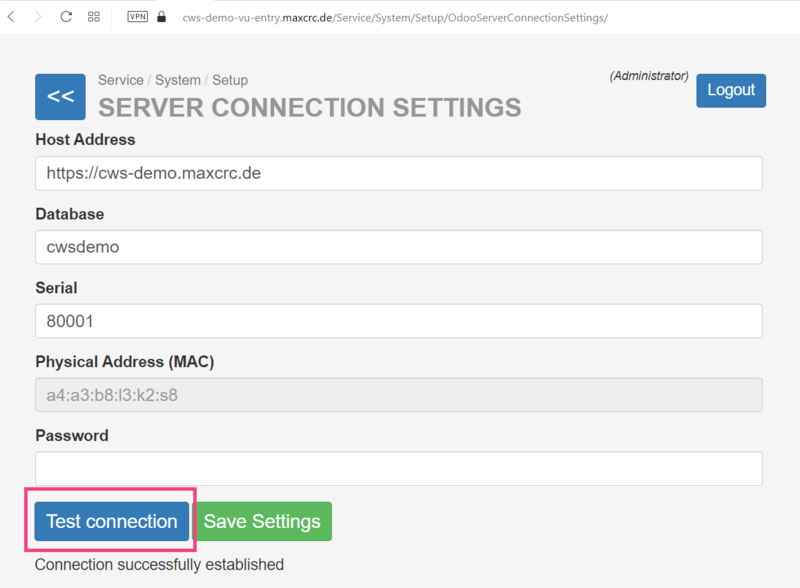
Next, login to the VU as Administrator and navigate to the "Service" -> "System" -> "Setup" -> "Server Connection Settings" page.
On this page enter the following server connection settings:
- Host Address: The URL address of the server.
- Database: The database name.
- Serial: Serial number of the VU.
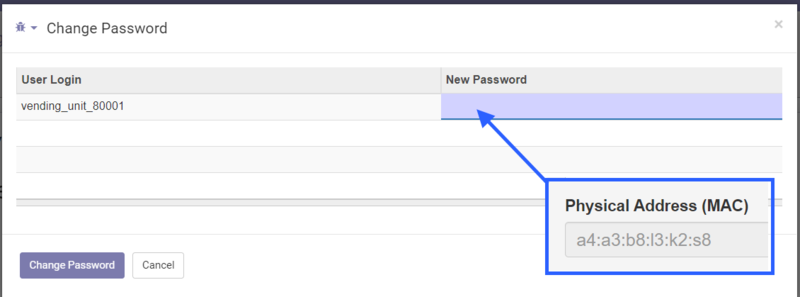
- Password: No need to fill in this field if you don't use "login/password" authorization. The VU's MAC address will be used as a password.
After filling in all these parameters click "Save settings" button. At this point we're almost done with the setup. All we need to do is to specify a password for the VU's linked user. The password should be the same as the MAC Address of the VU.
Changing VU's user password[Bearbeiten | Quelltext bearbeiten]
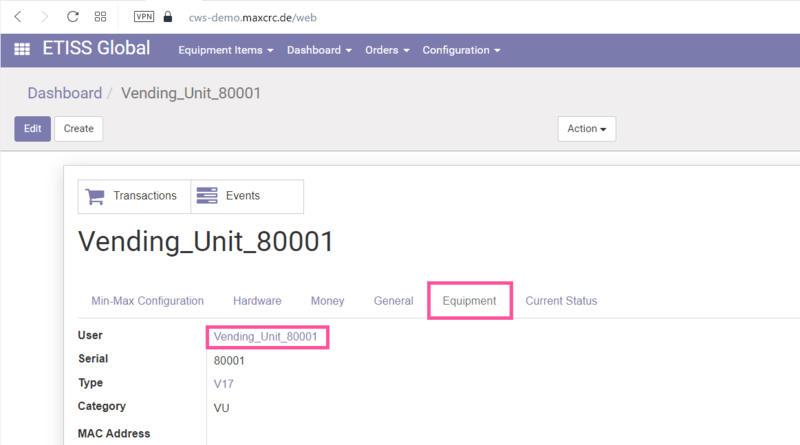
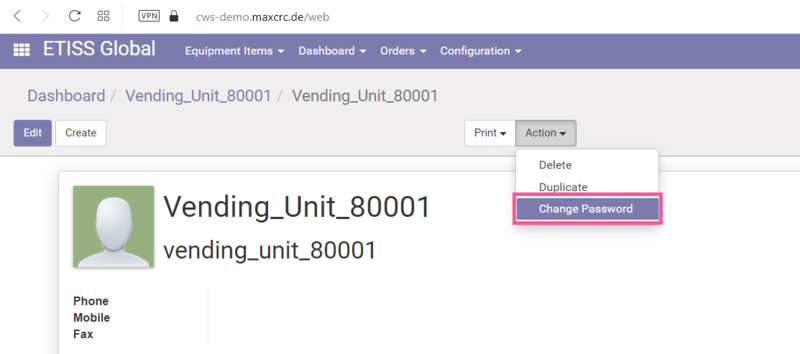
In the Odoo backend open the VU's linked user and change it's password to the value of MAC Address.
Testing server connection settings[Bearbeiten | Quelltext bearbeiten]
When the password has been changed, go back to the VU's settings page and click "Test connection" button. The message "Connection successfully established" should appear.
Generating FMCU's[Bearbeiten | Quelltext bearbeiten]
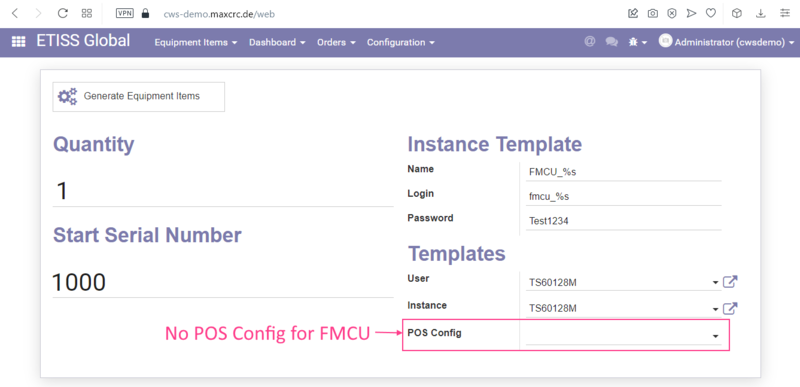
The process of generation FMCU's is basically the same as for VU's only you don't need to specify POS config in generator.
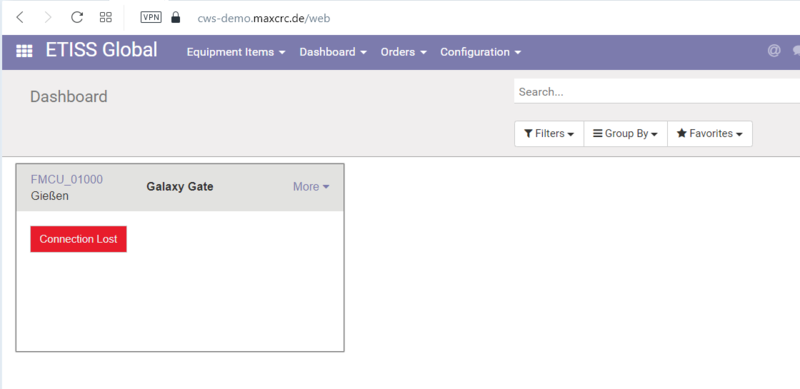
Once you've successfully generated FMCU, it'll look like this on the dashboard:
Creating a dispatcher[Bearbeiten | Quelltext bearbeiten]
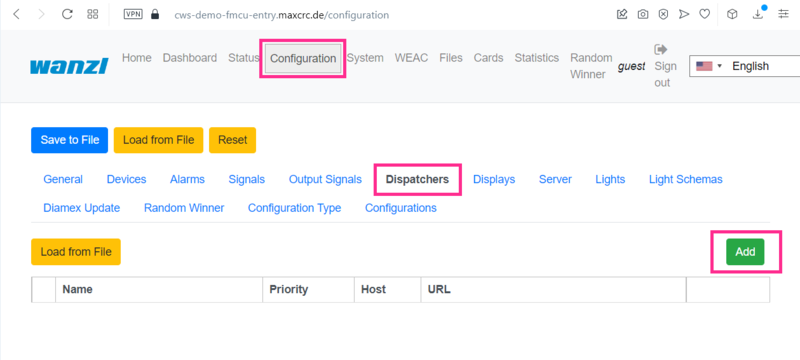
After that, login to the FMCU and create a new dispatcher to establish a connection between FMCU and the server.
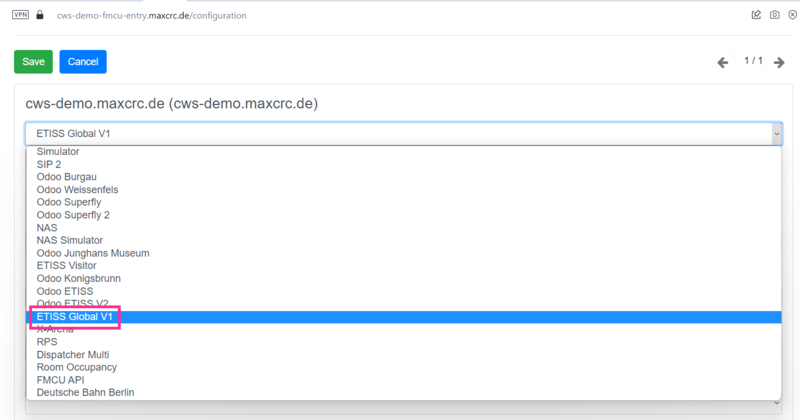
Enter the following parameters:
- Dispatcher type: ETISS Global v1.
- Name: The name of the dispatcher.
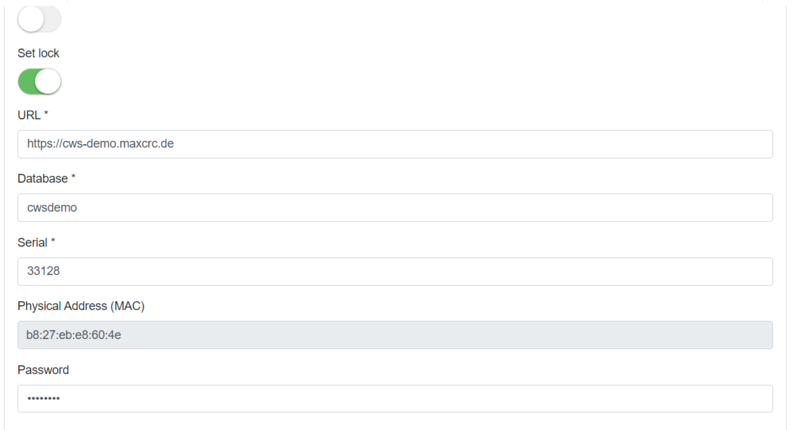
- URL: The URL of the server.
- Database: The database name.
- Serial: Serial number of the FMCU.
- Password: No need to fill in this field if you don't use "login/password" authorization. The FMCU's MAC address will be used as a password.
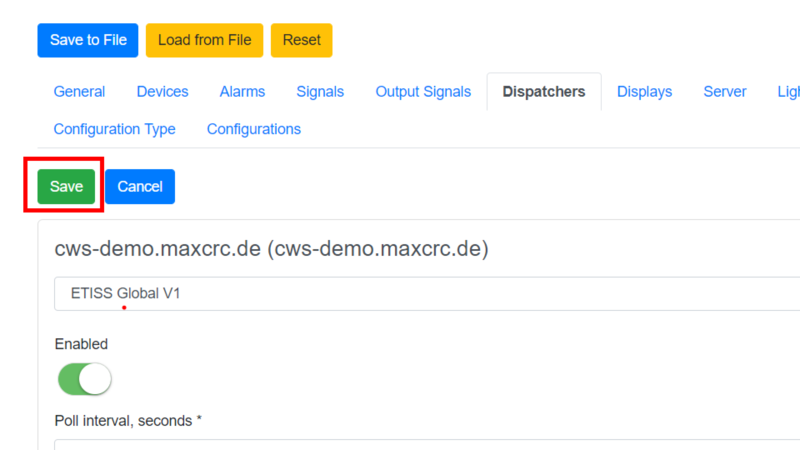
After filling in all these parameters click "Save" button at the top and save the dispatcher.
Changing FMCU's user password[Bearbeiten | Quelltext bearbeiten]
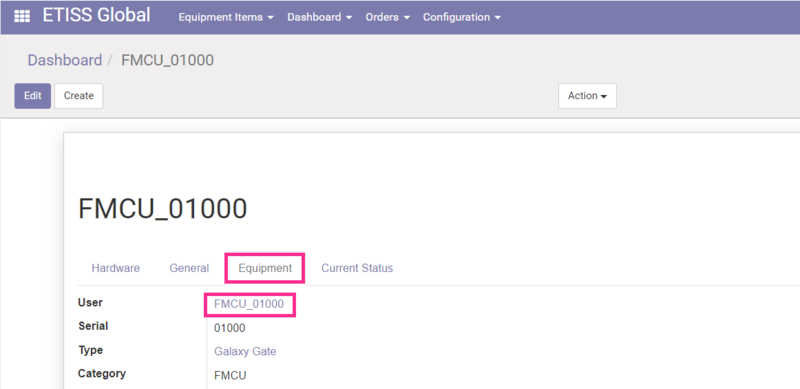
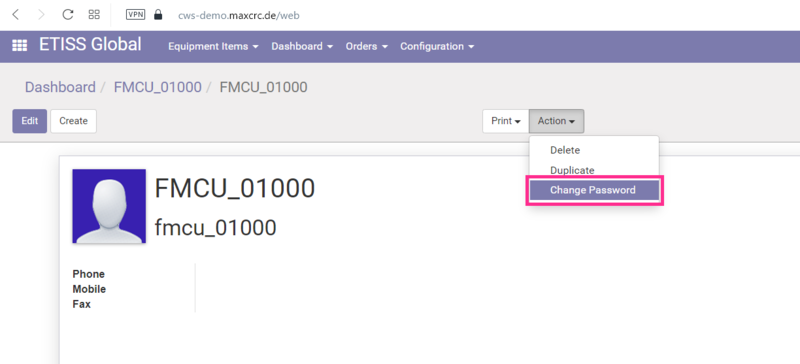
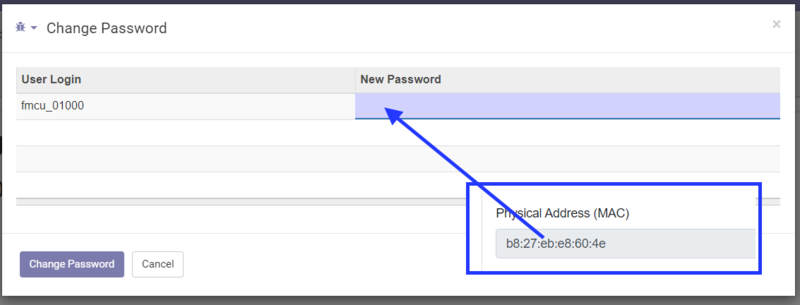
Next, open previously generated FMCU unit in the Odoo backend and change it's linked user password to FMCU's MAC address.
[[Datei:|rahmenlos|800px]]
[[Datei:|rahmenlos|800px]]
Testing dispatcher connection[Bearbeiten | Quelltext bearbeiten]
After this, open "Dashboard" tab of the FMCU and check that dispatcher is connected correctly in the "Status" section.
{{translate|ETISS Global ~ Bedienungsanleitung}}


        {{DISPLAYTITLE:ETISS Global ~ Bedienungsanleitung}}


        ==General description==


        Equipment Items Generator is used to generate vending units, turnstiles, FMCU's with specified parameters. It makes the task of registering physical equipment in the system a lot easier.


        '''Note''' that this generator is used to basically clone existing units with various settings. To be able to use it, you need to have at least one unit as a template. Otherwise, if you're starting from scratch you'll need to create everything manually.


        ==Generating Vending Units==


        To generate one or several vending units navigate to the "Etiss Global" -> "Equipment items" menu, and select "Equipment items generator".


        [[Datei:etiss-global-equipment-items-generator.png|rahmenlos|800px]]


        You'll be presented with the following view:


        [[Datei:etiss-global-generate-equipment-items.png|rahmenlos|800px]]


        On this form, fill in all necessary fields:


        *'''Quantity''': The number of vending units to generate.

        *'''Start serial number''': The starting value of the serial numbers to generate.

        *'''Name''': Vending unit name (note that '''%s''' value will be substituted with the VU serial number during the generation process for each generated unit).

        *'''Login''': Vending unit user login (the system creates associated user with login and password to establish a connection between VU and the server).

        *'''Password''': Vending unit user password (it's not a required field, if you omit the password it will be generated randomly).

        *'''User''': The user template which will be used for linked user creation. The system will use this user's groups, visibility setting, etc. (this will mostly establish required access level for the user).

        *'''Instance''': An existing VU instance on which to base all generated instances. The system will use this instance's type, configuration, etc. (If you're generating V21 units, select existing V21 instance here).

        *'''POS Config''': An existing "Point of Sale" config which will be copied to all generated VU instances.


        Once all fields are filled in, press the '''Generate Equipment Items''' button and wait for the generation process to finish. After that you'll see your new vending units created.


        [[Datei:etiss-global-vu-created.png|rahmenlos|800px]]


        ===VU Server Connection Settings===


        Next, login to the VU as Administrator and navigate to the "Service" -> "System" -> "Setup" -> "Server Connection Settings" page.


        [[Datei:etiss-global-server-connection-settings.png|rahmenlos|800px]]


        On this page enter the following server connection settings:


        *'''Host Address''': The URL address of the server.

        *'''Database''': The database name.

        *'''Serial''': Serial number of the VU.

        *'''Password''': No need to fill in this field if you don't use "login/password" authorization. The VU's MAC address will be used as a password.


        After filling in all these parameters click "Save settings" button. At this point we're almost done with the setup. All we need to do is to specify a password for the VU's linked user. The password should be the same as the MAC Address of the VU.


        ===Changing VU's user password===


        In the Odoo backend open the VU's linked user and change it's password to the value of MAC Address.


        [[Datei:etiss-global-vu-user.png|rahmenlos|800px]]


        [[Datei:etiss-global-vu-user-change-pass.png|rahmenlos|800px]]


        [[Datei:etiss-global-vu-user-new-pass.png|rahmenlos|800px]]


        ===Testing server connection settings===


        When the password has been changed, go back to the VU's settings page and click "Test connection" button. The message "Connection successfully established" should appear.


        [[Datei:etiss-global-test-connection.png|rahmenlos|800px]]


        ==Generating FMCU's==


        The process of generation FMCU's is basically the same as for VU's only you don't need to specify POS config in generator.


        [[Datei:etiss-global-no-pos-config-for-fmcu.png|rahmenlos|800px]]


        Once you've successfully generated FMCU, it'll look like this on the dashboard:


        [[Datei:etiss-global-generated-fmcu.png|rahmenlos|800px]]


        ===Creating a dispatcher===


        After that, login to the FMCU and create a new dispatcher to establish a connection between FMCU and the server.


        [[Datei:etiss-global-configuration-dispatchers.png|rahmenlos|800px]]


        Enter the following parameters:


        *'''Dispatcher type''': ETISS Global v1.


        [[Datei:etiss-global-dispatcher-type.png|rahmenlos|800px]]


        [[Datei:etiss-global-dispatcher-config.png|rahmenlos|800px]]


        *'''Name''': The name of the dispatcher.

        *'''URL''': The URL of the server.

        *'''Database''': The database name.

        *'''Serial''': Serial number of the FMCU.

        *'''Password''': No need to fill in this field if you don't use "login/password" authorization. The FMCU's MAC address will be used as a password.


        After filling in all these parameters click "Save" button at the top and save the dispatcher.


        [[Datei:etiss-global-saving-dispatcher.png|rahmenlos|800px]]


        ===Changing FMCU's user password===


        Next, open previously generated FMCU unit in the Odoo backend and change it's linked user password to FMCU's MAC address.


        [[Datei:etiss-global-user-fmcu.png|rahmenlos|800px]]


        [[Datei:|rahmenlos|800px]]

etiss-global-user-fmcu-change-pass.png|rahmenlos|800px]]


            [[Datei:etiss-global-user-fmcu-new-pass.png|rahmenlos|800px]]

===Testing dispatcher connection===


        After this, open "Dashboard" tab of the FMCU and check that dispatcher is connected correctly in the "Status" section.


        [[Datei:etiss-global-dispatcher-status.png|rahmenlos|800px]]


[[Kategorie:ETISS Global]]| Zeile 97: | Zeile 97: | ||
After filling in all these parameters click "Save" button at the top and save the dispatcher. | After filling in all these parameters click "Save" button at the top and save the dispatcher. | ||
| − | [[Datei:|rahmenlos|800px]] | + | [[Datei:etiss-global-saving-dispatcher.png|rahmenlos|800px]] |
===Changing FMCU's user password=== | ===Changing FMCU's user password=== | ||
| Zeile 103: | Zeile 103: | ||
Next, open previously generated FMCU unit in the Odoo backend and change it's linked user password to FMCU's MAC address. | Next, open previously generated FMCU unit in the Odoo backend and change it's linked user password to FMCU's MAC address. | ||
| − | [[Datei:|rahmenlos|800px]] | + | [[Datei:etiss-global-user-fmcu.png|rahmenlos|800px]] |
| − | [[Datei:|rahmenlos|800px]] | + | [[Datei:etiss-global-user-fmcu-change-pass.png|rahmenlos|800px]] |
| + | |||
| + | [[Datei:etiss-global-user-fmcu-new-pass.png|rahmenlos|800px]] | ||
===Testing dispatcher connection=== | ===Testing dispatcher connection=== | ||
| Zeile 111: | Zeile 113: | ||
After this, open "Dashboard" tab of the FMCU and check that dispatcher is connected correctly in the "Status" section. | After this, open "Dashboard" tab of the FMCU and check that dispatcher is connected correctly in the "Status" section. | ||
| − | [[Datei:|rahmenlos|800px]] | + | [[Datei:etiss-global-dispatcher-status.png|rahmenlos|800px]] |
[[Kategorie:ETISS Global]] | [[Kategorie:ETISS Global]] | ||
