Covcheck: Unterschied zwischen den Versionen
(Markierung: 2017-Quelltext-Bearbeitung) |
Inhaltsverzeichnis
Introduction[Bearbeiten | Quelltext bearbeiten]
The document describes how to install the Covcheck application server and configure a Galaxy Gate so that COVID certificates and tests presented at the gate can be validated through the server's REST API.
Installation of Covcheck Application Server[Bearbeiten | Quelltext bearbeiten]
Prerequisites[Bearbeiten | Quelltext bearbeiten]
- Ubuntu 22.04 with Internet access
- User with sudo permissions and availability of a user with ID 1000 (cat /etc/passwd | grep 1000), which is by default
- Archive covcheck-installer.tar.gz with the files listed in Installation Files. The name covcheck-installer.tar.gz can include a version, e.g. covcheck-installer-v0.1.tar.gz
Installation Steps[Bearbeiten | Quelltext bearbeiten]
- Connect with ssh to the Ubuntu server
- Copy covcheck-installer.tar.gz to the local directory
- Execute the following command:
tar xvf covcheck-installer.tar.gz && cd ./covcheck-installer
- Modify file .env and specify the database password (POSTGRES_PASSWORD) and, if necessary, host name (ODOO_HOST_NAME) and timezone (TZ):
                    POSTGRES_PASSWORD=gR7K6GT8MvQHpvLs
ODOO_HOST_NAME=covcheck.maxcr.de
TZ=Europe/Berlin
- If SSL certificates are provided for domain name ODOO_HOST_NAME, put them into directory /etc/nginx/certs, e.g:
                    sudo mkdir -p /etc/nginx/certs
sudo tar xvf certs.tar.gz -C /
- If SSL certificates are not available, HTTP connection will be used and you need to modify file **docker-compose** accordingly:
◦ Add this section to container **odoo**:
                           ports:
      - 80:8069
◦ Comment out or remove port 80 for container **nginx_proxy**:
                           ports:
    #  - 80:80
       - 443:443
- Run the installer script:
script=install-covcheck.sh && chmod +x $script && ./$script -i
- The installation is finished successfully if you see this line in the shell:
### Installation finished successfully
You can make sure that the Covcheck is installed and running by executing the following command:
curl https://covcheck.maxcrc.de/covcheck/status
The reply must be a JSON like as follows:
                    {
   "status":"ok",
   "last_update":"2022-07-04 12:06:34"
}
Installation Files[Bearbeiten | Quelltext bearbeiten]
- .env
- environment variables
- covcheck.tar.gz
- archived covcheck and request_extension ODOO addons
- docker-compose.yml
- docker compose file
- git-submodule-status
- information about git submodules that comprise the Covcheck application server
- install-covcheck.sh
- primary installation script
- nginx-vhost
- template vhost file for nginx
- odoo.conf
- configuration file for ODOO
Configuration of Covcheck Application Server[Bearbeiten | Quelltext bearbeiten]
Change Default Password[Bearbeiten | Quelltext bearbeiten]
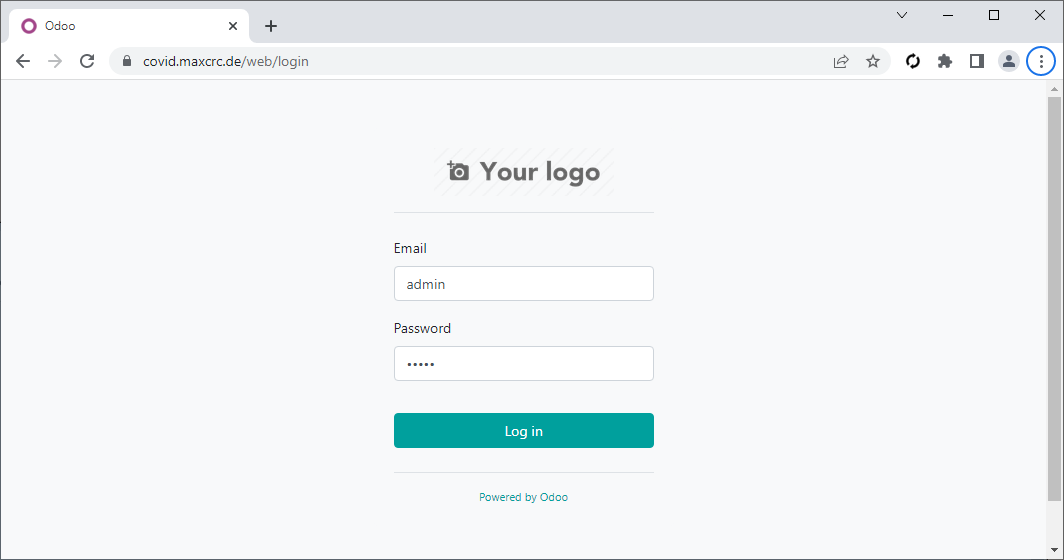
Open the address of the server in a browser and loging using the following default credentials:
| Username | Password |
|---|---|
| admin | admin |
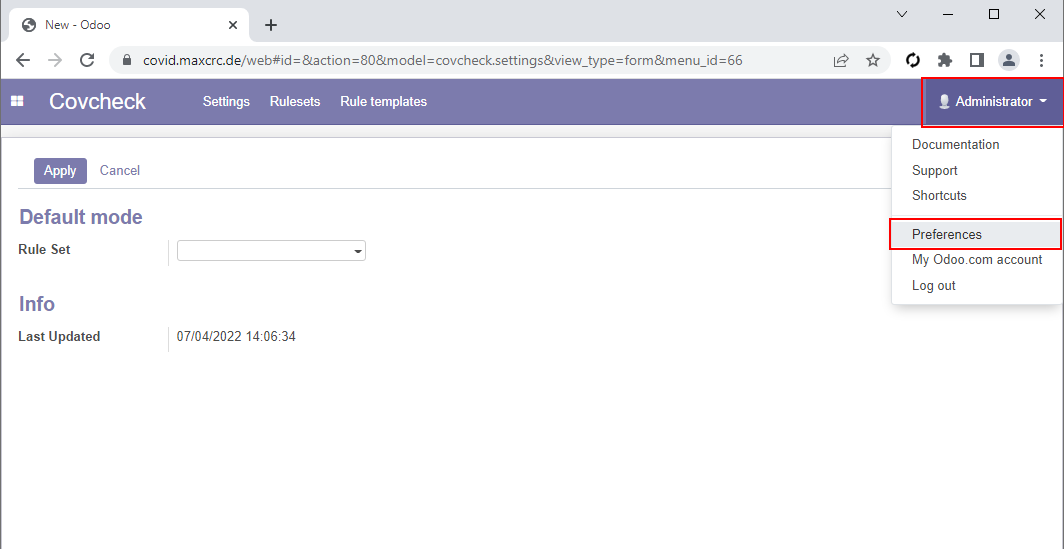
Click the Administrator in the top right corner and then Preferences:
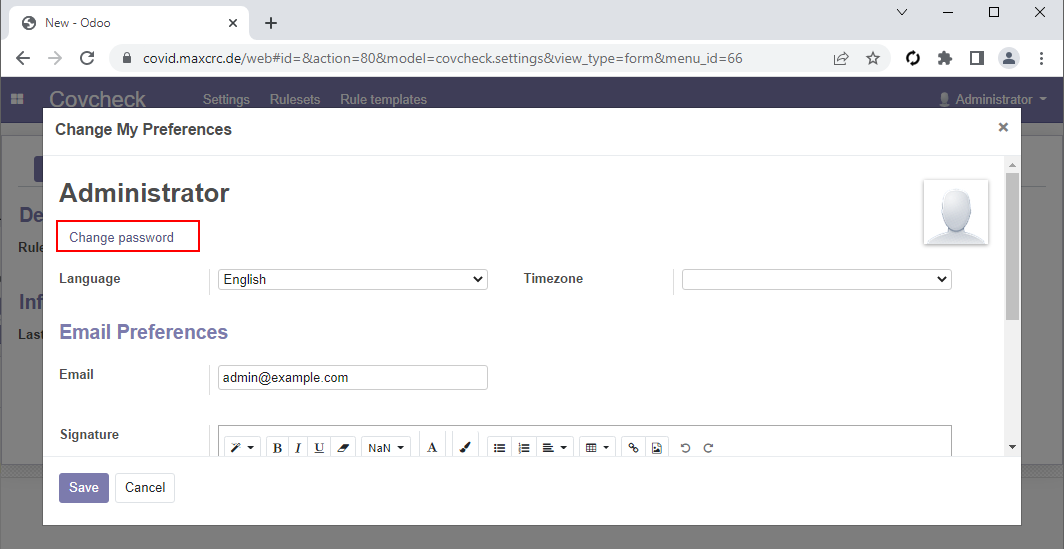
In the opened window click Change password:
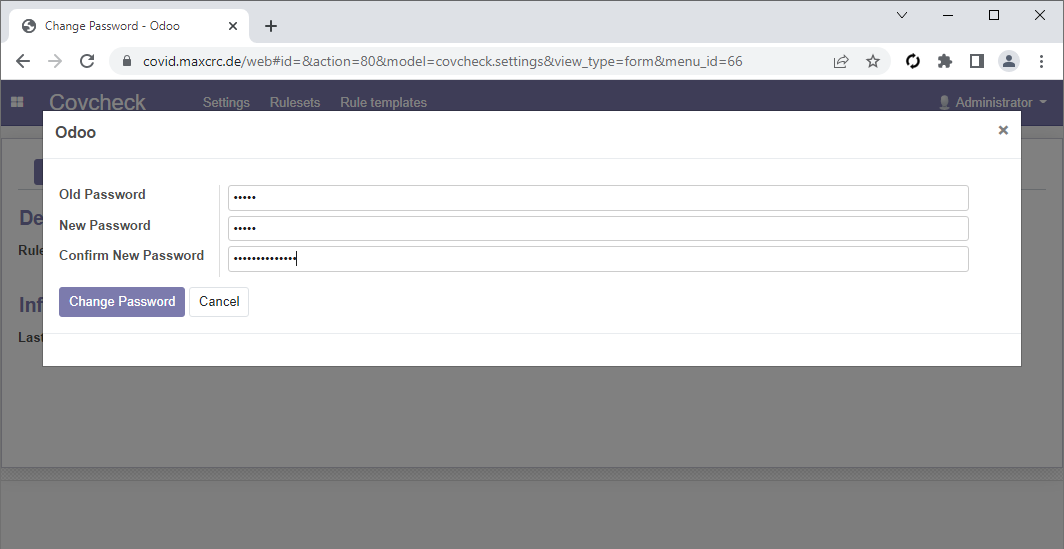
Fill-in the following fields and then click Change Password:
- Old Password
- New Password
- Confirm New Password
Managing Rulesets[Bearbeiten | Quelltext bearbeiten]
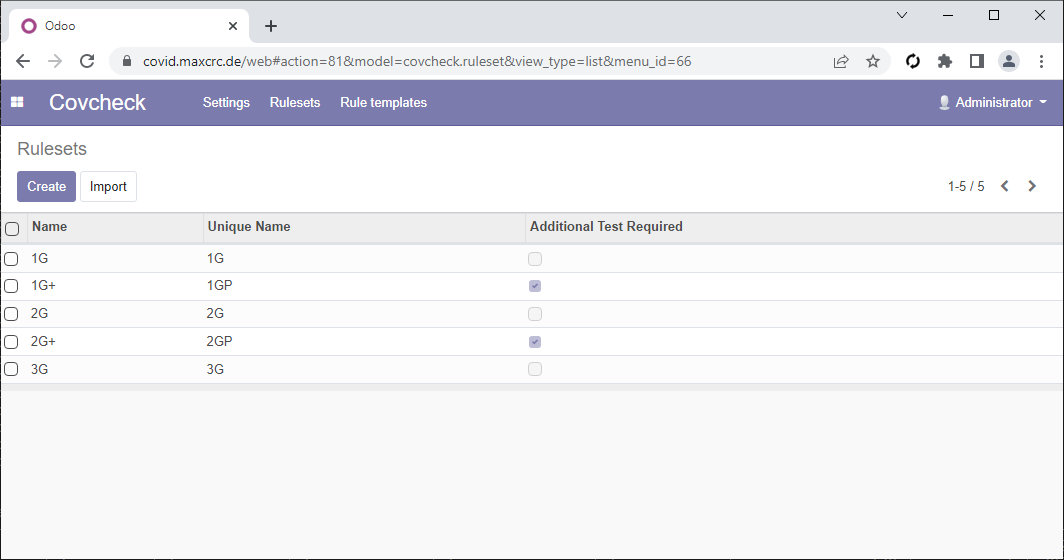
You can add, modify and delete rulesets on the Rulesets page:
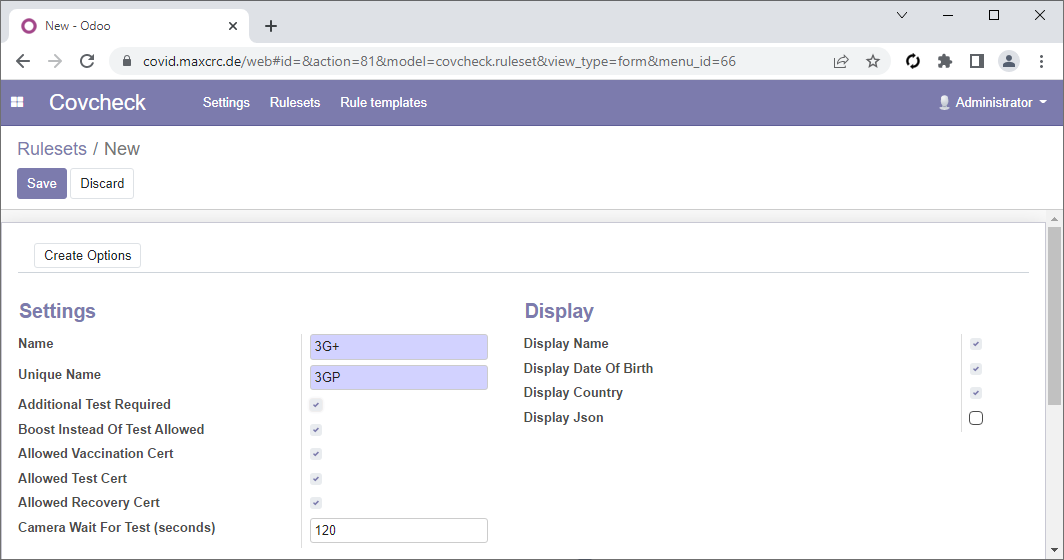
For example, let us create a ruleset 3G+, which requires an additional test. Click Create fill-in the fields Name and Unique Name, check Additional Test Required and click Save:
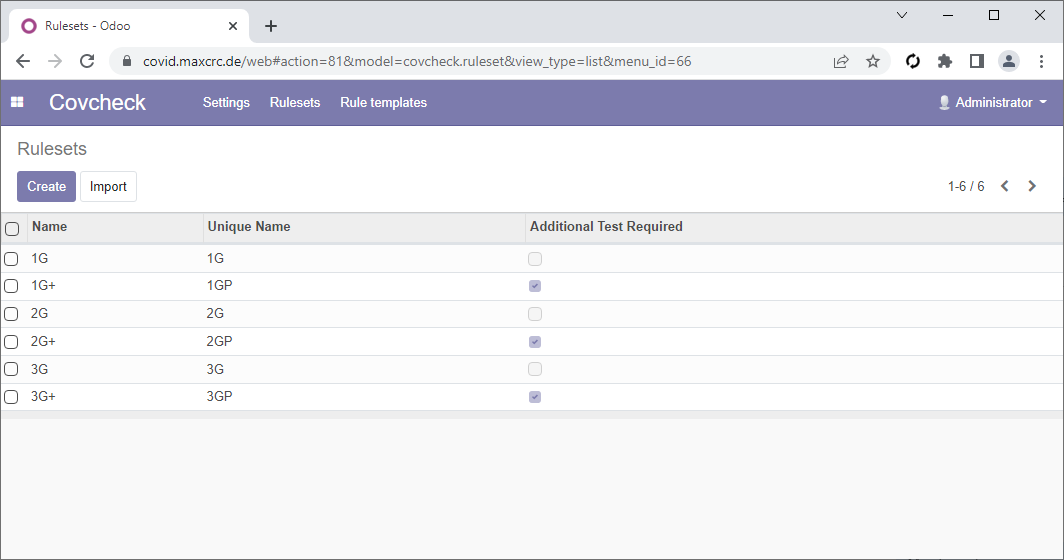
The list now includesthe 3G+ruleset:
Configuration of Galaxy Gate[Bearbeiten | Quelltext bearbeiten]
In order COVID certificates and tests can be validated against the Covcheck server, the proper dispatcher and display must be selected and configured.
Dispatcher[Bearbeiten | Quelltext bearbeiten]
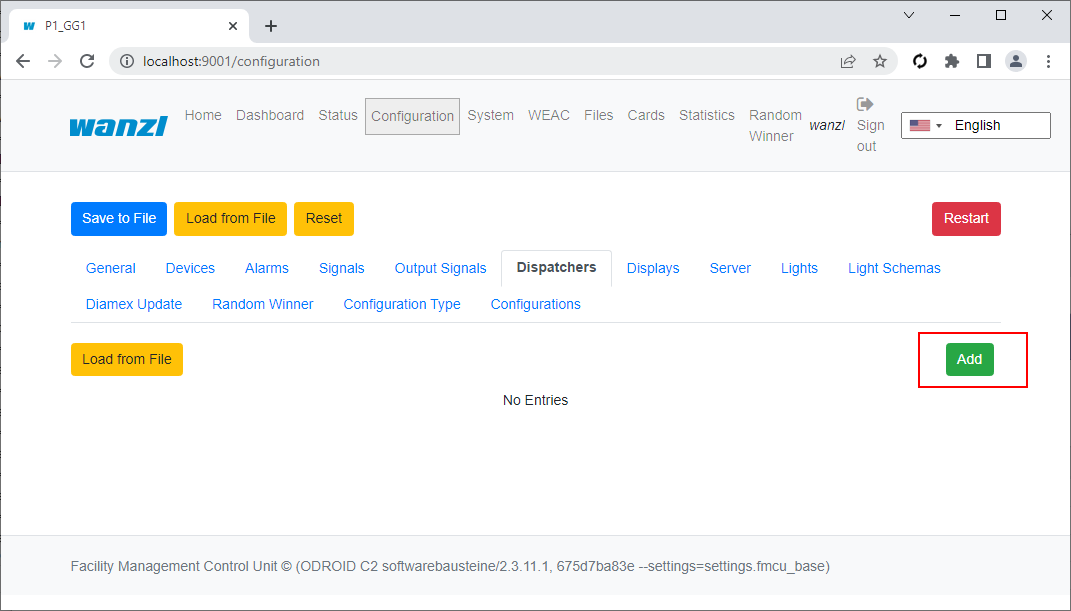
Open the URL of the gate, login with user wanzl and navigate to the Configuration page. Select tab Dispatchers and click Add:
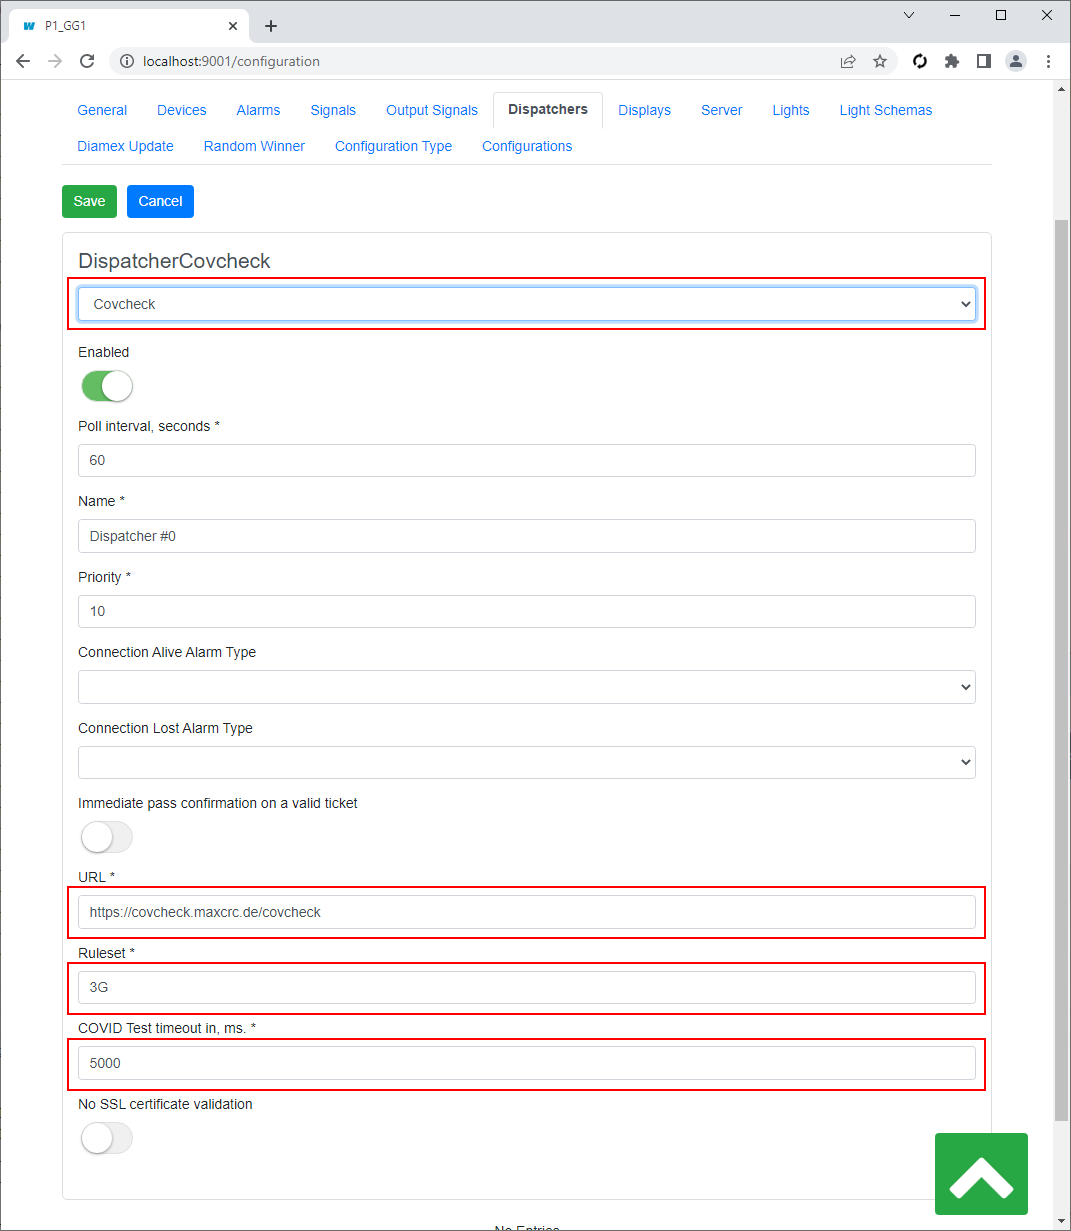
In the combo box under the title Dispatcher select Covcheck, modify the following properties if needed and click Save:
- URL
- Base URL of Covcheck's API
- Ruleset
- Ruleset for validating COVID certificates and tests
- COVID Test timeout, ms
- When a COVID test is required, specifies the timeout of waiting for it
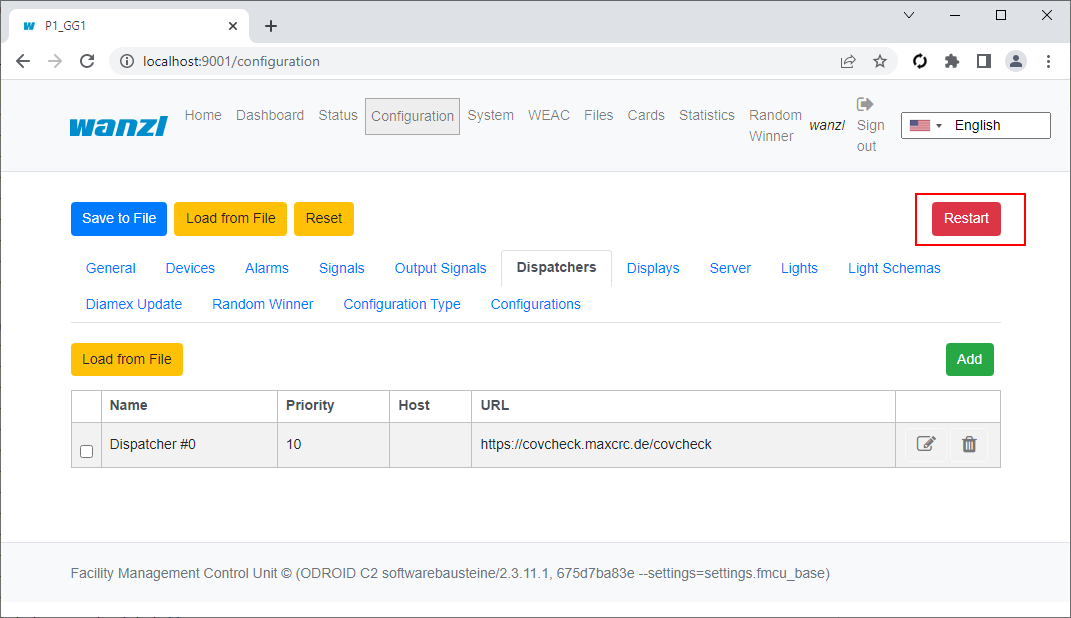
Restart the gate:
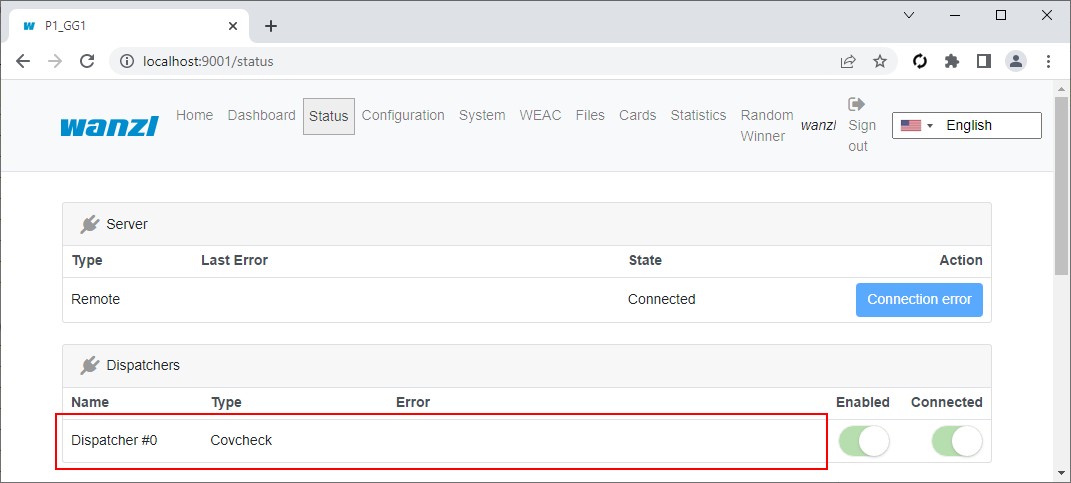
If the Covcheck server is available, the Error field is empty:
Display[Bearbeiten | Quelltext bearbeiten]
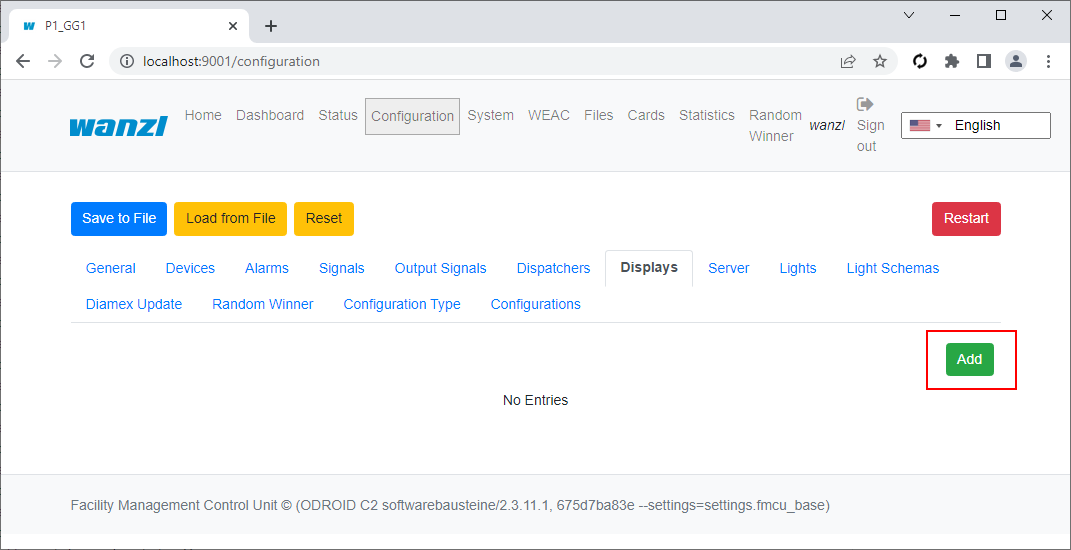
Open the URL of the gate, login with user wanzl and navigate to the Configuration page. Select tab Displays and click Add:
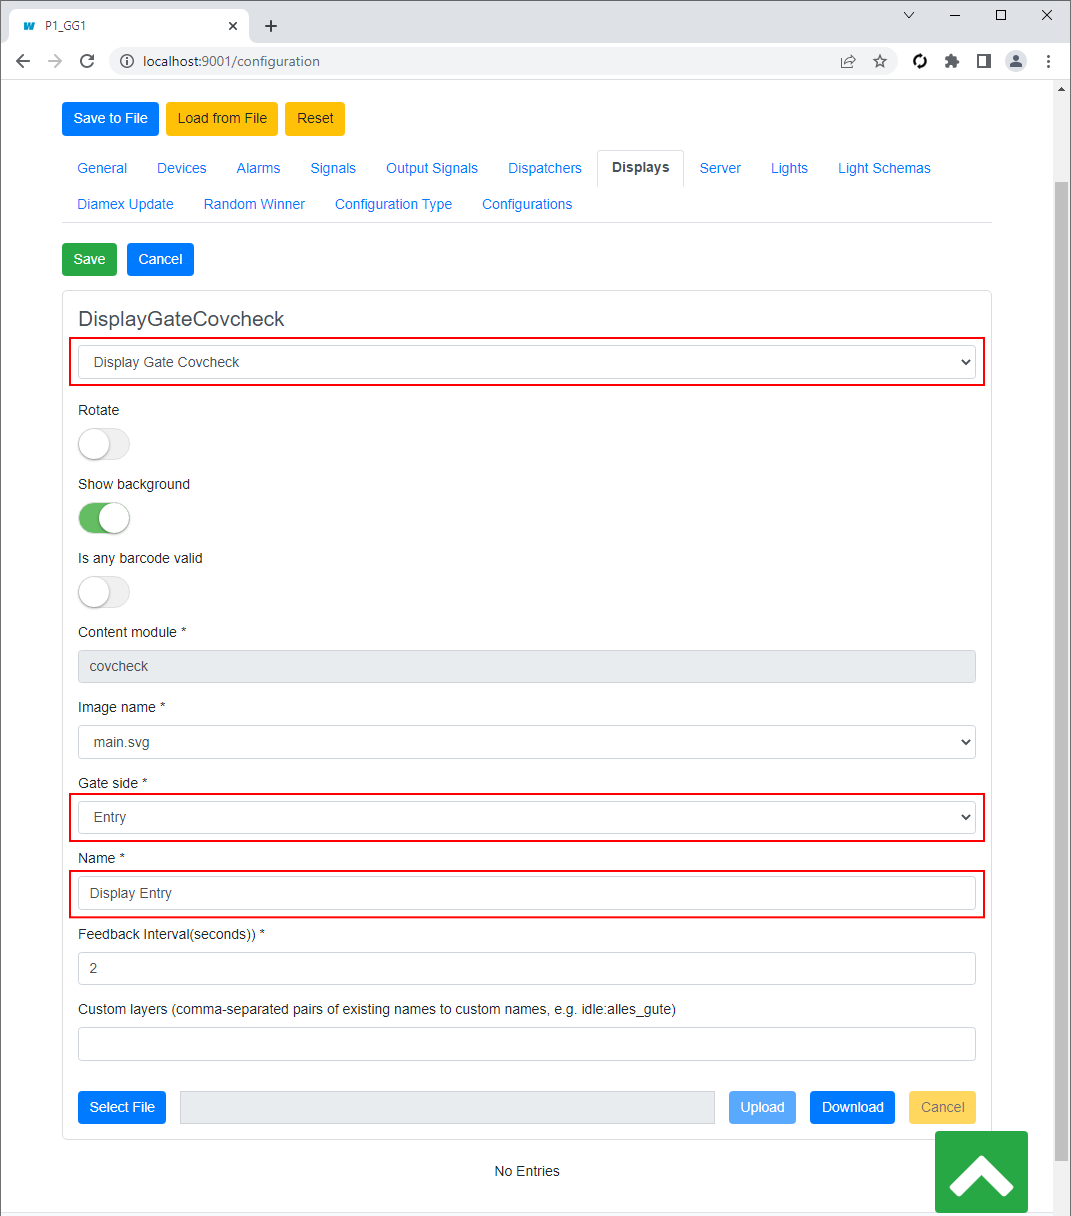
In the combo box under the title Display select Display Gate Covcheck, modify the following properties if needed and click Save:
- Gate side
- Side of the display, Entry or Exit
- Name
- User-friendly name
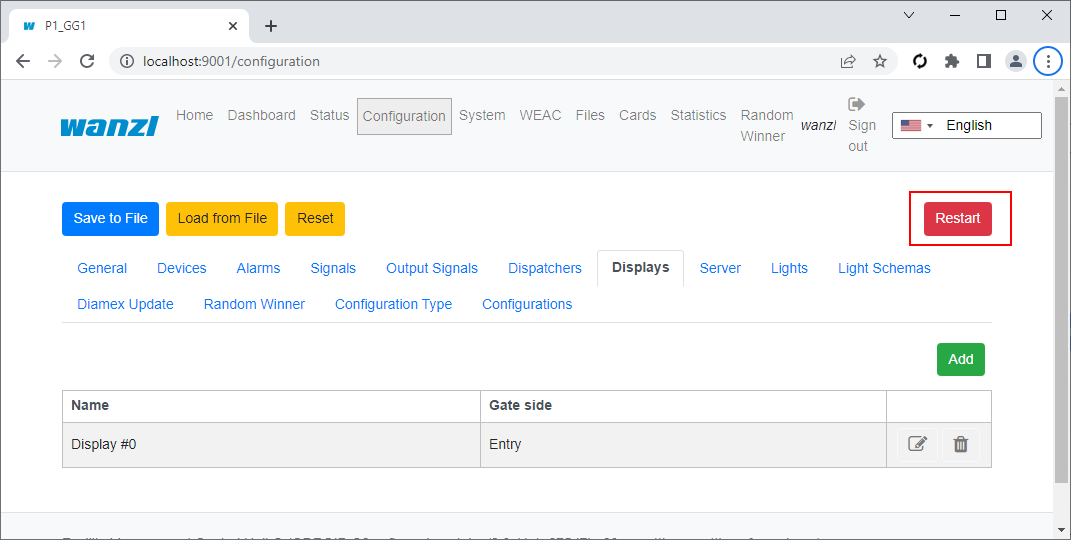
Restart the gate:
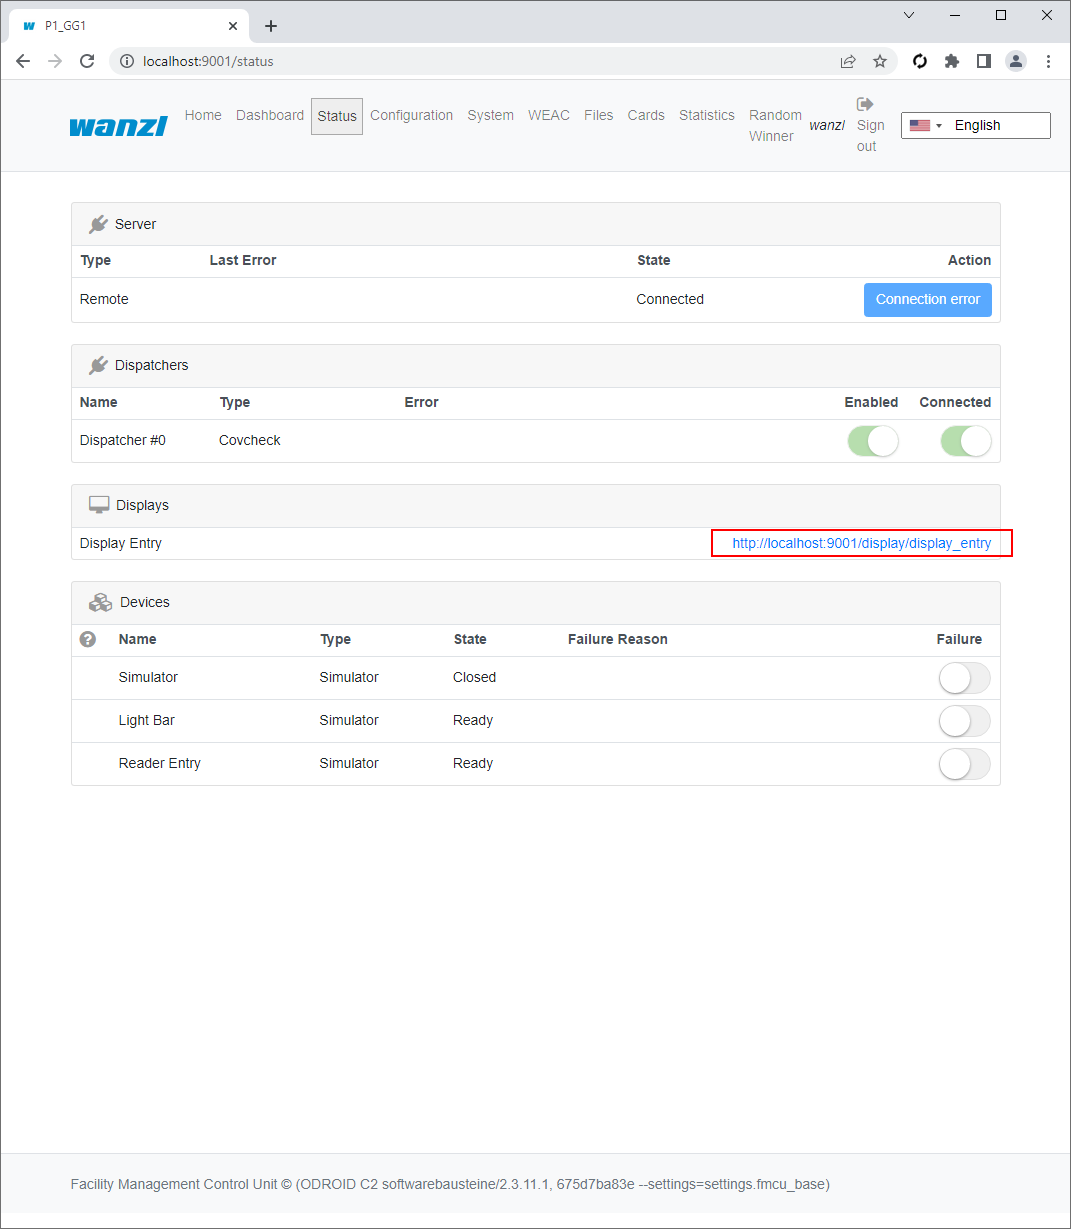
Navigate to the Status page and open the link corresponding to the display:
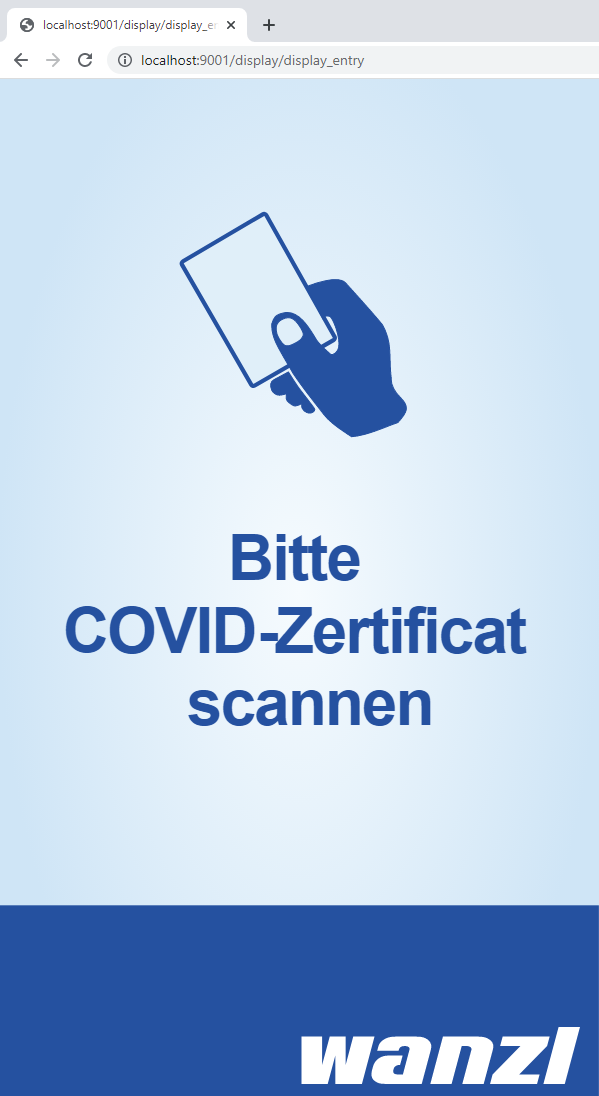
The following screen for the idle state invites to present a COVID certificate:
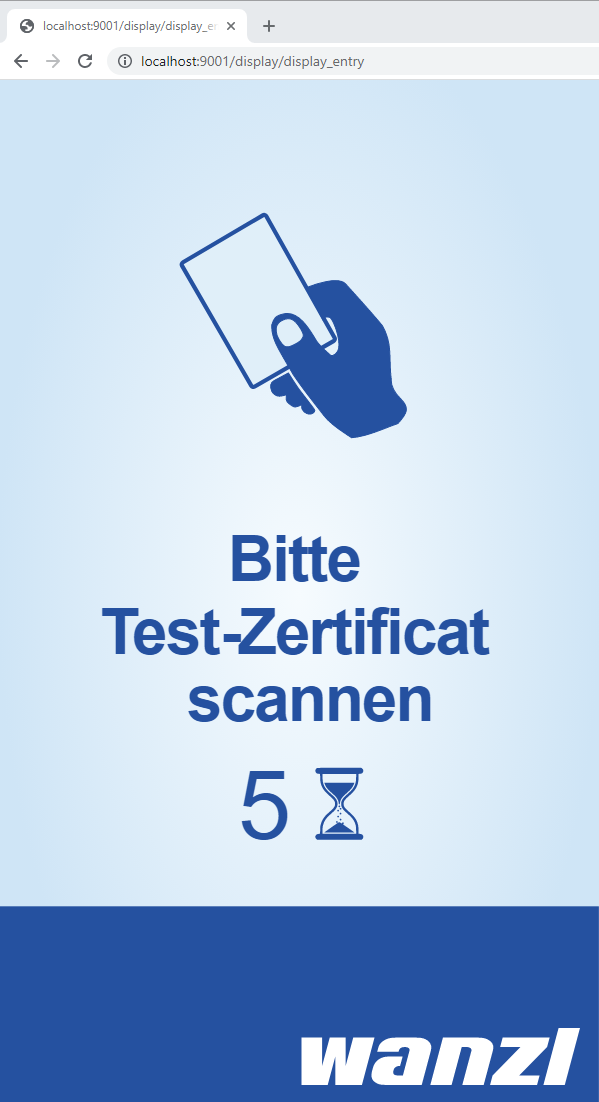
When in addition a test certificate is required, the next screen asks to show it:
Test [[Kategorie:Gate]]{{DISPLAYTITLE:Covcheck Applicaton Server}} __TOC__ [[Kategorie:Galaxy Gate]] {{DEFAULTSORT:Covcheck}} ==Introduction== The document describes how to install the '''Covcheck''' application server and configure a Galaxy Gate so that COVID certificates and tests presented at the gate can be validated through the server's REST API. ==Installation of Covcheck Application Server== ===Prerequisites=== *Ubuntu 22.04 with Internet access *User with '''sudo''' permissions and availability of a user with ID 1000 ('''cat /etc/passwd | grep 1000'''), which is by default *Archive '''covcheck-installer.tar.gz''' with the files listed in [[#Installation Files|Installation Files]]. The name '''covcheck-installer.tar.gz''' can include a version, e.g. '''covcheck-installer-v0.1.tar.gz''' ===Installation Steps=== *Connect with '''ssh''' to the Ubuntu server *Copy '''covcheck-installer.tar.gz''' to the local directory *Execute the following command: <br /> <syntaxhighlight> tar xvf covcheck-installer.tar.gz && cd ./covcheck-installer </syntaxhighlight> <br /> *Modify file '''.env''' and specify the database password ('''POSTGRES_PASSWORD''') and, if necessary, host name ('''ODOO_HOST_NAME''') and timezone ('''TZ'''): <br /> <syntaxhighlight>POSTGRES_PASSWORD=gR7K6GT8MvQHpvLs ODOO_HOST_NAME=covcheck.maxcr.de TZ=Europe/Berlin</syntaxhighlight> <br /> *If SSL certificates are provided for domain name '''ODOO_HOST_NAME''', put them into directory '''/etc/nginx/certs''', e.g: <syntaxhighlight> sudo mkdir -p /etc/nginx/certs sudo tar xvf certs.tar.gz -C / </syntaxhighlight> *If SSL certificates are not available, HTTP connection will be used and you need to modify file **docker-compose** accordingly: ◦ Add this section to container **odoo**: <syntaxhighlight> ports: - 80:8069 </syntaxhighlight> ◦ Comment out or remove port 80 for container **nginx_proxy**: <syntaxhighlight> ports: # - 80:80 - 443:443 </syntaxhighlight> *Run the installer script: <br /> <syntaxhighlight>script=install-covcheck.sh && chmod +x $script && ./$script -i</syntaxhighlight> <br /> *The installation is finished successfully if you see this line in the shell: <br /> <syntaxhighlight>### Installation finished successfully</syntaxhighlight> <br /> You can make sure that the Covcheck is installed and running by executing the following command: <br /> <syntaxhighlight>curl https://covcheck.maxcrc.de/covcheck/status</syntaxhighlight> <br /> The reply must be a JSON like as follows: <br /> <syntaxhighlight>{ "status":"ok", "last_update":"2022-07-04 12:06:34" }</syntaxhighlight> <br /> ===Installation Files=== ;.env :environment variables ;covcheck.tar.gz :archived covcheck and request_extension ODOO addons ;docker-compose.yml :docker compose file ;git-submodule-status:information about git submodules that comprise the Covcheck application server ;install-covcheck.sh :primary installation script ;nginx-vhost :template vhost file for nginx ;odoo.conf :configuration file for ODOO ==Configuration of Covcheck Application Server== ===Change Default Password=== Open the address of the server in a browser and loging using the following default credentials: {| class="wikitable" !Username !Password |- |admin |admin |} <br /> [[Datei:covcheck-login.png|ohne]] <br /> Click the '''Administrator''' in the top right corner and then '''Preferences''': <br /> [[Datei:covcheck-admin.png|ohne]] <br /> In the opened window click '''Change password''': <br /> [[Datei:covcheck-change-password.png|ohne]] <br /> Fill-in the following fields and then click '''Change Password''': *Old Password *New Password *Confirm New Password <br /> [[Datei:covcheck-change-password2.png|ohne]] <br /> ===Managing Rulesets=== You can add, modify and delete rulesets on the '''Rulesets''' page: <br /> [[Datei:covcheck-rulesets.png|ohne]] <br /> For example, let us create a ruleset '''3G+''', which requires an additional test. Click '''Create''' fill-in the fields '''Name''' and '''Unique Name''', check '''Additional Test Required''' and click '''Save''': <br /> [[Datei:covcheck-3gp.png|ohne]] <br /> The list now includesthe '''3G+'''ruleset: <br /> [[Datei:covcheck-rulesets-with-3gp.png|ohne]] <br /> ==Configuration of Galaxy Gate== In order COVID certificates and tests can be validated against the Covcheck server, the proper dispatcher and display must be selected and configured. ===Dispatcher=== Open the URL of the gate, login with user '''wanzl''' and navigate to the '''Configuration''' page. Select tab '''Dispatchers''' and click '''Add''': <br /> [[Datei:covcheck-dispatcher-add.png|ohne]] <br /> In the combo box under the title '''Dispatcher''' select '''Covcheck''', modify the following properties if needed and click '''Save''': ;URL :Base URL of Covcheck's API ;Ruleset :Ruleset for validating COVID certificates and tests ;COVID Test timeout, ms :When a COVID test is required, specifies the timeout of waiting for it <br /> [[Datei:covcheck-dispatcher-covcheck.png|ohne]] <br /> Restart the gate: <br /> [[Datei:covcheck-dispatcher-restart.png|ohne]] <br /> If the Covcheck server is available, the '''Error''' field is empty: <br /> [[Datei:covcheck-dispatcher-connected.png|ohne]] <br /> ===Display=== Open the URL of the gate, login with user '''wanzl''' and navigate to the '''Configuration''' page. Select tab '''Displays''' and click '''Add''': <br /> [[Datei:covcheck-display-add.png|ohne]] <br /> In the combo box under the title '''Display''' select '''Display Gate Covcheck''', modify the following properties if needed and click '''Save''': ;Gate side :Side of the display, '''Entry''' or '''Exit''' ;Name :User-friendly name <br /> [[Datei:covcheck-display-covcheck.png|ohne]] <br /> Restart the gate: <br /> [[Datei:covcheck-display-restart.png|ohne]] <br /> Navigate to the '''Status''' page and open the link corresponding to the display: <br /> [[Datei:covcheck-display-link.png|ohne]] <br /> The following screen for the idle state invites to present a COVID certificate: <br /> [[Datei:covcheck-display-scan-certificate.png|ohne]] <br /> When in addition a test certificate is required, the next screen asks to show it: <br /> [[Datei:covcheck-display-scan-test.png|ohne]] <br />
| (29 dazwischenliegende Versionen von 2 Benutzern werden nicht angezeigt) | |||
| Zeile 1: | Zeile 1: | ||
| − | Test | + | {{DISPLAYTITLE:Covcheck Applicaton Server}} |
| − | [[ | + | __TOC__ |
| + | |||
| + | [[Kategorie:Galaxy Gate]] | ||
| + | {{DEFAULTSORT:Covcheck}} | ||
| + | |||
| + | ==Introduction== | ||
| + | |||
| + | The document describes how to install the '''Covcheck''' application server and configure a Galaxy Gate so that COVID certificates and tests presented at the gate can be validated through the server's REST API. | ||
| + | |||
| + | ==Installation of Covcheck Application Server== | ||
| + | |||
| + | ===Prerequisites=== | ||
| + | |||
| + | *Ubuntu 22.04 with Internet access | ||
| + | *User with '''sudo''' permissions and availability of a user with ID 1000 ('''cat /etc/passwd | grep 1000'''), which is by default | ||
| + | *Archive '''covcheck-installer.tar.gz''' with the files listed in [[#Installation Files|Installation Files]]. The name '''covcheck-installer.tar.gz''' can include a version, e.g. '''covcheck-installer-v0.1.tar.gz''' | ||
| + | |||
| + | ===Installation Steps=== | ||
| + | |||
| + | *Connect with '''ssh''' to the Ubuntu server | ||
| + | |||
| + | *Copy '''covcheck-installer.tar.gz''' to the local directory | ||
| + | |||
| + | *Execute the following command: | ||
| + | |||
| + | <br /> | ||
| + | <syntaxhighlight> | ||
| + | tar xvf covcheck-installer.tar.gz && cd ./covcheck-installer | ||
| + | </syntaxhighlight> | ||
| + | <br /> | ||
| + | |||
| + | *Modify file '''.env''' and specify the database password ('''POSTGRES_PASSWORD''') and, if necessary, host name ('''ODOO_HOST_NAME''') and timezone ('''TZ'''): | ||
| + | |||
| + | <br /> | ||
| + | <syntaxhighlight>POSTGRES_PASSWORD=gR7K6GT8MvQHpvLs | ||
| + | ODOO_HOST_NAME=covcheck.maxcr.de | ||
| + | TZ=Europe/Berlin</syntaxhighlight> | ||
| + | <br /> | ||
| + | |||
| + | *If SSL certificates are provided for domain name '''ODOO_HOST_NAME''', put them into directory '''/etc/nginx/certs''', e.g: | ||
| + | |||
| + | <syntaxhighlight> | ||
| + | sudo mkdir -p /etc/nginx/certs | ||
| + | sudo tar xvf certs.tar.gz -C / | ||
| + | </syntaxhighlight> | ||
| + | |||
| + | *If SSL certificates are not available, HTTP connection will be used and you need to modify file **docker-compose** accordingly: | ||
| + | |||
| + | ◦ Add this section to container **odoo**: | ||
| + | <syntaxhighlight> | ||
| + | ports: | ||
| + | - 80:8069 </syntaxhighlight> | ||
| + | ◦ Comment out or remove port 80 for container **nginx_proxy**: | ||
| + | <syntaxhighlight> | ||
| + | ports: | ||
| + | # - 80:80 | ||
| + | - 443:443 </syntaxhighlight> | ||
| + | |||
| + | *Run the installer script: | ||
| + | |||
| + | <br /> | ||
| + | <syntaxhighlight>script=install-covcheck.sh && chmod +x $script && ./$script -i</syntaxhighlight> | ||
| + | <br /> | ||
| + | |||
| + | *The installation is finished successfully if you see this line in the shell: | ||
| + | |||
| + | <br /> | ||
| + | <syntaxhighlight>### Installation finished successfully</syntaxhighlight> | ||
| + | <br /> | ||
| + | |||
| + | You can make sure that the Covcheck is installed and running by executing the following command: | ||
| + | |||
| + | <br /> | ||
| + | <syntaxhighlight>curl https://covcheck.maxcrc.de/covcheck/status</syntaxhighlight> | ||
| + | <br /> | ||
| + | |||
| + | The reply must be a JSON like as follows: | ||
| + | <br /> | ||
| + | <syntaxhighlight>{ | ||
| + | "status":"ok", | ||
| + | "last_update":"2022-07-04 12:06:34" | ||
| + | }</syntaxhighlight> | ||
| + | <br /> | ||
| + | |||
| + | ===Installation Files=== | ||
| + | |||
| + | ;.env :environment variables | ||
| + | ;covcheck.tar.gz :archived covcheck and request_extension ODOO addons | ||
| + | ;docker-compose.yml :docker compose file | ||
| + | ;git-submodule-status:information about git submodules that comprise the Covcheck application server | ||
| + | ;install-covcheck.sh :primary installation script | ||
| + | ;nginx-vhost :template vhost file for nginx | ||
| + | ;odoo.conf :configuration file for ODOO | ||
| + | |||
| + | ==Configuration of Covcheck Application Server== | ||
| + | |||
| + | ===Change Default Password=== | ||
| + | |||
| + | Open the address of the server in a browser and loging using the following default credentials: | ||
| + | |||
| + | {| class="wikitable" | ||
| + | !Username | ||
| + | !Password | ||
| + | |- | ||
| + | |admin | ||
| + | |admin | ||
| + | |} | ||
| + | |||
| + | <br /> | ||
| + | [[Datei:covcheck-login.png|ohne]] | ||
| + | <br /> | ||
| + | |||
| + | Click the '''Administrator''' in the top right corner and then '''Preferences''': | ||
| + | |||
| + | <br /> | ||
| + | [[Datei:covcheck-admin.png|ohne]] | ||
| + | <br /> | ||
| + | |||
| + | In the opened window click '''Change password''': | ||
| + | |||
| + | <br /> | ||
| + | [[Datei:covcheck-change-password.png|ohne]] | ||
| + | <br /> | ||
| + | |||
| + | Fill-in the following fields and then click '''Change Password''': | ||
| + | |||
| + | *Old Password | ||
| + | *New Password | ||
| + | *Confirm New Password | ||
| + | |||
| + | <br /> | ||
| + | |||
| + | [[Datei:covcheck-change-password2.png|ohne]] | ||
| + | |||
| + | <br /> | ||
| + | |||
| + | ===Managing Rulesets=== | ||
| + | |||
| + | You can add, modify and delete rulesets on the '''Rulesets''' page: | ||
| + | |||
| + | <br /> | ||
| + | [[Datei:covcheck-rulesets.png|ohne]] | ||
| + | <br /> | ||
| + | |||
| + | For example, let us create a ruleset '''3G+''', which requires an additional test. Click '''Create''' fill-in the fields '''Name''' and '''Unique Name''', check '''Additional Test Required''' and click '''Save''': | ||
| + | |||
| + | <br /> | ||
| + | [[Datei:covcheck-3gp.png|ohne]] | ||
| + | <br /> | ||
| + | |||
| + | The list now includesthe '''3G+'''ruleset: | ||
| + | |||
| + | <br /> | ||
| + | [[Datei:covcheck-rulesets-with-3gp.png|ohne]] | ||
| + | <br /> | ||
| + | |||
| + | ==Configuration of Galaxy Gate== | ||
| + | |||
| + | In order COVID certificates and tests can be validated against the Covcheck server, the proper dispatcher and display must be selected and configured. | ||
| + | |||
| + | ===Dispatcher=== | ||
| + | |||
| + | Open the URL of the gate, login with user '''wanzl''' and navigate to the '''Configuration''' page. Select tab '''Dispatchers''' and click '''Add''': | ||
| + | |||
| + | <br /> | ||
| + | [[Datei:covcheck-dispatcher-add.png|ohne]] | ||
| + | <br /> | ||
| + | |||
| + | In the combo box under the title '''Dispatcher''' select '''Covcheck''', modify the following properties if needed and click '''Save''': | ||
| + | |||
| + | ;URL :Base URL of Covcheck's API | ||
| + | ;Ruleset :Ruleset for validating COVID certificates and tests | ||
| + | ;COVID Test timeout, ms :When a COVID test is required, specifies the timeout of waiting for it | ||
| + | |||
| + | |||
| + | <br /> | ||
| + | [[Datei:covcheck-dispatcher-covcheck.png|ohne]] | ||
| + | <br /> | ||
| + | |||
| + | Restart the gate: | ||
| + | |||
| + | <br /> | ||
| + | [[Datei:covcheck-dispatcher-restart.png|ohne]] | ||
| + | <br /> | ||
| + | |||
| + | If the Covcheck server is available, the '''Error''' field is empty: | ||
| + | |||
| + | <br /> | ||
| + | [[Datei:covcheck-dispatcher-connected.png|ohne]] | ||
| + | <br /> | ||
| + | |||
| + | ===Display=== | ||
| + | |||
| + | Open the URL of the gate, login with user '''wanzl''' and navigate to the '''Configuration''' page. Select tab '''Displays''' and click '''Add''': | ||
| + | |||
| + | <br /> | ||
| + | [[Datei:covcheck-display-add.png|ohne]] | ||
| + | <br /> | ||
| + | |||
| + | In the combo box under the title '''Display''' select '''Display Gate Covcheck''', modify the following properties if needed and click '''Save''': | ||
| + | |||
| + | ;Gate side :Side of the display, '''Entry''' or '''Exit''' | ||
| + | |||
| + | ;Name :User-friendly name | ||
| + | |||
| + | <br /> | ||
| + | [[Datei:covcheck-display-covcheck.png|ohne]] | ||
| + | <br /> | ||
| + | |||
| + | Restart the gate: | ||
| + | |||
| + | <br /> | ||
| + | [[Datei:covcheck-display-restart.png|ohne]] | ||
| + | <br /> | ||
| + | |||
| + | Navigate to the '''Status''' page and open the link corresponding to the display: | ||
| + | |||
| + | <br /> | ||
| + | [[Datei:covcheck-display-link.png|ohne]] | ||
| + | <br /> | ||
| + | |||
| + | The following screen for the idle state invites to present a COVID certificate: | ||
| + | |||
| + | <br /> | ||
| + | [[Datei:covcheck-display-scan-certificate.png|ohne]] | ||
| + | <br /> | ||
| + | |||
| + | When in addition a test certificate is required, the next screen asks to show it: | ||
| + | |||
| + | <br /> | ||
| + | [[Datei:covcheck-display-scan-test.png|ohne]] | ||
| + | <br /> | ||
