People Counter Dashboard: Unterschied zwischen den Versionen
Dub4ik (Diskussion | Beiträge) (Added new section with link on the image) |
Dub4ik (Diskussion | Beiträge) K (Changed SD Card to Micro SD Card) |
Inhaltsverzeichnis
Prepare KBOX A-330-RPI[Bearbeiten | Quelltext bearbeiten]
Download image[Bearbeiten | Quelltext bearbeiten]
| Version | Download Link |
|---|---|
| 1.3.0.1 | http://nas0.dnsalias.com:5000/sharing/78Cu2REf4 |
Copy image to the Micro SD Card[Bearbeiten | Quelltext bearbeiten]
1. Download an image from the table above
2. Extract an archive
3. Use utility HDDRawCopy1.10Portable from the archive to copy the image on the Micro SD Card
Setup XOVIS cameras[Bearbeiten | Quelltext bearbeiten]
Add XOVIS cameras[Bearbeiten | Quelltext bearbeiten]
1. To add a new XOVIS camera, you firstly need to select the Settings tab.
2. Click on the Add button.
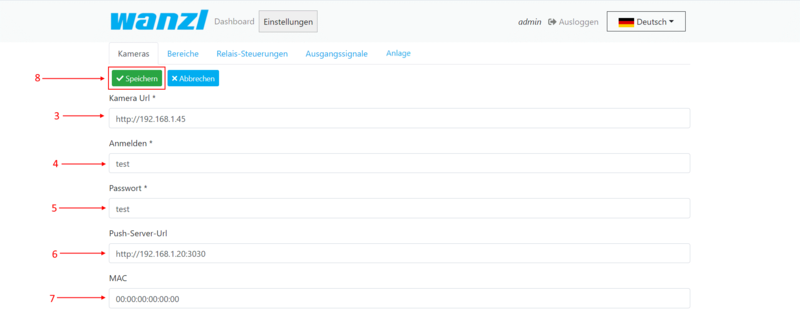
3. Here you should specify the camera URL.
4. Specify a login to access the camera.
5. Specify a password to access the camera.
6. In this field specify the URL of your server (this field will be used for PUSH notification configuration on the camera side).
7. Here, specify the MAC of your camera.
8. Save it.
Delete API cameras[Bearbeiten | Quelltext bearbeiten]
1. To remove unwanted cameras, mark them.
2. Be careful! Do not remove a cameras that are used. Click on the Delete button.
Setup Areas[Bearbeiten | Quelltext bearbeiten]
Add Areas.[Bearbeiten | Quelltext bearbeiten]
1. Add a new area, you firstly need to go to Settings.
2. Select the Areas tab.
3. And Then click on the Add button.
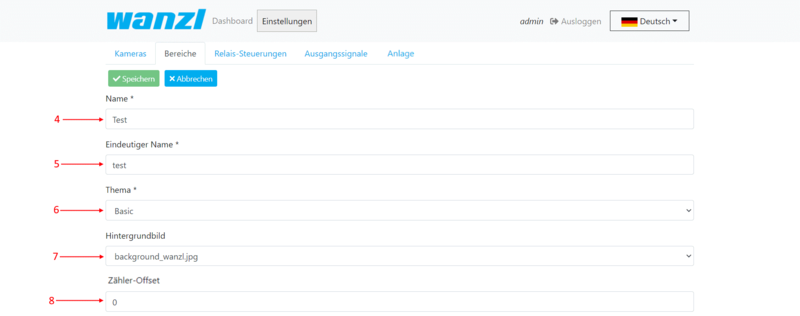
4. Enter here the name of the area.
5. Here you should specify a unique name without spaces and starts with a lowercase letter. This is a service field. For example: If you specified the name "Test", you can specify a unique name "test".
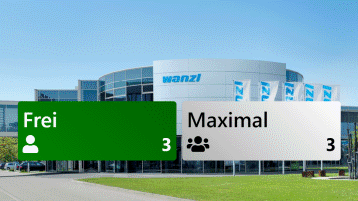
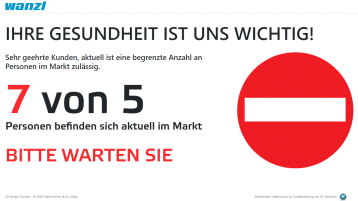
6. Here you can select a theme for the area display. For example:
7. Here you can choose the background for the "Basic" theme. If you want to add an image, you should upload it up to the server. More details on the link upload files
8. This field can be used in case if you want to specify an Offset for counter(for example when people are already in the area, but camera's counter is zero).
9. Click on the Add button to add a camera.
10. Select the camera that was added earlier. If you do not know how to add a camera to click on this link setup XOVIS cameras
11. Choose the detect type.
12. Enter the name line.
13. Here we specify the maximum capacity of the number of people.
14. Here you can specify the schedule restart counter time. If you need to specify more than 2 values, be sure to separate them with a semicolon.
If you need to change the text translation on Area by interval:
15. To add the ability to select a language, click the Add button as many times as you need the languages.
16. Choose a language.
17. Enter the language switching interval in seconds.
18. And save it.Delete Areas.[Bearbeiten | Quelltext bearbeiten]
1. To remove unwanted Areas, mark them.
2. And then click on the Delete button.
Setup Relay Controllers[Bearbeiten | Quelltext bearbeiten]
Add Relay Controllers[Bearbeiten | Quelltext bearbeiten]
1. To add a new relay controller, you firstly need to select the Settings tab.
2. Select the Relay Controllers tab.
3. And then click on the Add button.
4. Here you should specify the relay controller URL.
5. Select the type of relay controller communication protocol.
6. And Save it.
Delete Relay Controllers[Bearbeiten | Quelltext bearbeiten]
1. To remove unwanted cameras, mark them.
2. Be careful! Do not remove Relay Controllers that are used. Click on the Delete button.
Setup Output Signals of Relay Controller[Bearbeiten | Quelltext bearbeiten]
Add Output Signals[Bearbeiten | Quelltext bearbeiten]
1. To add a new relay controller, you firstly need to select the Settings tab.
2. Select the Output Signals tab.
3. And Then to click on the Add button.
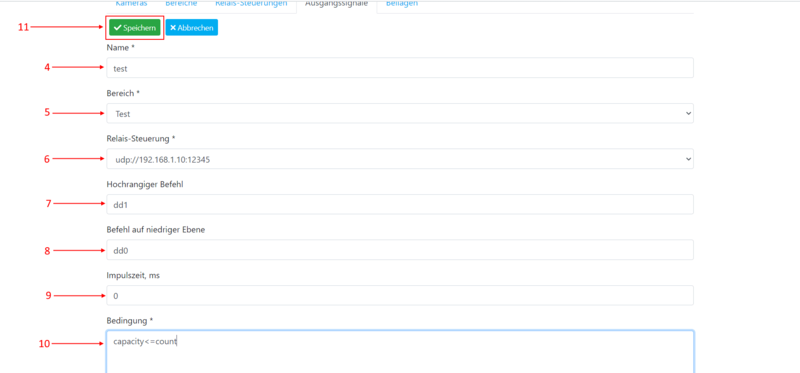
4. Enter here the name of the output signal.
5. Here you should select an area.
6. Here you should choose the relay controller URL.
7. Insert the command of a high level of the relay controller.
8. Insert the command of a low level of the relay controller.
9. Here you can specify transition delay time.
10. This field is necessary to specify the condition of relay triggering.
11. Save it.
Delete Output Signals[Bearbeiten | Quelltext bearbeiten]
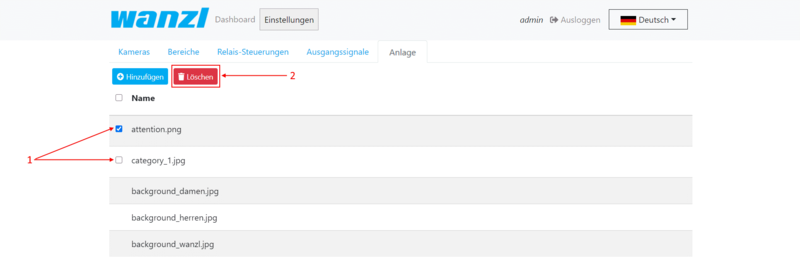
1. To remove unwanted cameras, mark them.
2. Click on the Delete button.
Upload files to the server[Bearbeiten | Quelltext bearbeiten]
Add Files.[Bearbeiten | Quelltext bearbeiten]
1. Add a new area, you firstly need to go to Settings.
2. Select the Assets tab.
3. And then click on the Add button and select a file on your file system. If a file is uploaded to the server, you can see it in the file list.
Show uploaded image files.[Bearbeiten | Quelltext bearbeiten]
1 If you want to see image files just click on the file list area.
Delete Files.[Bearbeiten | Quelltext bearbeiten]
1. To remove unwanted files on the server, mark them. Preset files can't be deleted.
2. Be careful! Do not remove files that are used. And then click on the Delete button.
== Prepare KBOX A-330-RPI ==


            === Download image ==


            ===Download image===

        {| class="wikitable"

        !Version

        !Download Link

        |-

        |1.3.0.1

        |http://nas0.dnsalias.com:5000/sharing/78Cu2REf4

        |}


        === Copy image to the Micro SD Card ===

        1. Download an image from the table above


        2. Extract an archive


        3. Use utility '''HDDRawCopy1.10Portable''' from the archive to copy the image on the Micro SD Card


        ==Setup XOVIS cameras==


        ===Add XOVIS cameras===

        1. To add a new XOVIS camera, you firstly need to select the '''Settings''' tab.


        2. Click on the '''Add''' button.

        [[Datei:Add XOVIS camera.png|mini|800x800px|ohne]]


        3. Here you should specify the camera URL.


        4. Specify a login to access the camera.


        5. Specify a password to access the camera.


        6. In this field specify the URL of your server (this field will be used for PUSH notification configuration on the camera side).


        7. Here, specify the MAC of your camera.


        8. Save it.

        [[Datei:Add XOVIS camera details.png|mini|800x800px|ohne]]

        ===Delete API cameras===

        1. To remove unwanted cameras, mark them.


        2. '''Be careful! Do not remove a cameras that are used.''' Click on the '''Delete''' button.

        [[Datei:Delete API camera.png|mini|800x800px|ohne]]


        ==Setup Areas==


        ===Add Areas.===

        1. Add a new area, you firstly need to go to '''Settings'''.


        2. Select the '''Areas''' tab.


        3. And Then click on the '''Add''' button.

        [[Datei:Add Areas.png|ohne|mini|800x800px]]

        4. Enter here the name of the area.


        5. Here you should specify a unique name without spaces and starts with a lowercase letter. This is a service field. For example: If you specified the name "Test", you can specify a unique name "test".


        6. Here you can select a theme for the area display. For example:

        [[Datei:Add Areas Basic.png|ohne|mini|358x358px|Basic]]

        [[Datei:Add Areas Wanzl.png|ohne|mini|358x358px|Wanzl]]

        7. Here you can choose the background for the "Basic" theme. If you want to add an image, you should upload it up to the server. More details on the link upload files


        8. This field can be used in case if you want to specify an Offset for counter(for example when people are already in the area, but camera's counter is zero).

        [[Datei:Add Areas description.png|mini|800x800px|ohne]]


        9. Click on the '''Add''' button to add a camera.


        10. Select the camera that was added earlier. If you do not know how to add a camera to click on this link setup XOVIS cameras


        11. Choose the detect type.


        12. Enter the name line.

        [[Datei:Add Areas add camera.png|ohne|mini|800x800px]]

        13. Here we specify the maximum capacity of the number of people.


        14. Here you can specify the schedule restart counter time. If you need to specify more than 2 values, be sure to separate them with a semicolon.

        [[Datei:Add Areas number of people.png|ohne|mini|800x800px]]

        If you need to change the text translation on Area by interval:


        15. To add the ability to select a language, click the '''Add''' button as many times as you need the languages.


        16. Choose a language.


        17. Enter the language switching interval in seconds.

        [[Datei:Add Areas language.png|ohne|mini|800x800px]]

        18. And save it.[[Datei:Add Areas Save.png|mini|800x800px|ohne]]

        ===Delete Areas.===

        1. To remove unwanted Areas, mark them.


        2. And then click on the '''Delete''' button.

        [[Datei:Delete Areas.png|mini|800x800px|ohne]]


        ==Setup Relay Controllers==


        ===Add Relay Controllers===

        1. To add a new relay controller, you firstly need to select the Settings tab.


        2. Select the '''Relay Controllers''' tab.


        3. And then click on the '''Add''' button.

        [[Datei:Add Relay Controllers.png|mini|800x800px|ohne]]

        4. Here you should specify the relay controller URL.


        5. Select the type of relay controller communication protocol.


        6. And Save it.

        [[Datei:Add Relay Controllers description.png|mini|800x800px|ohne]]


        ===Delete Relay Controllers===

        1. To remove unwanted cameras, mark them.


        2. '''Be careful! Do not remove Relay Controllers that are used'''. Click on the '''Delete''' button.

        [[Datei:Delete Relay Controllers.png|mini|800x800px|ohne]]


        ==Setup Output Signals of Relay Controller==


        ===Add Output Signals===

        1. To add a new relay controller, you firstly need to select the Settings tab.


        2. Select the '''Output Signals''' tab.


        3. And Then to click on the '''Add''' button.

        [[Datei:Add Output Signals.png|mini|800x800px|ohne]]

        4. Enter here the name of the output signal.


        5. Here you should select an area.


        6. Here you should choose the relay controller URL.


        7. Insert the command of a high level of the relay controller.


        8. Insert the command of a low level of the relay controller.


        9. Here you can specify transition delay time.


        10. This field is necessary to specify the condition of relay triggering.


        11. Save it.

        [[Datei:Add Output Signals details.png|mini|800x800px|ohne]]


        ===Delete Output Signals===

        1. To remove unwanted cameras, mark them.


        2. Click on the '''Delete''' button.

        [[Datei:Delete Output Signals.png|mini|800x800px|ohne]]


        ==Upload files to the server==


        ===Add Files.===

        1. Add a new area, you firstly need to go to '''Settings'''.


        2. Select the '''Assets''' tab.


        3. And then click on the '''Add''' button and select a file on your file system. If a file is uploaded to the server, you can see it in the file list.

        [[Datei:Add Files.png|mini|800x800px|ohne]]


        ===Show uploaded image files.===

        1 If you want to see image files just click on the file list area.

        [[Datei:Delete Files.png|mini|800x800px|ohne]]


        ===Delete Files.===

        1. To remove unwanted files on the server, mark them. Preset files can't be deleted.


        2. Be careful! Do not remove files that are used. And then click on the '''Delete''' button.

        [[Datei:Show Uploaded Images.png|mini|800x800px|ohne]]
        <br />
| Zeile 1: | Zeile 1: | ||
| − | == Prepare KBOX A-330-RPI == | + | ==Prepare KBOX A-330-RPI== |
| − | === Download image === | + | ===Download image=== |
{| class="wikitable" | {| class="wikitable" | ||
!Version | !Version | ||
| Zeile 10: | Zeile 10: | ||
|} | |} | ||
| − | === Copy image to SD Card === | + | ===Copy image to the Micro SD Card=== |
1. Download an image from the table above | 1. Download an image from the table above | ||
2. Extract an archive | 2. Extract an archive | ||
| − | 3. Use utility '''HDDRawCopy1.10Portable''' from the archive to copy the image on the SD Card | + | 3. Use utility '''HDDRawCopy1.10Portable''' from the archive to copy the image on the Micro SD Card |
==Setup XOVIS cameras== | ==Setup XOVIS cameras== | ||

